命令执行底层原理探究-PHP
声明
Author:Qftm
Data:2020/12/01
Blog:https://qftm.github.io
正文
针对不同平台/语言下的命令执行是不相同的,存在很大的差异性。因此,这里对不同平台/语言下的命令执行函数进行深入的探究分析。
文章开头会对不同平台(Linux、Windows)下:终端的指令执行、语言(PHP、Java、Python)的命令执行进行介绍分析。后面,主要以PHP语言为对象,针对不同平台,对命令执行函数进行底层深入分析,这个过程包括:环境准备、PHP内核源码的编译、运行、调试、审计等,其它语言分析原理思路类似。
平台语言
不同平台终端指令执行
不同平台终端中执行的命令方式一般有两种:自身终端封装的指令(内置)、终端下调用其它目录下的可执行程序(外部)。
Linux
Linux下终端一般为/bin/bash、/bin/sh、/bin/zsh等,这里以bash终端为例测试。
以Linux为例【Windows等平台原理同Linux类似】,Linux下终端内建(内置)的指令类型为:shell built-in command。
所谓shell built-in command,就是那些内建在linux shell里面的command指令。
通常情况下,在linux shell下面执行一个command指令,shell会查找command是否为built-in command类型,对于built-in command指令类型,shell会自己解释执行,而无需fork一个child process子进程来执行该command指令;对于,不是built-in command指令类型,shell会从环境变量中按顺序搜索该command指令,如果能查到则会fork一个child process子进程来执行该command指令;然而,对于找不到的command指令,一般为:执行的指令不存在、指令未加入到环境变量中。
那么如何进行终端内建指令的判断与查看呢,对于内建指令可以使用type指令去判断
┌──(root💀toor)-[~/桌面]
└─# type echo
echo is a shell builtin
┌──(root💀toor)-[~/桌面]
└─# type whoami
whoami is /usr/bin/whoami
┌──(root💀toor)-[~/桌面]
└─# 或着也可以使用其它指令进行查找判断:which、where
┌──(root💀toor)-[~/桌面]
└─# which echo
echo: shell built-in command
┌──(root💀toor)-[~/桌面]
└─# which whoami
/usr/bin/whoami
┌──(root💀toor)-[~/桌面]
└─#


┌──(root💀toor)-[~/桌面]
└─# where echo
echo: shell built-in command
 echo
/bin/echo
┌──(root💀toor)-[~/桌面]
└─# where whoami
/usr/bin/whoami
/bin/whoami
┌──(root💀toor)-[~/桌面]
└─#
注意:在Linux平台,有些命令虽然为内建命令,但是系统关键目录也存在其可执行文件。
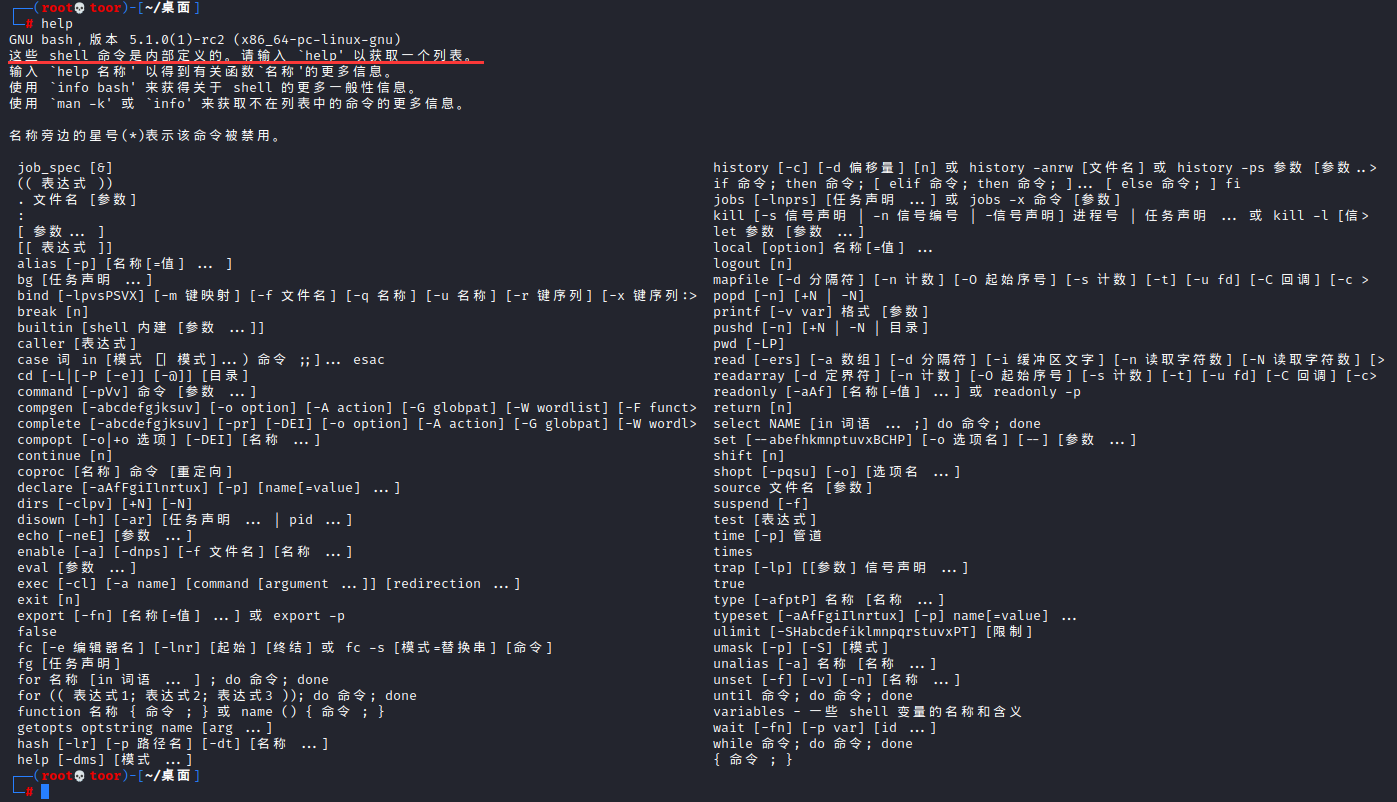
这里也可以使用enable或help指令,查看终端内建的所有指令
- 第一种:
enable指令
┌──(root💀toor)-[~/桌面]
└─# enable
-
.
:
[
alias
autoload
bg
bindkey
break
builtin
bye
cd
chdir
command
compadd
comparguments
compcall
compctl
compdescribe
compfiles
compgroups
compquote
compset
comptags
comptry
compvalues
continue
declare
dirs
disable
disown
echo
echotc
echoti
emulate
enable
eval
exec
exit
export
false
fc
fg
float
functions
getln
getopts
hash
history
integer
jobs
kill
let
limit
local
log
logout
noglob
popd
print
printf
private
pushd
pushln
pwd
r
read
readonly
rehash
return
sched
set
setopt
shift
source
suspend
test
times
trap
true
ttyctl
type
typeset
ulimit
umask
unalias
unfunction
unhash
unlimit
unset
unsetopt
vared
wait
whence
where
which
zcompile
zformat
zle
zmodload
zparseopts
zregexparse
zstat
zstyle
┌──(root💀toor)-[~/桌面]
└─# - 第二种:
help指令
接着对终端(内置|外置)命令进行测试,测试终端/bin/zsh:
- 测试:
whoami指令
先对whoami指令进行类型探测与指令定位查询
# 指令探测:非内置指令
┌──(root💀toor)-[~/桌面]
└─# type whoami
whoami is /usr/bin/whoami

┌──(root💀toor)-[~/桌面]
└─#


# 指令定位查询:搜索发现系统特殊目录存在`whoami`可执行程序
┌──(root💀toor)-[~/桌面]
└─# where whoami
/usr/bin/whoami
/bin/whoami
┌──(root💀toor)-[~/桌面]
└─# 注意:/bin目录为/usr/bin目录的链接
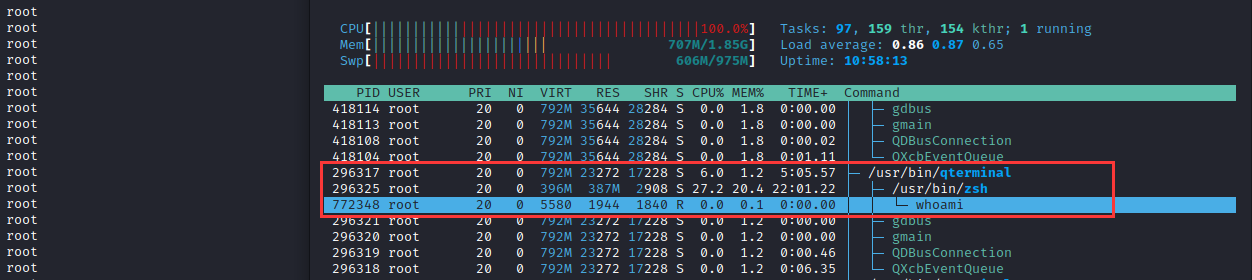
然后,在zsh终端写入For循环执行whoami指令查看是否为内部执行或外部调用
for n in {0..10000000}; do whoami ; done另一侧,使用htop动态进程监控程序对该终端进行监控,可发现whoami指令并非zsh终端内置封装的指令
- 测试:
echo指令
同样,对echo指令进行类型探测与指令定位查询
# 指令探测:内置指令
┌──(root💀toor)-[~/桌面]
└─# type echo
echo is a shell builtin

┌──(root💀toor)-[~/桌面]
└─#


# 指令定位查询:搜索发现系统特殊目录存在`echo`可执行程序,同时还发现存在`echo: shell built-in command`【终端内置指令】
┌──(root💀toor)-[~/桌面]
└─# where echo
echo: shell built-in command
/usr/bin/echo
/bin/echo
┌──(root💀toor)-[~/桌面]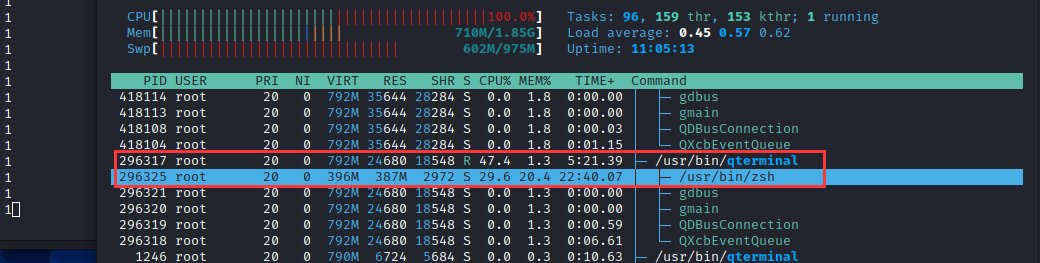
└─#然后,在zsh终端写入For循环执行echo指令查看是否为内部执行或外部调用
for n in {0..10000000}; do echo 1 ; done另一侧,使用htop动态进程监控程序对该终端进行监控,可以发现echo指令为zsh终端内置封装的指令,并未出现外部调用
Windows
Windows下终端一般为cmd.exe、powershell.exe等,这里以cmd来测试。终端指令执行原理同上述Linux讲解原理相同,分为终端内置指令与外部调用指令。
那么,针对Windows平台可执行终端,如何进行终端内建指令的判断与查看呢。可惜Windows平台终端不像Linux终端存在相应的type指令进行判断与enable、help指令查看所有内建指令。不过在Windows终端里可以借助where或set PATH指令进行指令判断。
- 第一种:
where指令【不太友好】
从系统环境变量PATH里面定位查询(注意人为增添的环境变量的影响),如果能查到一般来说可以判定为外部调用指令(排除非系统特殊目录),否则为内部调用指令(排除不存在指令)
# 外部调用指令
C:\Users\Qftm>where whoami
C:\Windows\System32\whoami.exe
C:\Users\Qftm>

# 内部调用指令
C:\Users\Qftm>where cd
INFO: Could not find files for the given pattern(s).
C:\Users\Qftm>

# 不存在指令
C:\Users\Qftm>where qftm
INFO: Could not find files for the given pattern(s).
C:\Users\Qftm>

# 内部调用指令(排除人为增添的环境变量的影响)(排除非系统特殊目录)
C:\Users\Qftm>where echo
D:\QSoftware\W3Server\phpstudy2019\Extensions\MySQL5.7.26\bin\echo.exe
C:\Users\Qftm>- 第二种:
set path指令【友好】
将系统环境变量临时设置为null,然后对指令进行帮助查询,如果能查到则判定为内置指令,否则为外部调用。
# path置空
C:\Users\Qftm>set path=
C:\Users\Qftm>path
PATH=(null)
C:\Users\Qftm>

# 内部调用指令
C:\Users\Qftm>cd /?
Displays the name of or changes the current directory.

CHDIR [/D] [drive:][path]
CHDIR [..]
CD [/D] [drive:][path]
CD [..]

  ..   Specifies that you want to change to the parent directory.

Type CD drive: to display the current directory in the specified drive.
Type CD without parameters to display the current drive and directory.

Use the /D switch to change current drive in addition to changing current
directory for a drive.

If Command Extensions are enabled CHDIR changes as follows:

The current directory string is converted to use the same case as
the on disk names.  So CD C:\TEMP would actually set the current
directory to C:\Temp if that is the case on disk.

CHDIR command does not treat spaces as delimiters, so it is possible to
CD into a subdirectory name that contains a space without surrounding
the name with quotes.  For example:

    cd \winnt\profiles\username\programs\start menu

is the same as:

    cd "\winnt\profiles\username\programs\start menu"

which is what you would have to type if extensions were disabled.
C:\Users\Qftm>

# 外部调用指令
C:\Users\Qftm>whoami /?
'whoami' is not recognized as an internal or external command,
operable program or batch file.
C:\Users\Qftm>

# 不存在指令
C:\Users\Qftm>qftm /?
'qftm' is not recognized as an internal or external command,
operable program or batch file.
C:\Users\Qftm>注意:Windows下终端help指令并不能够查询终端内建指令:首先help指令为外部调用指令,然后help指令查询出的所有指令=(内建指令+外部指令)
# help:属于外部指令
C:\Users\Qftm>where help
C:\Windows\System32\help.exe
C:\Users\Qftm>

# help:内建指令+外部指令(不同于Linux下bash等终端)
C:\Users\Qftm>help
For more information on a specific command, type HELP command-name
ASSOC          Displays or modifies file extension associations.
ATTRIB         Displays or changes file attributes.
BREAK          Sets or clears extended CTRL+C checking.
BCDEDIT        Sets properties in boot database to control boot loading.
CACLS          Displays or modifies access control lists (ACLs) of files.
CALL           Calls one batch program from another.
CD             Displays the name of or changes the current directory.
CHCP           Displays or sets the active code page number.
CHDIR          Displays the name of or changes the current directory.
CHKDSK         Checks a disk and displays a status report.
CHKNTFS        Displays or modifies the checking of disk at boot time.
CLS            Clears the screen.
CMD            Starts a new instance of the Windows command interpreter.
COLOR          Sets the default console foreground and background colors.
COMP           Compares the contents of two files or sets of files.
COMPACT        Displays or alters the compression of files on NTFS partitions.
CONVERT        Converts FAT volumes to NTFS.  You cannot convert the
               current drive.
COPY           Copies one or more files to another location.
DATE           Displays or sets the date.
DEL            Deletes one or more files.
DIR            Displays a list of files and subdirectories in a directory.
DISKPART       Displays or configures Disk Partition properties.
DOSKEY         Edits command lines, recalls Windows commands, and
               creates macros.
DRIVERQUERY    Displays current device driver status and properties.
ECHO           Displays messages, or turns command echoing on or off.
ENDLOCAL       Ends localization of environment changes in a batch file.
ERASE          Deletes one or more files.
EXIT           Quits the CMD.EXE program (command interpreter).
FC             Compares two files or sets of files, and displays the
               differences between them.
FIND           Searches for a text string in a file or files.
FINDSTR        Searches for strings in files.
FOR            Runs a specified command for each file in a set of files.
FORMAT         Formats a disk for use with Windows.
FSUTIL         Displays or configures the file system properties.
FTYPE          Displays or modifies file types used in file extension
               associations.
GOTO           Directs the Windows command interpreter to a labeled line in
               a batch program.
GPRESULT       Displays Group Policy information for machine or user.
GRAFTABL       Enables Windows to display an extended character set in
               graphics mode.
HELP           Provides Help information for Windows commands.
ICACLS         Display, modify, backup, or restore ACLs for files and
               directories.
IF             Performs conditional processing in batch programs.
LABEL          Creates, changes, or deletes the volume label of a disk.
MD             Creates a directory.
MKDIR          Creates a directory.
MKLINK         Creates Symbolic Links and Hard Links
MODE           Configures a system device.
MORE           Displays output one screen at a time.
MOVE           Moves one or more files from one directory to another
               directory.
OPENFILES      Displays files opened by remote users for a file share.
PATH           Displays or sets a search path for executable files.
PAUSE          Suspends processing of a batch file and displays a message.
POPD           Restores the previous value of the current directory saved by
               PUSHD.
PRINT          Prints a text file.
PROMPT         Changes the Windows command prompt.
PUSHD          Saves the current directory then changes it.
RD             Removes a directory.
RECOVER        Recovers readable information from a bad or defective disk.
REM            Records comments (remarks) in batch files or CONFIG.SYS.
REN            Renames a file or files.
RENAME         Renames a file or files.
REPLACE        Replaces files.
RMDIR          Removes a directory.
ROBOCOPY       Advanced utility to copy files and directory trees
SET            Displays, sets, or removes Windows environment variables.
SETLOCAL       Begins localization of environment changes in a batch file.
SC             Displays or configures services (background processes).
SCHTASKS       Schedules commands and programs to run on a computer.
SHIFT          Shifts the position of replaceable parameters in batch files.
SHUTDOWN       Allows proper local or remote shutdown of machine.
SORT           Sorts input.
START          Starts a separate window to run a specified program or command.
SUBST          Associates a path with a drive letter.
SYSTEMINFO     Displays machine specific properties and configuration.
TASKLIST       Displays all currently running tasks including services.
TASKKILL       Kill or stop a running process or application.
TIME           Displays or sets the system time.
TITLE          Sets the window title for a CMD.EXE session.
TREE           Graphically displays the directory structure of a drive or
               path.
TYPE           Displays the contents of a text file.
VER            Displays the Windows version.
VERIFY         Tells Windows whether to verify that your files are written
               correctly to a disk.
VOL            Displays a disk volume label and serial number.
XCOPY          Copies files and directory trees.
WMIC           Displays WMI information inside interactive command shell.

For more information on tools see the command-line reference in the online help.

C:\Users\Qftm>接着对终端(内置|外置)命令进行测试,测试终端cmd.exe:
- 测试:
whoami指令
先对whoami指令进行类型探测与指令定位查询
# 类型探测:外部调用指令
# 定位查询:系统可执行程序
C:\Users\Qftm>where whoami
C:\Windows\System32\whoami.exe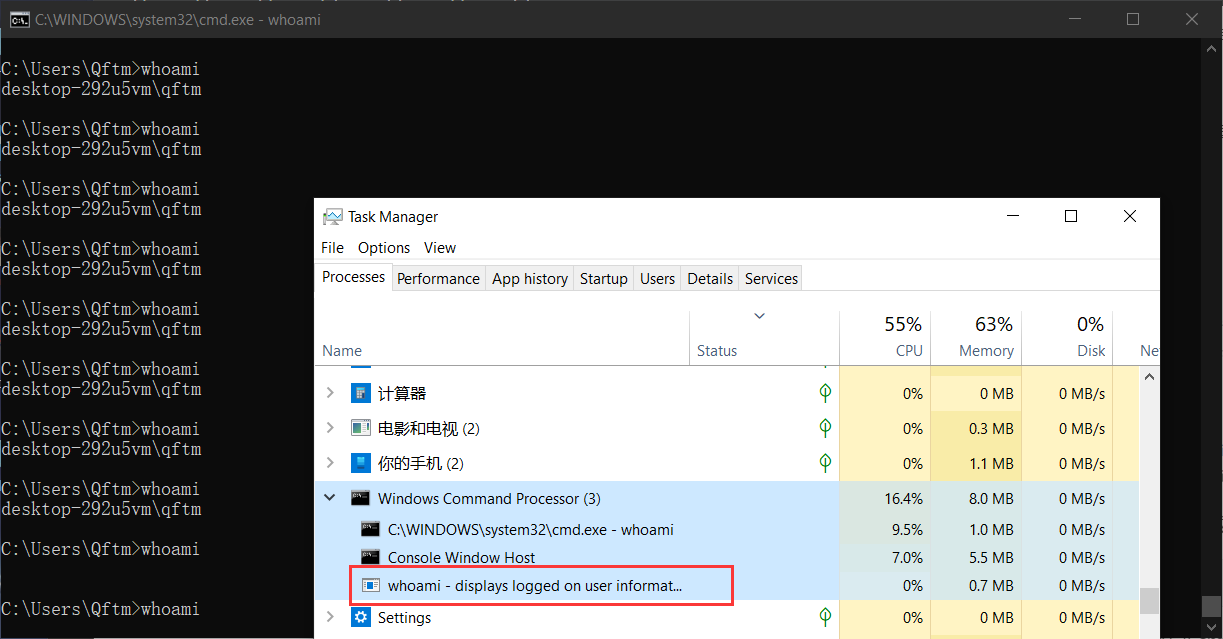
C:\Users\Qftm>然后,在cmd终端写入For循环执行whoami指令查看是否为内部执行或外部调用
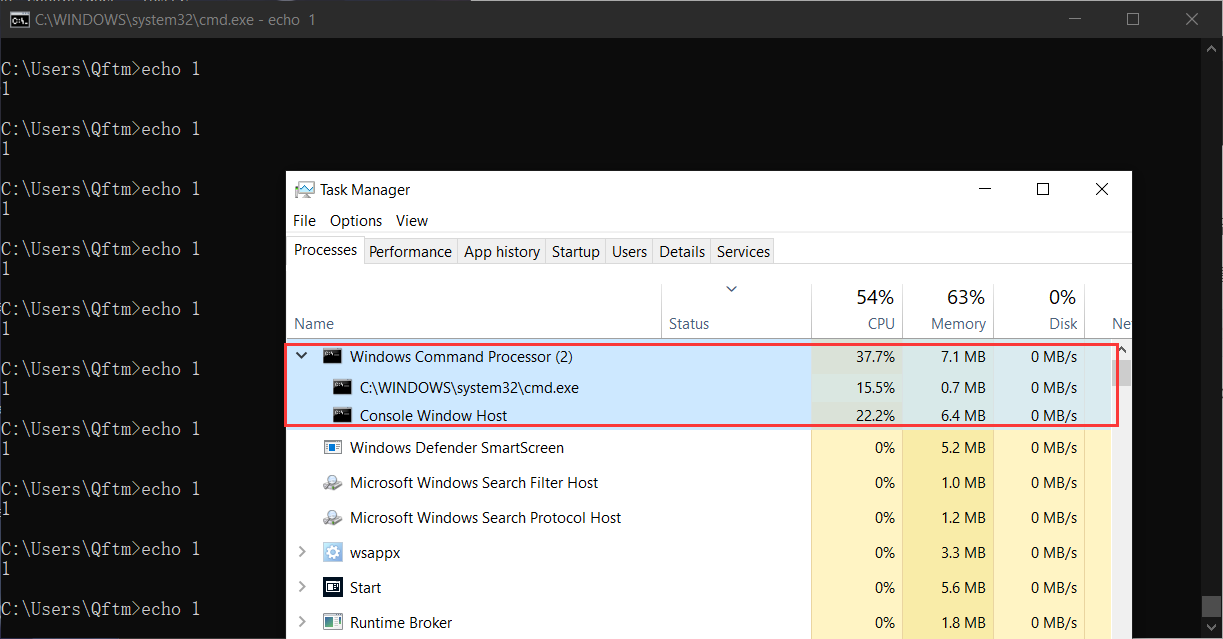
C:\Users\Qftm>for /l %i in (1,1,1000000) do whoami另一侧,打开任务管理进行cmd终端的监控,可发现whoami指令并非cmd.exe终端内置封装的指令
- 测试:
echo指令
同样,对echo指令进行类型探测与指令定位查询
# 类型探测:内部调用指令
# 定位查询:非系统可执行程序
C:\Users\Qftm>where echo
D:\QSoftware\W3Server\phpstudy2019\Extensions\MySQL5.7.26\bin\echo.exe
C:\Users\Qftm>然后,在cmd终端写入For循环执行echo指令查看是否为内部执行或外部调用
for /l %i in (1,1,1000000) do echo 1另一侧,打开任务管理进行cmd终端的监控,可以发现echo指令为终端内置封装的指令,并未出现外部调用
语言差异
针对命令执行函数,底层实现上是否存在命令执行程序 cmd.exe、/bin/sh、/bin/bash 等,去执行命令执行函数传入的参数【系统命令】。这个过程相当于底层是否引入第三方可执行终端去执行相应命令。
比如:可执行函数(系统命令)
CommandExecFunc(echo 111 > shell.txt); //echo是一个可执行程序上述命令执行函数模型在【Linux平台/windows平台】不同语言下面执行效果不同。
PHP
PHP - 底层调用系统终端,执行命令 Mode => Window:cmd.exe /c Command || Linux:sh -c Command在PHP语言里面,针对Linux平台,系统命令echo 111 > shell.txt传入CommandExecFunc函数,最终在底层相当于执行/bin/sh -c echo 111 > shell.txt。成功创建文件shell.txt【执行过程相当于:在/bin/sh终端下执行命令echo 111,并将echo结果通过重定向符写入文件shell.txt中。这里的重定向符不是echo中的参数或字符串,而是在/bin/sh下面起特殊作用。这里的echo并不是可执行程序/bin/echo,而是/bin/sh执行终端中的内建命令】【进程相关:一个进程/bin/sh,在/bin/sh进程中执行系统命令,而不是执行系统程序】
- 跟踪一下程序执行流程:
For Linux
利用strace程序执行监视可知,底层通过execve系统调用来启动相关进程、然后通过/bin/sh进程来执行相关指令(此处echo为sh内置指令)。
┌──(root💀toor)-[~/桌面/CodeDebug/php]
└─# strace -f -e execve php -r "system('echo 111 > shell.txt');"
execve("/usr/bin/php", ["php", "-r", "system('echo 111 > shell.txt');"], 0x7ffd51277198 /* 53 vars */) = 0
strace: Process 3436 attached
[pid  3436] execve("/bin/sh", ["sh", "-c", "echo 111 > shell.txt"], 0x562c96ef1eb0 /* 53 vars */) = 0
[pid  3436] +++ exited with 0 +++
--- SIGCHLD {si_signo=SIGCHLD, si_code=CLD_EXITED, si_pid=3436, si_uid=0, si_status=0, si_utime=0, si_stime=0} ---
+++ exited with 0 +++

┌──(root💀toor)-[~/桌面/CodeDebug/php]
└─# ls
shell.txt

┌──(root💀toor)-[~/桌面/CodeDebug/php]
└─#同理,针对Windows平台:系统命令echo 111 > shell.txt传入CommandExecFunc函数,最终在底层相当于执行cmd.exe /c echo 111 > shell.txt。成功创建文件shell.txt【执行过程相当于:在cmd终端下执行命令echo 111,并将echo结果通过重定向符写入文件shell.txt中。【进程相关:一个进程cmd.exe,在cmd.exe进程中执行系统命令,而不是执行系统程序】
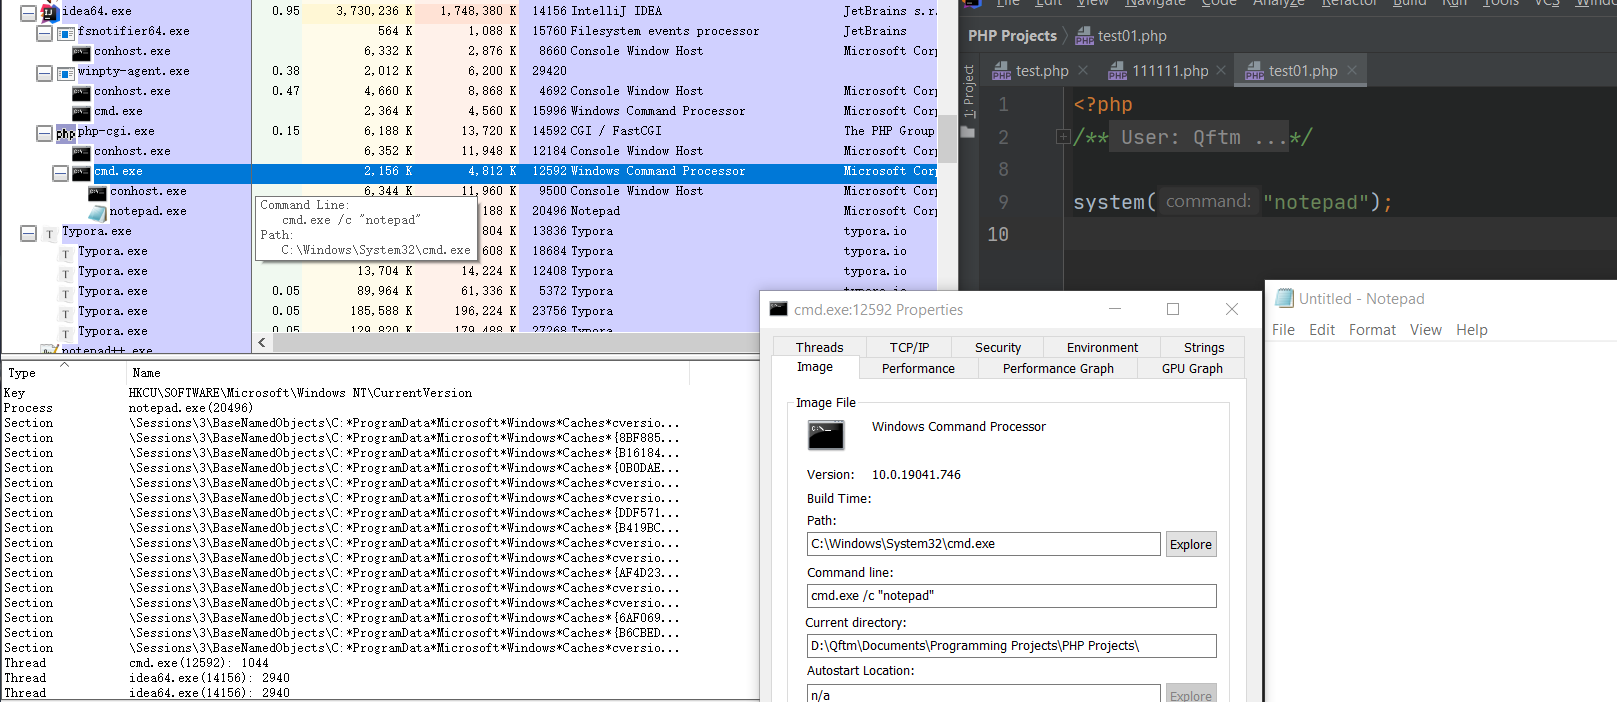
- 跟踪一下程序执行流程:
For Windows
使用OD动态调试,加载php.exe程序,对相关创建进程的系统API下断点(如果不知道是那个CreateProcess API可以把查询到的都进行断点即可)
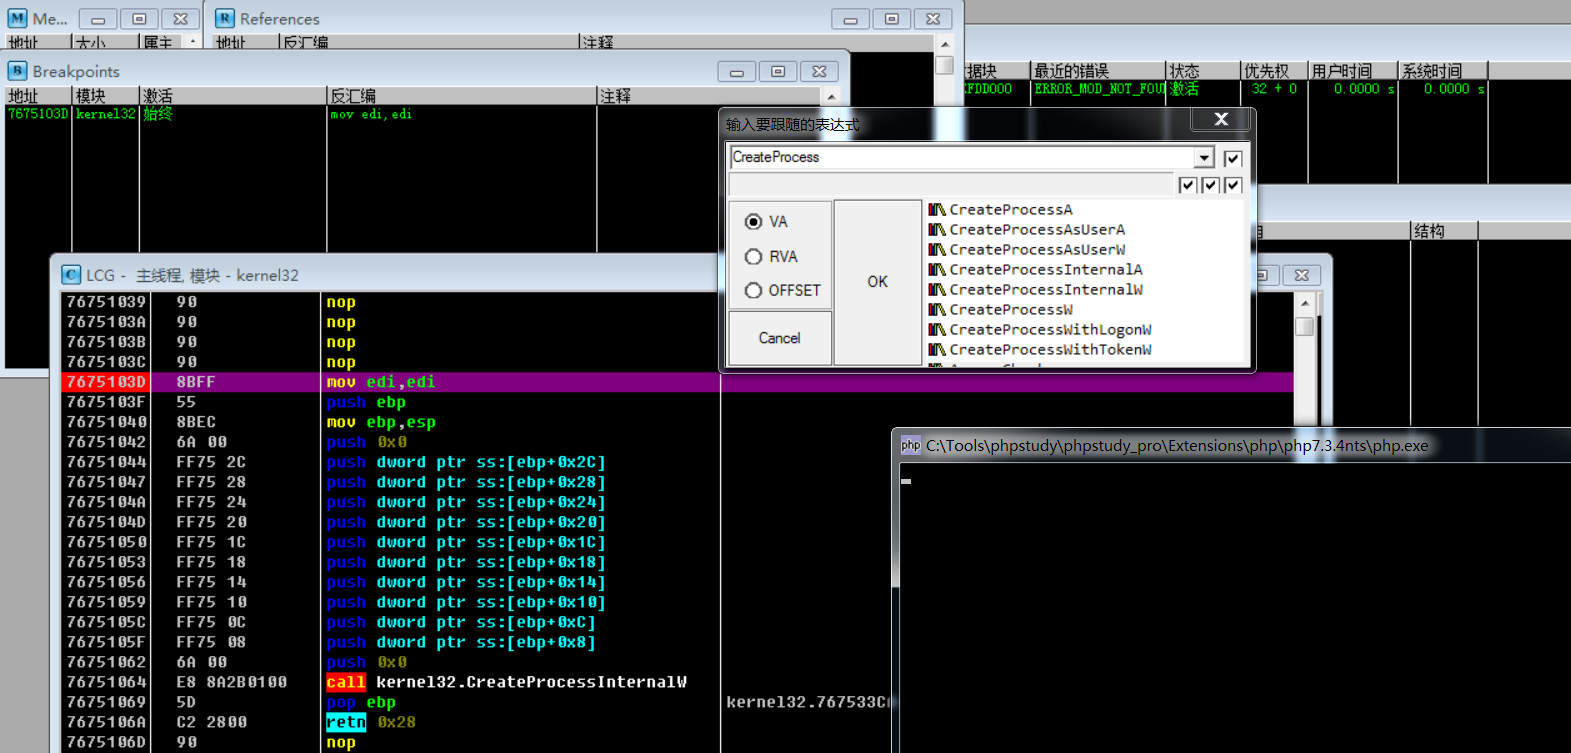
断点之后,F9使程序运行至用户交互处,然后输入PHP执行指令system('echo 111 > shell.txt');
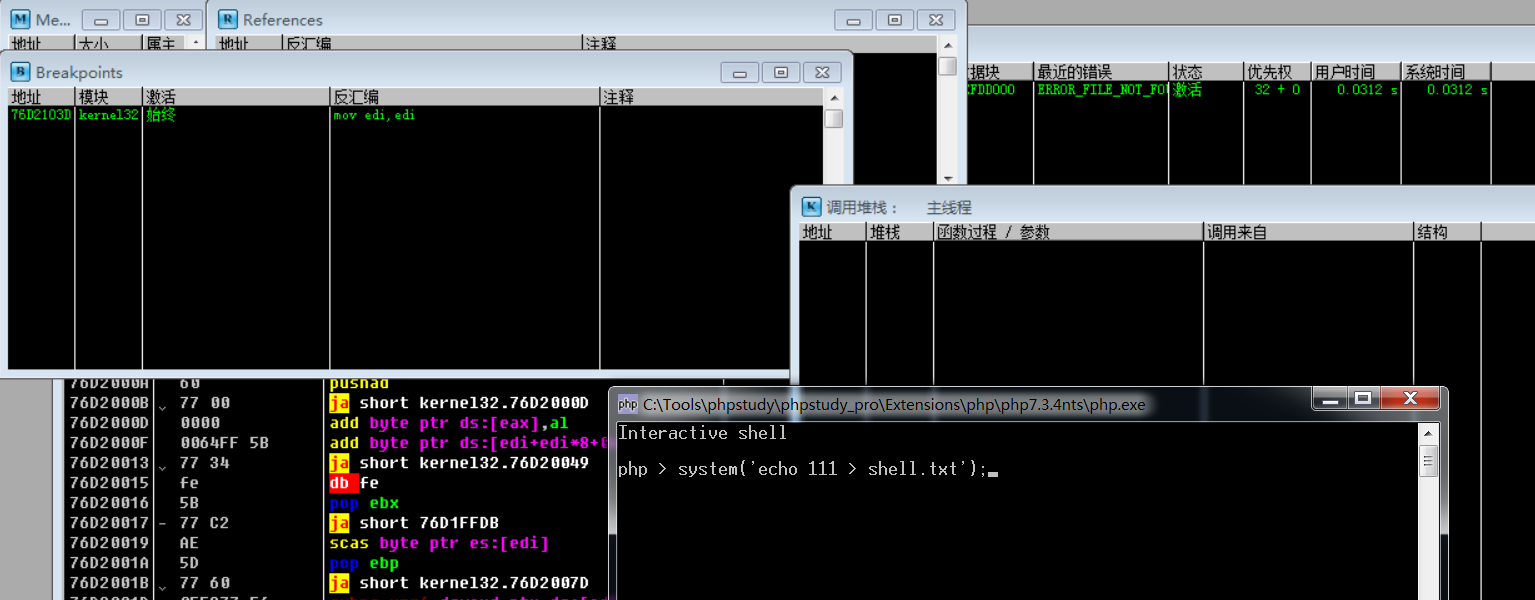
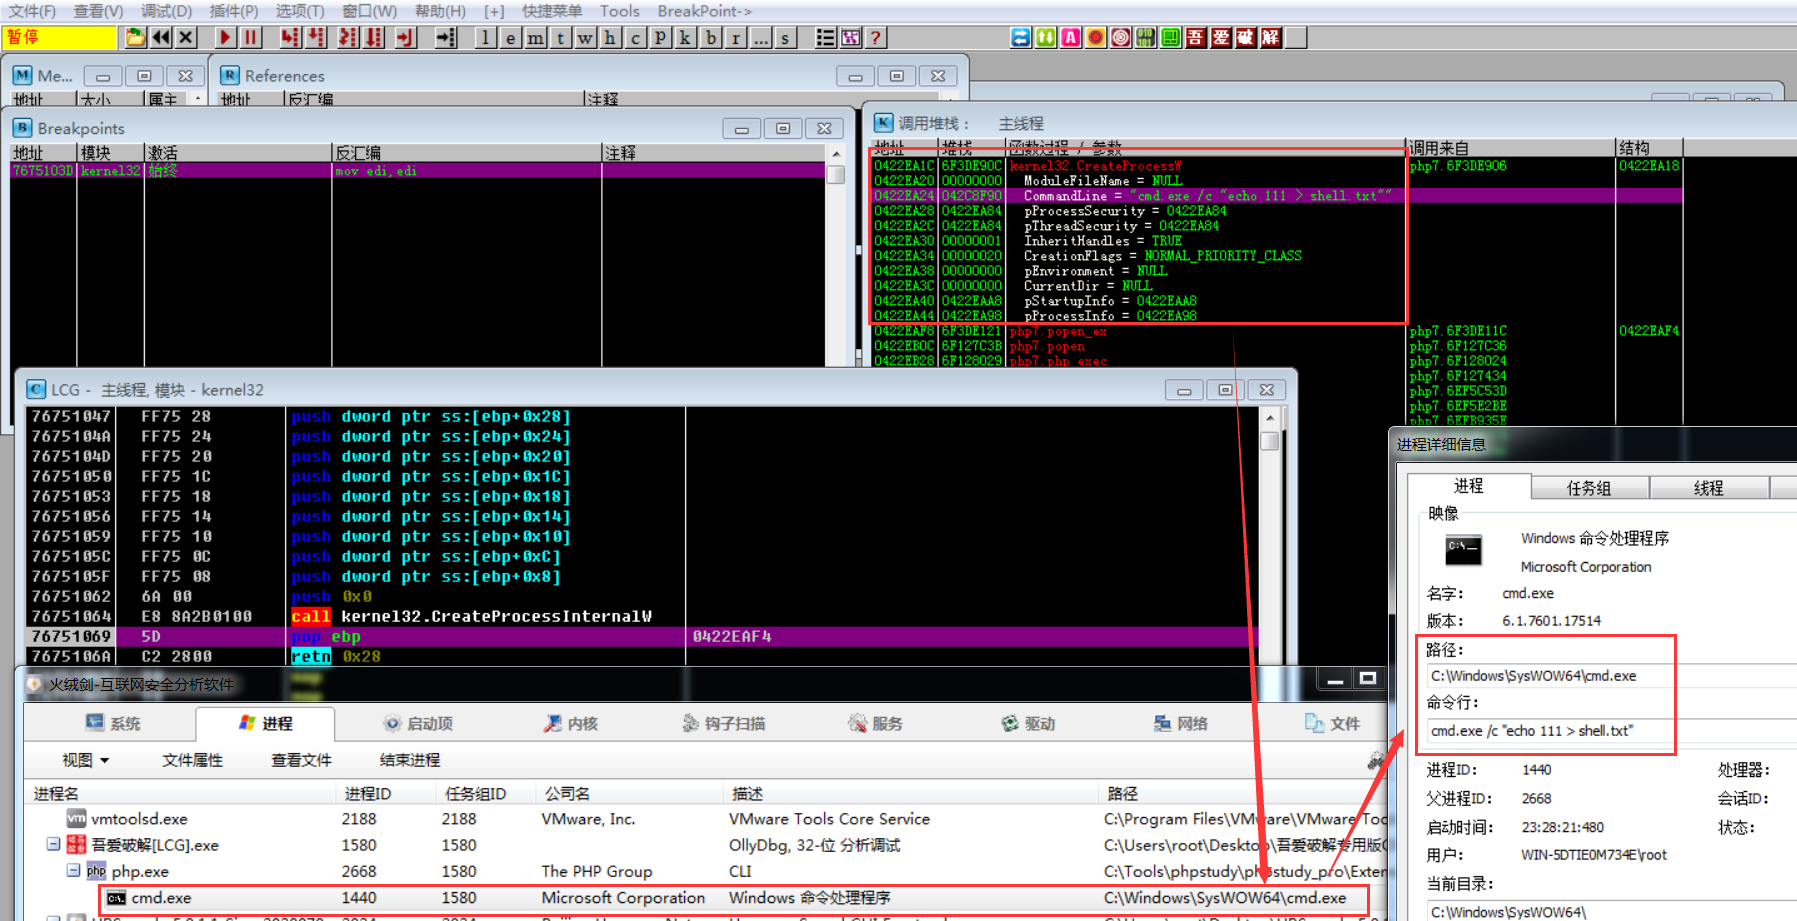
运行PHP执行指令后,程序可到断点处,然后通过调用栈可知:底层通过CreateProcessW系统API调用来启动相关进程、然后通过cmd进程来执行相关指令(此处echo为cmd内置指令)(注意:这里也可查看到PHP程序的完整调用链)
- 进程信息跟踪执行:
For Windows
利用微软官方提供的Process Explorer工具进行跟踪分析:发现底层调用cmd.exe /c xxx来执行
Java
Java - 底层不调用系统终端,自己启动传入的可执行程序 Mode => Window:Command || Linux:Command但是在Java语言里面,针对Linux平台,系统命令echo 111 > shell.txt传入CommandExecFunc函数,最终在底层相当于执行/bin/echo 111 > shell.txt成功打印一个字符串"111 > shell.txt"并没有创建文件shell.txt。【执行过程相当于:运行可执行程序/bin/echo并传入参数111 > shell.txt进行打印输出,这里的特殊字符>被当作普通字符串被echo程序打印。这里的echo作为可执行程序出现,而不是终端中的命令】【进程相关:一个进程/bin/echo,在/bin/echo进程中传入字符串参数111 > shell.txt进行打印输出】【有关可执行程序怎么查询:从环境变量中进行查询】
测试代码如下
import org.apache.commons.io.IOUtils;

import java.lang.Runtime;

public class CommandExec1 {
    public static void main(String[] args) {
        try{

            String str = IOUtils.toString(Runtime.getRuntime().exec("whoami").getInputStream());
            System.out.println(str);
        }
        catch(Exception a){
            System.out.println(a);
        }
    }
}
- 跟踪一下程序执行流程:
For Linux
程序执行监视情况:从系统环境变量中查找输入的指令可执行程序位置,然后由execve系统调用来启动相关程序进程(并未涉及系统终端调用)。
┌──(root💀toor)-[~/桌面/CodeDebug/java]
└─# strace -f -e execve java CommandExec1
execve("/usr/bin/java", ["java", "CommandExec1"], 0x7ffdb259ee90 /* 53 vars */) = 0
strace: Process 3923 attached
Picked up _JAVA_OPTIONS: -Dawt.useSystemAAFontSettings=on -Dswing.aatext=true
[pid  3923] --- SIGSEGV {si_signo=SIGSEGV, si_code=SEGV_MAPERR, si_addr=NULL} ---
strace: Process 3924 attached
strace: Process 3925 attached
strace: Process 3926 attached
strace: Process 3927 attached
strace: Process 3928 attached
strace: Process 3929 attached
strace: Process 3930 attached
strace: Process 3931 attached
strace: Process 3932 attached
[pid  3932] execve("/mnt/hgfs/QSec/Pentest/Red-Team/\347\245\236\345\205\265\345\210\251\345\231\250/Windows/VSCode/VSCode-linux-x64/whoami", ["whoami"], 0x7ffd28368b80 /* 53 vars */) = -1 ENOENT (没有那个文件或目录)
[pid  3932] execve("/usr/local/sbin/whoami", ["whoami"], 0x7ffd28368b80 /* 53 vars */) = -1 ENOENT (没有那个文件或目录)
[pid  3932] execve("/usr/local/bin/whoami", ["whoami"], 0x7ffd28368b80 /* 53 vars */) = -1 ENOENT (没有那个文件或目录)
[pid  3932] execve("/usr/sbin/whoami", ["whoami"], 0x7ffd28368b80 /* 53 vars */) = -1 ENOENT (没有那个文件或目录)
[pid  3932] execve("/usr/bin/whoami", ["whoami"], 0x7ffd28368b80 /* 53 vars */) = 0
[pid  3932] +++ exited with 0 +++
[pid  3923] --- SIGCHLD {si_signo=SIGCHLD, si_code=CLD_EXITED, si_pid=3932, si_uid=0, si_status=0, si_utime=0, si_stime=0} ---
strace: Process 3933 attached
root

[pid  3931] +++ exited with 0 +++
[pid  3927] +++ exited with 0 +++
[pid  3924] +++ exited with 0 +++
[pid  3923] +++ exited with 0 +++
[pid  3933] +++ exited with 0 +++
[pid  3930] +++ exited with 0 +++
[pid  3929] +++ exited with 0 +++
[pid  3928] +++ exited with 0 +++
[pid  3926] +++ exited with 0 +++
[pid  3925] +++ exited with 0 +++
+++ exited with 0 +++

┌──(root💀toor)-[~/桌面/CodeDebug/java]
└─# 同理,针对Windows平台,系统命令echo 111 > shell.txt传入CommandExecFunc函数,最终在底层相当于执行系统环境变量/echo.exe 111 > shell.txt成功打印一个字符串"111 > shell.txt"并没有创建文件shell.txt。
但是,正常情况下,这里执行上述指令会报错,因为Windows平台,默认情况下系统环境变量中不存在echo.exe可执行程序,导致指令无法正常执行
# 无法定位echo可执行程序
D:\QSec\Code-Audit\Tools\Java\Kits\RCE>where echo
INFO: Could not find files for the given pattern(s).

D:\QSec\Code-Audit\Tools\Java\Kits\RCE>where whoami
C:\Windows\System32\whoami.exe

D:\QSec\Code-Audit\Tools\Java\Kits\RCE>

# 执行报错
D:\QSec\Code-Audit\Tools\Java\Kits\RCE>javac RuntimeRCE.java

D:\QSec\Code-Audit\Tools\Java\Kits\RCE>java RuntimeRCE
java.io.IOException: Cannot run program "echo": CreateProcess error=2, The system cannot find the file specified

D:\QSec\Code-Audit\Tools\Java\Kits\RCE>- 进程信息跟踪执行:
For Windows
进程分析可知底层直接创建了notepad.exe进程

Python
Python - 底层调用系统终端,执行命令 Mode => Window:cmd.exe /c Command || Linux:sh -c Command而Python语言,命令执行函数底层原理实现同PHP语言。
总结起来,也就是,命令执行函数执行分为两类,一类:传入的命令仅仅作为可执行终端中的命令执行;另一类:传入的命令仅仅是运行传入的命令中的可执行程序。对象不同,一类:是底层语言系统终端帮我们执行传入的命令;另一类:是自己启动传入的可执行程序。
PHP for Windows
针对Windows平台下:PHP命令执行函数的底层分析。
环境准备
环境部署情况:
- Windows (Win10 Pro)
- Visual Studio (Visual Studio Professional 2019)
- Visual Studio Code (VSCode-win32-x64-1.51.1)
- PHP Source Code (PHP 7.2.9)
- PHP Windows SDK (php-sdk-binary-tools-php-sdk-2.2.0)
- Source Insight (Source Insight 4.0)
php官方wiki对不同php版本编译的需求如下:
- Visual C++ 14.0 (Visual Studio 2015) for PHP 7.0 or PHP 7.1.
- Visual C++ 15.0 (Visual Studio 2017) for PHP 7.2, PHP 7.3 or PHP 7.4.
- Visual C++ 16.0 (Visual Studio 2019) for master.
虽然官方wiki指出不同VS编译不同PHP版本,但是这里使用VS2019去编译PHP 7.2.9是没有问题的(兼容性)。
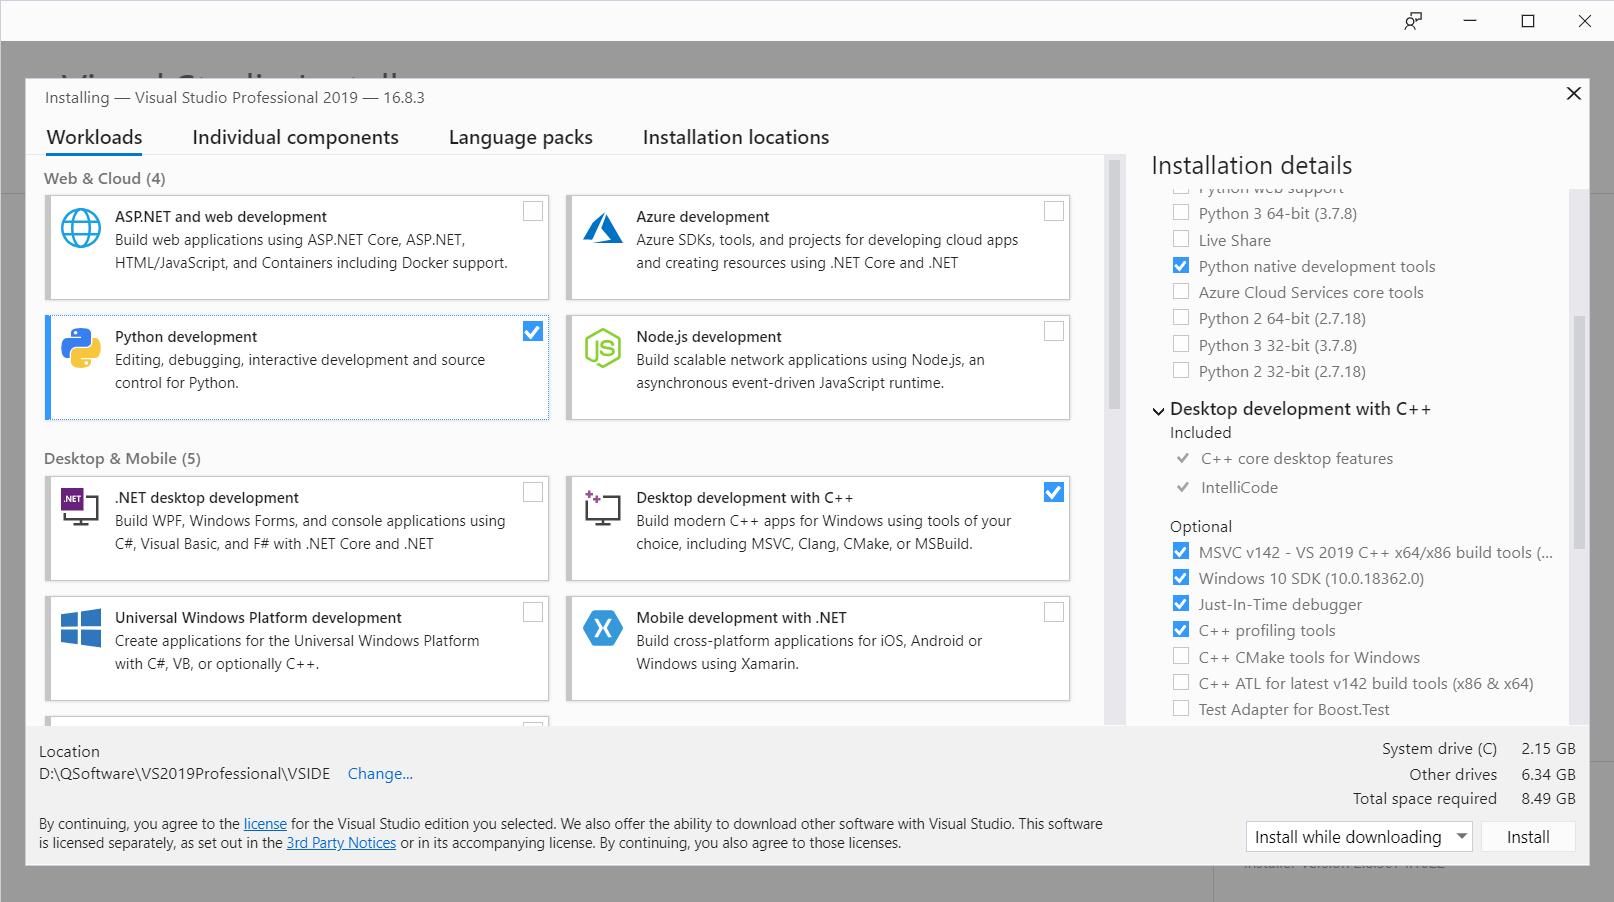
Visual Studio
Visual Studio 面向任何开发者的同类最佳工具,功能完备的 IDE,可用于编码、调试、测试和部署到任何平台。
Visual Studio 官网:介绍、下载
# 下载官网最新版 VS2019

https://visualstudio.microsoft.com/zh-hans/
Visual Studio 历史版本下载(这里无论是下载的社区版或企业版等,下载器都是一样的,在社区版下载器里面也可选择安装专业版、企业版)
https://visualstudio.microsoft.com/zh-hans/vs/older-downloads/
or
https://my.visualstudio.com/Downloads?q=Visual%20Studio这里下载Visual Studio Professional 2019主要的作用为:提供开发环境,编译PHP内核。
Visual Studio Professional 2019 安装情况:仅安装在 Visual Studio 中进行开发所需的工具和组件捆绑包。
Visual Studio Code
Visual Studio Code 常用于不同语言的项目开发、源代码编辑调试等工作。
- 官网:介绍、下载
https://code.visualstudio.com/- 添加相应扩展:c/c++扩展、代码辅助运行扩展
C/C++
Code Runner
PHP Source Code
- PHP官方各个版本源代码下载
https://www.php.net/releases/
or
https://github.com/php/php-src/releases这里下载的版本为:PHP 7.2.9
PHP Windows SDK
PHP SDK is a tool kit for Windows PHP builds.
PHP SDK 依赖关系
The PHP SDK 2.2+ is compatible with PHP 7.2 and above.

The PHP SDK 2.1 is required to build PHP 7.1 or 7.0.
新版SDK下载地址:构建PHP7
https://github.com/Microsoft/php-sdk-binary-tools旧版SDK下载地址:构建PHP5
https://windows.php.net/downloads/php-sdk/
or
https://github.com/Microsoft/php-sdk-binary-tools/tree/legacy这里下载的PHP-SDK版本为2.2.0,下载解压并添加相应环境变量
xxx\php-sdk-binary-tools-php-sdk-2.2.0\bin
xxx\php-sdk-binary-tools-php-sdk-2.2.0\msys2\usr\bin
Source Insight
Source Insight是一个强大的面向项目的程序开发编辑器、代码浏览器和分析器,在您工作和规划时帮助您理解代码。
- 官网:介绍、下载
https://www.sourceinsight.com/《PHP 7底层设计与源码实现》书中有写到
在研究PHP7源码之前,我们首先要掌握学习源码的方法论。首先是阅读工具,本章会介绍Windows下的Source lnsight、Mac下的Understand以及Linux下的Vim+Ctags,方便读者根据自己的操作系统选择不同的阅读工具。
Windows环境下有一款功能强大的IDE:Source Insight,内置了C++代码分析功能;同时还能自动维护项目内的符号数据库,使用非常方便。
有关Source Insight详细参考:【工利其器】必会工具之(一)Source Insight篇
PS:这里Source Insight给我的使用感觉就一个字:强!!!
源码结构
下面先简单介绍一下PHP源码的目录结构。
根目录: /
这个目录包含的东西比较多,主要包含一些说明文件以及设计方案。 其实项目中的这些README文件是非常值得阅读的例如:
/README.PHP4-TO-PHP5-THIN-CHANGES这个文件就详细列举了PHP4和PHP5的一些差异。- 还有有一个比较重要的文件
/CODING_STANDARDS,如果要想写PHP扩展的话,这个文件一定要阅读一下,不管你个人的代码风格是什么样,怎么样使用缩进和花括号,既然来到了这样一个团体里就应该去适应这样的规范,这样在阅读代码或者别人阅读你的代码是都会更轻松。
build 顾名思义,这里主要放置一些和源码编译相关的一些文件,比如开始构建之前的buildconf脚本等文件,还有一些检查环境的脚本等。
ext 官方扩展目录,包括了绝大多数PHP的函数的定义和实现,如array系列,pdo系列,spl系列等函数的实现,都在这个目录中。个人写的扩展在测试时也可以放到这个目录,方便测试和调试。
main 这里存放的就是PHP最为核心的文件了,主要实现PHP的基本设施,这里和Zend引擎不一样,Zend引擎主要实现语言最核心的语言运行环境。
Zend Zend引擎的实现目录,比如脚本的词法语法解析,opcode的执行以及扩展机制的实现等等。
pear “PHP 扩展与应用仓库”,包含PEAR的核心文件。
sapi 包含了各种服务器抽象层的代码,例如apache的mod_php,cgi,fastcgi以及fpm等等接口。
TSRM PHP的线程安全是构建在TSRM库之上的,PHP实现中常见的
*G宏通常是对TSRM的封装,TSRM(Thread Safe Resource Manager)线程安全资源管理器。tests PHP的测试脚本集合,包含PHP各项功能的测试文件
win32 这个目录主要包括Windows平台相关的一些实现,比如socket的实现在Windows下和
*Nix平台就不太一样,同时也包括了Windows下编译PHP相关的脚本。
源码编译
环境准备部分,安装Visual Studio 2019后,运行在开始菜单里的Visual Studio 2019文件夹下的x86 Native Tools Command Prompt for VS 2019终端。
终端运行后,进入到PHP 7.2.9源代码目录中进行编译配置工作:
- 生成configure配置文件
执行源代码下buildconf.bat生成windows下的configure文件(configure.js)
xxx\php-7.2.9-windows-debug>buildconf.bat
Rebuilding configure.js
Now run 'configure --help'

xxx\php-7.2.9-windows-debug>- 查看configure支持的编译参数
xxx\php-7.2.9-windows-debug>configure.bat --help
PHP Version: 7.2.9

Options that enable extensions and SAPI will accept 'yes' or 'no' as a
parameter. They also accept 'shared' as a synonym for 'yes' and request a
shared build of that module. Not all modules can be built as shared modules;
configure will display [shared] after the module name if can be built that
way.

  --enable-snapshot-build           Build a snapshot; turns on everything it
                                    can and ignores build errors
  --with-toolset                    Toolset to use for the compilation, give:
                                    vs, clang, icc. The only recommended and
                                    supported toolset for production use is
                                    Visual Studio. Use others at your own
                                    risk.
  --with-cygwin                     Path to cygwin utilities on your system
  --enable-object-out-dir           Alternate location for binary objects
                                    during build
  --enable-debug                    Compile with debugging symbols
  --enable-debug-pack               Release binaries with external debug
                                    symbols (--enable-debug must not be
                                    specified)
  --enable-pgi                      Generate PGO instrumented binaries
  --with-pgo                        Compile optimized binaries using training
                                    data from folder
  --disable-zts                     Thread safety
  --with-prefix                     where PHP will be installed
  --with-mp                         Tell Visual Studio use up to
                                    [n,auto,disable] processes for compilation
  --with-php-build                  Path to where you extracted the
                                    development libraries
                                    (http://wiki.php.net/internals/windows/libs).
                                    Assumes that it is a sibling of this
                                    source dir (..\deps) if not specified
  --with-extra-includes             Extra include path to use when building
                                    everything
  --with-extra-libs                 Extra library path to use when linking
                                    everything
  --with-analyzer                   Enable static analyzer. Pass vs for Visual
                                    Studio, clang for clang, cppcheck for
                                    Cppcheck, pvs for PVS-Studio
  --disable-ipv6                    Disable IPv6 support (default is turn it
                                    on if available)
  --enable-fd-setsize               Set maximum number of sockets for
                                    select(2)
  --with-snapshot-template          Path to snapshot builder template dir
  --disable-security-flags          Disable the compiler security flags
  --without-uncritical-warn-choke   Disable some uncritical warnings
  --enable-sanitizer                Enable address sanitizer extension
  --with-codegen-arch               Architecture for code generation: ia32,
                                    sse, sse2, avx, avx2
  --with-all-shared                 Force all the non obligatory extensions to
                                    be shared
  --with-config-profile             Name of the configuration profile to save
                                    this to in php-src/config.name.bat
  --disable-test-ini                Enable automatic php.ini generation. The
                                    test.ini will be put into the build dir
                                    and used to automatically load the shared
                                    extensions.
  --with-test-ini-ext-exclude       Comma separated list of shared extensions
                                    to be excluded from the test.ini
  --enable-apache2handler           Build Apache 2.x handler
  --enable-apache2-2handler         Build Apache 2.2.x handler
  --enable-apache2-4handler         Build Apache 2.4.x handler
  --disable-cgi                     Build CGI version of PHP
  --disable-cli                     Build CLI version of PHP
  --enable-crt-debug                Enable CRT memory dumps for debugging sent
                                    to STDERR
  --enable-cli-win32                Build console-less CLI version of PHP
  --enable-embed                    Embedded SAPI library
  --enable-phpdbg                   Build phpdbg
  --enable-phpdbgs                  Build phpdbg shared
  --disable-phpdbg-webhelper        Build phpdbg webhelper
  --disable-bcmath                  bc style precision math functions
  --with-bz2                        BZip2
  --disable-calendar                calendar conversion support
  --disable-com-dotnet              COM and .Net support
  --disable-ctype                   ctype
  --with-curl                       cURL support
  --with-dba                        DBA support
  --with-qdbm                       DBA: QDBM support
  --with-db                         DBA: Berkeley DB support
  --with-lmdb                       DBA: Lightning memory-mapped database
                                    support
  --with-enchant                    Enchant Support
  --enable-fileinfo                 fileinfo support
  --disable-filter                  Filter Support
  --enable-ftp                      ftp support
  --without-gd                      Bundled GD support
  --without-libwebp                 webp support
  --with-gettext                    gettext support
  --with-gmp                        Include GNU MP support.
  --disable-hash                    enable hash support
  --with-mhash                      mhash support
  --without-iconv                   iconv support
  --with-imap                       IMAP Support
  --with-interbase                  InterBase support
  --enable-intl                     Enable internationalization support
  --disable-json                    JavaScript Object Serialization support
  --with-ldap                       LDAP support
  --with-libmbfl                    use external libmbfl
  --enable-mbstring                 multibyte string functions
  --enable-mbregex                  multibyte regex support
  --disable-mbregex-backtrack       check multibyte regex backtrack
  --without-mysqlnd                 Mysql Native Client Driver
  --with-oci8                       OCI8 support
  --with-oci8-11g                   OCI8 support using Oracle 11g Instant
                                    Client
  --with-oci8-12c                   OCI8 support using Oracle Database 12c
                                    Instant Client
  --enable-odbc                     ODBC support
  --with-odbcver                    Force support for the passed ODBC version.
                                    A hex number is expected, default 0x0350.
                                    Use the special value of 0 to prevent an
                                    explicit ODBCVER to be defined.
  --disable-opcache                 whether to enable Zend OPcache support
  --disable-opcache-file            whether to enable file based caching
  --with-openssl                    OpenSSL support
  --without-pcre-jit                Enable PCRE JIT support
  --with-pgsql                      PostgreSQL support
  --with-pspell                     pspell/aspell (whatever it's called this
                                    month) support
  --without-readline                Readline support
  --disable-session                 session support
  --enable-shmop                    shmop support
  --with-snmp                       SNMP support
  --enable-sockets                  SOCKETS support
  --with-sodium                     for libsodium support
  --with-sqlite3                    SQLite 3 support
  --with-password-argon2            Argon2 support
  --with-config-file-scan-dir       Dir to check for additional php ini files
  --enable-sysvshm                  SysV Shared Memory support
  --with-tidy                       TIDY support
  --disable-tokenizer               tokenizer support
  --enable-zend-test                enable zend-test extension
  --disable-zip                     ZIP support
  --disable-zlib                    ZLIB support
  --without-libxml                  LibXML support
  --without-dom                     DOM support
  --enable-exif                     Exchangeable image information (EXIF)
                                    Support
  --with-mysqli                     MySQLi support
  --enable-pdo                      Enable PHP Data Objects support
  --with-pdo-dblib                  freetds dblib (Sybase, MS-SQL) support for
                                    PDO
  --with-pdo-mssql                  Native MS-SQL support for PDO
  --with-pdo-firebird               Firebird support for PDO
  --with-pdo-mysql                  MySQL support for PDO
  --with-pdo-oci                    Oracle OCI support for PDO
  --with-pdo-odbc                   ODBC support for PDO
  --with-pdo-pgsql                  PostgreSQL support for PDO
  --with-pdo-sqlite                 for pdo_sqlite support
  --with-pdo-sqlite-external        for pdo_sqlite support from an external
                                    dll
  --disable-phar                    disable phar support
  --enable-phar-native-ssl          enable phar with native OpenSSL support
  --without-simplexml               Simple XML support
  --enable-soap                     SOAP support
  --without-xml                     XML support
  --without-wddx                    WDDX support
  --disable-xmlreader               XMLReader support
  --with-xmlrpc                     XMLRPC-EPI support
  --disable-xmlwriter               XMLWriter support
  --with-xsl                        xsl support
xxx\php-7.2.9-windows-debug>- 配置编译参数
这里的编译参数为:以Debug模式编译PHP内核源码
xxx\php-7.2.9-windows-debug>configure.bat --disable-all --enable-cli --enable-debug
PHP Version: 7.2.9

Saving configure options to config.nice.bat
Checking for cl.exe ...
WARNING: Using unknown MSVC version 19.28.29335

  Detected compiler MSVC 19.28.29335, untested
  Detected 32-bit compiler
Checking for link.exe ...  D:\QSoftware\VS2019Professional\Professional\VC\Tools\MSVC\14.28.29333\bin\HostX86\x86
Checking for nmake.exe ...
Checking for lib.exe ...
Checking for bison.exe ...
Checking for sed.exe ...
Checking for re2c.exe ...
  Detected re2c version 1.1.1
Checking for zip.exe ...
Checking for lemon.exe ...
Checking for mc.exe ...  C:\Program Files (x86)\Windows Kits\10\bin\10.0.18362.0\x86
Checking for mt.exe ...  C:\Program Files (x86)\Windows Kits\10\bin\10.0.18362.0\x86
WARNING: Debug builds cannot be built using multi processing

Build dir: D:\QSec\Code-Audit\PHP\PHP-Source-Code\php-7.2.9-windows-debug\Debug_TS
PHP Core:  php7ts_debug.dll and php7ts_debug.lib

Checking for wspiapi.h ...
Enabling IPv6 support
Enabling SAPI sapi\cli
Checking for library edit_a.lib;edit.lib ...
Enabling extension ext\date
Enabling extension ext\pcre
Enabling extension ext\reflection
Enabling extension ext\spl
Checking for timelib_config.h ...  ext/date/lib
Enabling extension ext\standard

Creating build dirs...
Generating files...
Generating Makefile
Generating main/internal_functions.c
Generating main/config.w32.h
Generating phpize
Done.

Enabled extensions:
-----------------------
| Extension  | Mode   |
-----------------------
| date       | static |
| pcre       | static |
| reflection | static |
| spl        | static |
| standard   | static |
-----------------------

Enabled SAPI:
-------------
| Sapi Name |
-------------
| cli       |
-------------
------------------------------------------------
|                 |                            |
------------------------------------------------
| Build type      | Debug                      |
| Thread Safety   | Yes                        |
| Compiler        | MSVC 19.28.29335, untested |
| Architecture    | x86                        |
| Optimization    | disabled                   |
| Static analyzer | disabled                   |
------------------------------------------------
Type 'nmake' to build PHP
xxx\php-7.2.9-windows-debug> - 开始编译
运行nmake指令进行编译
D:\QSec\Code-Audit\PHP\PHP-Source-Code\php-7.2.9-windows-debug>nmake

Microsoft (R) 程序维护实用工具 14.28.29335.0 版
版权所有 (C) Microsoft Corporation。  保留所有权利。

Recreating build dirs
        type ext\pcre\php_pcre.def > D:\QSec\Code-Audit\PHP\PHP-Source-Code\php-7.2.9-windows-debug\Debug_TS\php7ts_debug.dll.def
        "C:\Program Files (x86)\Windows Kits\10\bin\10.0.18362.0\x86\mc.exe" -h win32\ -r D:\QSec\Code-Audit\PHP\PHP-Source-Code\php-7.2.9-windows-debug\Debug_TS\ -x D:\QSec\Code-Audit\PHP\PHP-Source-Code\php-7.2.9-windows-debug\Debug_TS\ win32\build\wsyslog.mc
MC: Compiling win32\build\wsyslog.mc
cl: 命令行 warning D9035 :“Gm”选项已否决,并将在将来的版本中移除
php_cli.c
cl: 命令行 warning D9035 :“Gm”选项已否决,并将在将来的版本中移除
php_cli_process_title.c
、、、、、
、、、、、编译完成后,在当前源码目录生成:Debug_TS项目(编译后的PHP可执行文件 php.exe->32位)
xxx\php-7.2.9-windows-debug\Debug_TS
λ  Qftm >>>: ls
devel/        php.exe*          php.ilk   php7ts_debug.dll*          php7ts_debug.exp  resp/   wsyslog.dbg
ext/          php.exe.manifest  php.lib   php7ts_debug.dll.def       php7ts_debug.ilk  sapi/   wsyslog.rc
main/         php.exe.res       php.pdb   php7ts_debug.dll.manifest  php7ts_debug.lib  TSRM/   Zend/
MSG00001.bin  php.exp           php-7.2.9-devel-19.28.29335-x86/  php7ts_debug.dll.res       php7ts_debug.pdb  win32/

λ Qftm >>>:测试Debug_TS/php.exe
λ  Qftm >>>: php.exe -v
PHP 7.2.9 (cli) (built: Dec 15 2020 14:40:17) ( ZTS MSVC 19.28.29335, untested x86 DEBUG )
Copyright (c) 1997-2018 The PHP Group
Zend Engine v3.2.0, Copyright (c) 1998-2018 Zend Technologies
源码调试
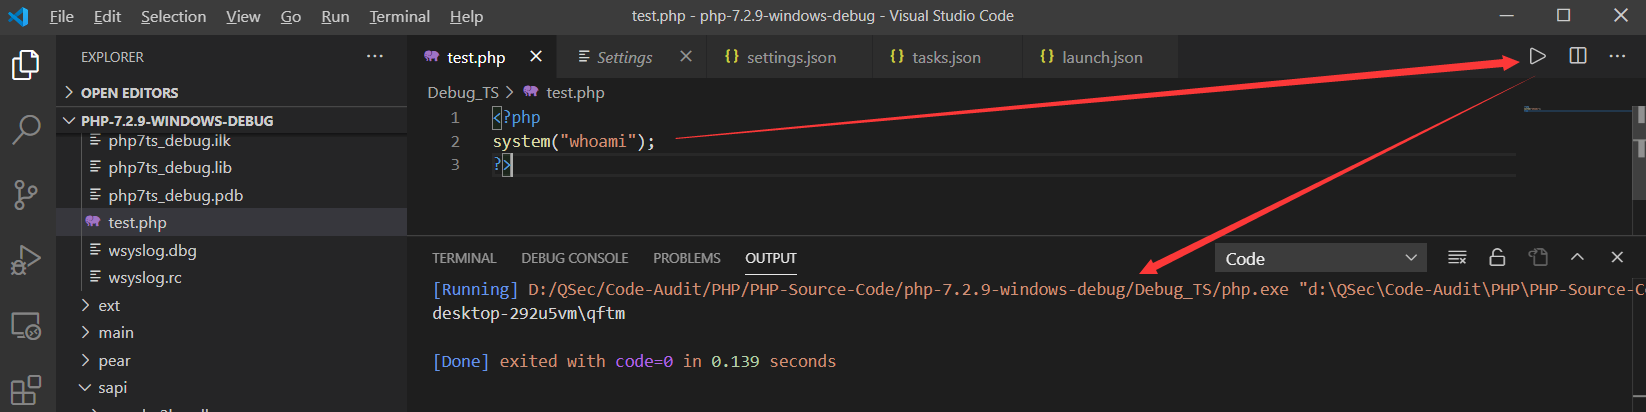
这里通过配置VSCode进行PHP内核源码的调试工作:
先用VSCode打开PHP7.2.9编译的源代码项目,然后,在源代码目录下的Debug_TS里,创建一个用于测试的php文件test.php。
# /Debug_TS/test.php

<?php
system("whoami");
?>随后点击功能菜单:Run->Start Debugging【F5】,弹框中任意选择一个,自动生成调试配置文件.vscode/launch.json,修改其内容如下:
{
        "version": "0.2.0",
        "configurations": [
            {
                "name": "Windows PHP7.2.9 Source Code Debug",
                "type": "cppvsdbg",
                "request": "launch",
                "program": "${workspaceRoot}/Debug_TS/php.exe",
                "args": ["${file}"],
                "stopAtEntry": false,
                "cwd": "${workspaceRoot}/Debug_TS/",
                "environment": [],
                "externalConsole": false
            }
        ]
}
PS:注意这里需要存在扩展 C/C++,同时这里的调试和gdb没有关系。
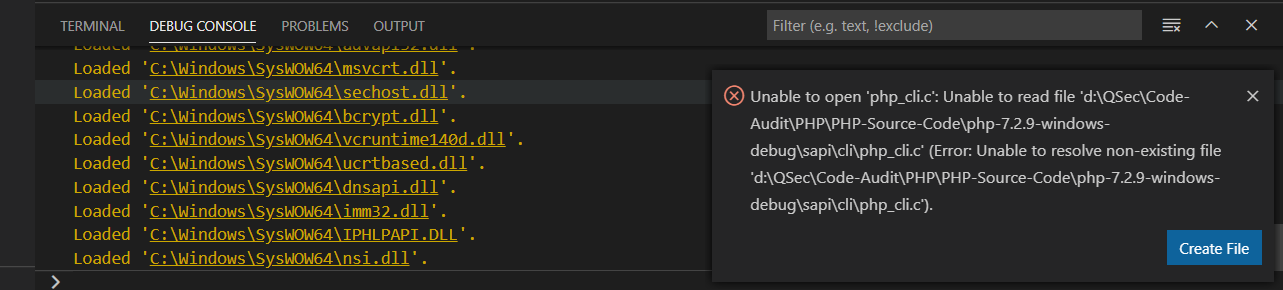
打开php-7.2.9-windows-debug/sapi/cli/php_cli.c源文件【程序执行入口文件】,定位到1200行的main函数内打上断点。【在想要调试的源代码特定位置上打上特定的断点即可】
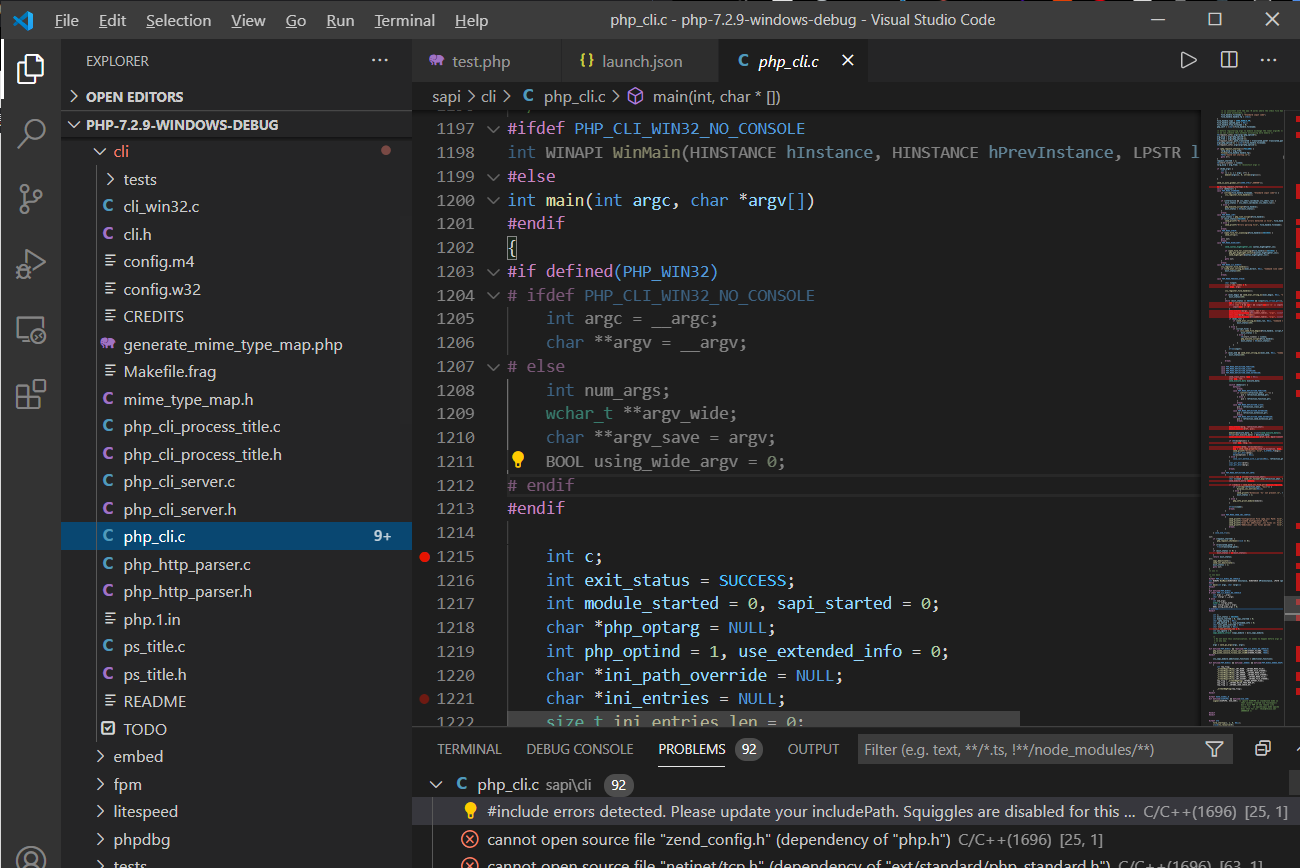
PS:虽然这里的C文件显示有问题Problems,但是不影响调试,准确来说这里的调试和配置C环境没有关系。
点击Run->Start Debugging【F5】开始调试
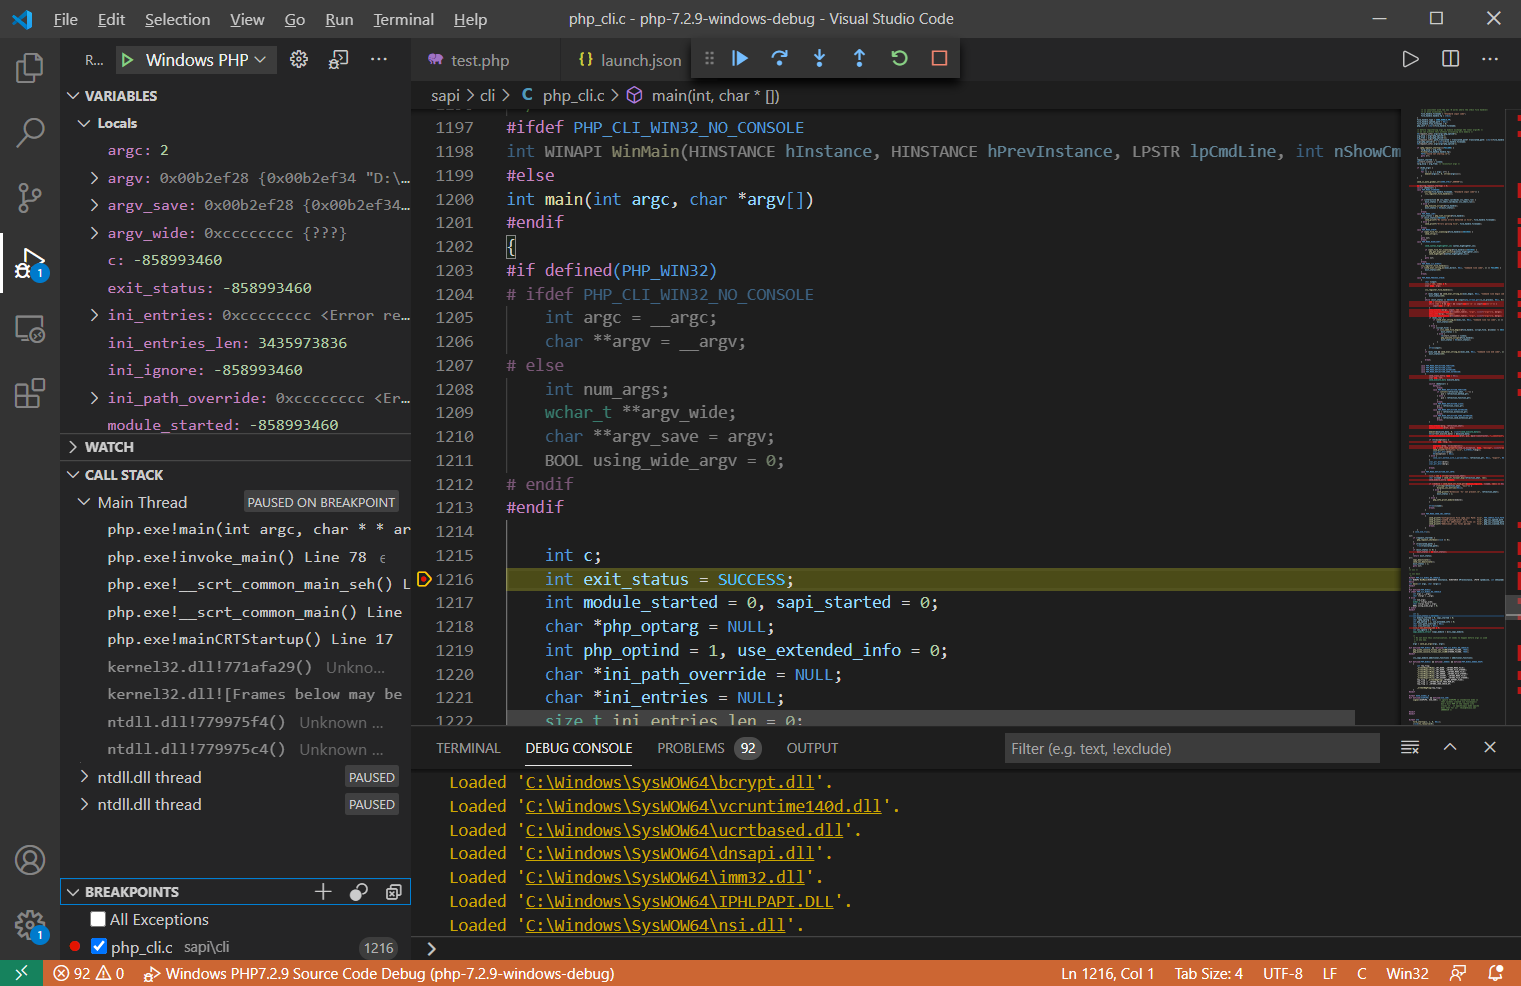
VSCode调试窗口介绍
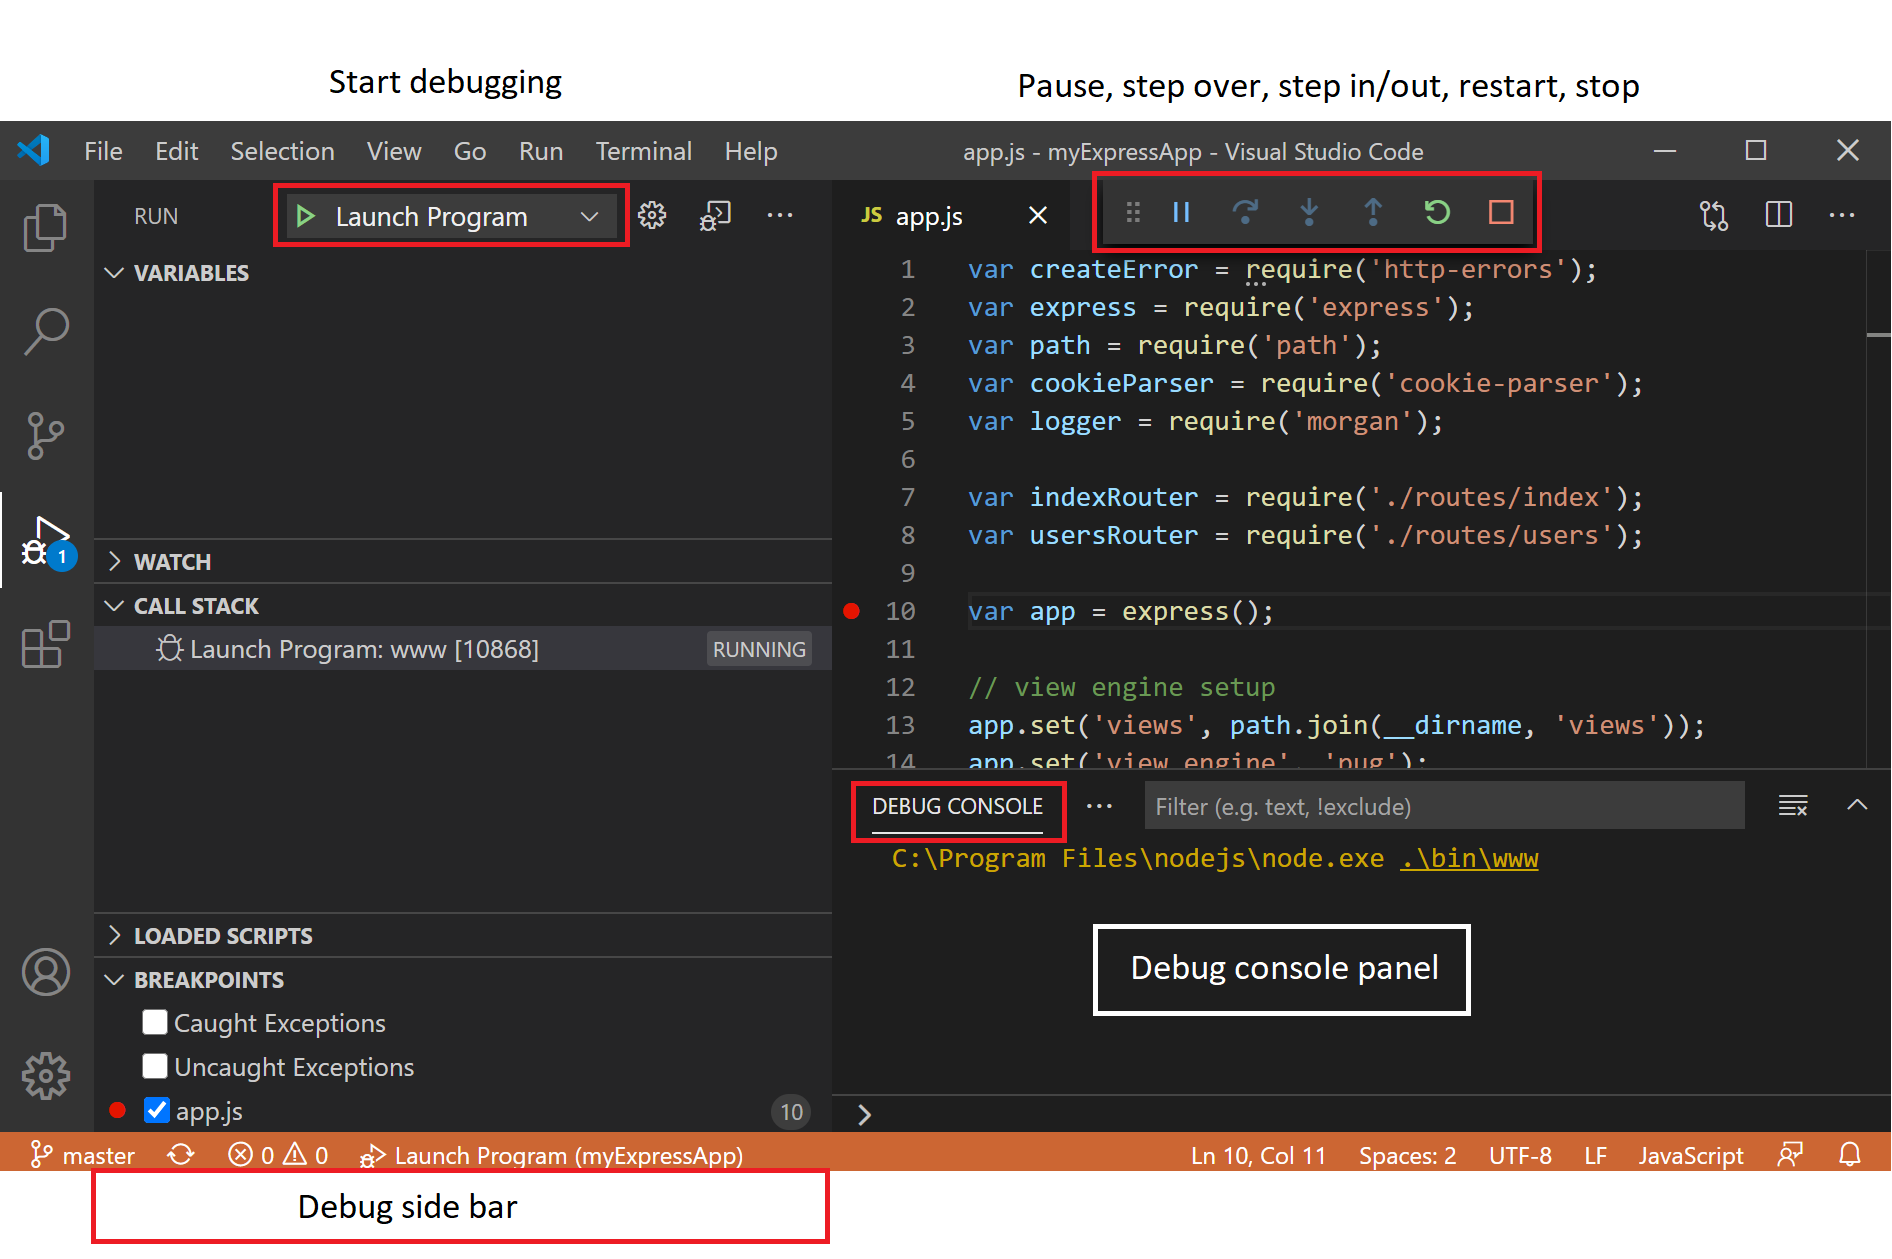
VSCode调试快捷键介绍:对应上方调试窗口Debug动作按钮
- Continue/Pause   运行         F5
- Step Over        单步 步过     F10
- Step Into        单步 步入     F11
- Step Out         跳出 函数     Shift+F11
- Restart          重新 调试     Ctrl+Shift+F5
- Stop             关闭 调试     Shift+F5
源码执行
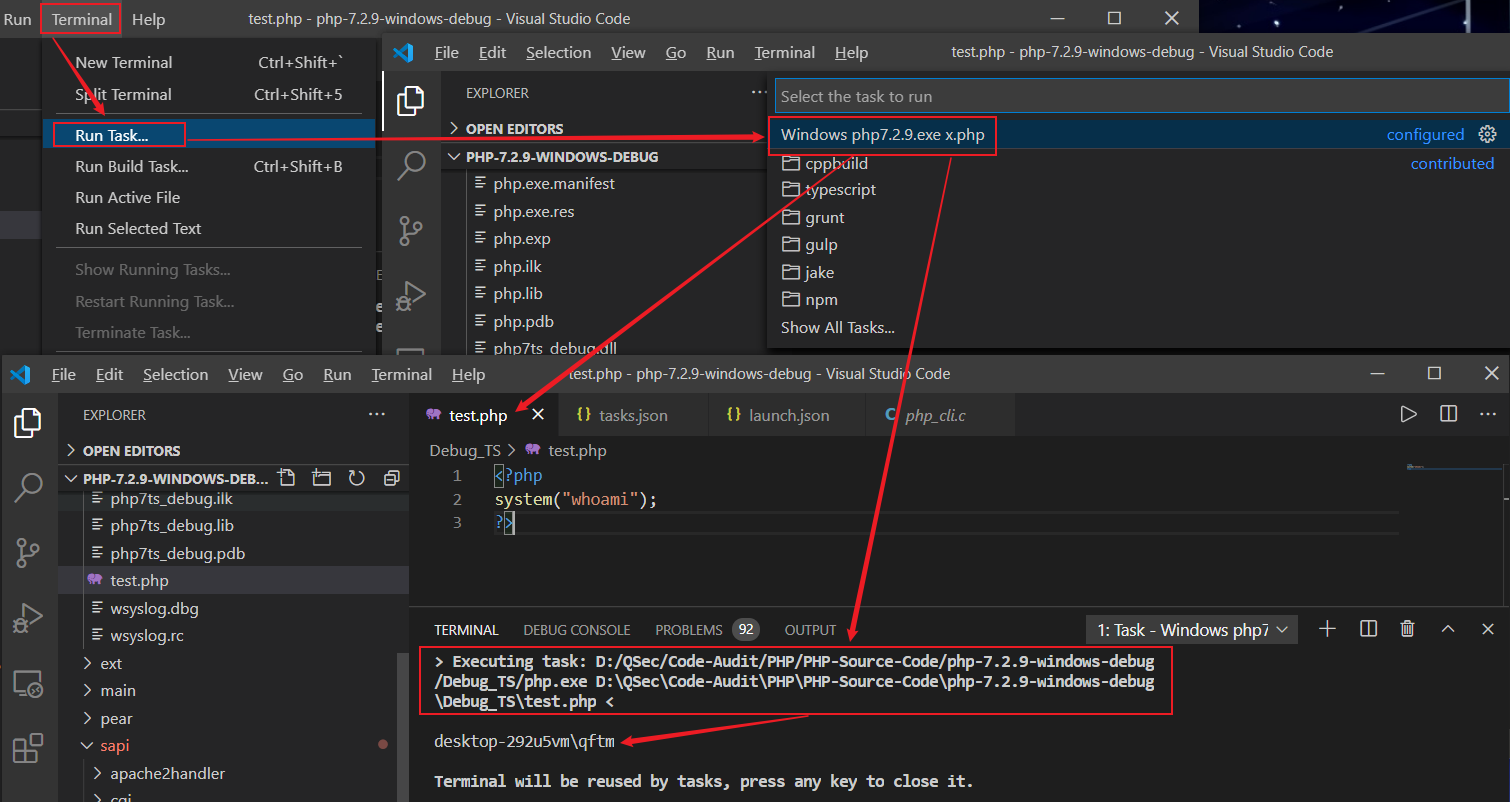
任务执行
如果需要单纯执行PHP代码则需要配置tasks.json任务文件,初始化点击:Terminal->Configure Tasks进行模板文件的创建,然后选择其它命令执行模板即可
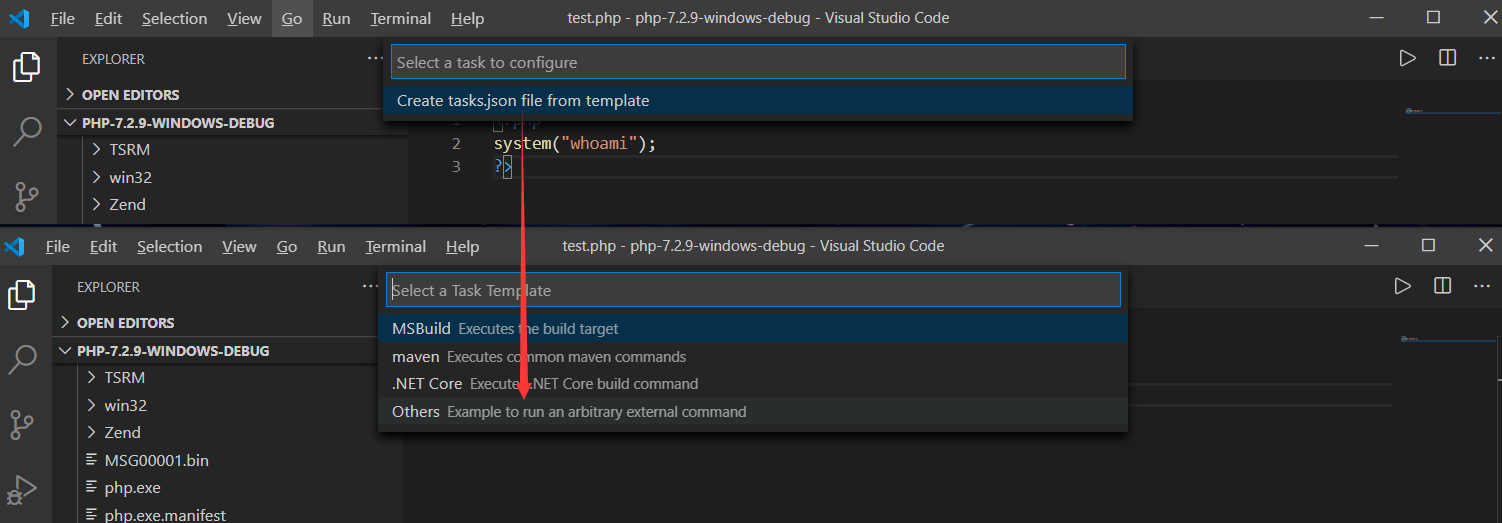
初始任务模板内容:tasks.json
{
    // See https://go.microsoft.com/fwlink/?LinkId=733558
    // for the documentation about the tasks.json format
    "version": "2.0.0",
    "tasks": [
        {
            "label": "echo",
            "type": "shell",
            "command": "echo Hello"
        }
    ]
}
修改任务模板配置文件,配置PHP执行环境
// tasks.json

{
    "version": "2.0.0",
    "tasks": [
        {
            "label": "Windows php7.2.9.exe x.php",
            "type": "shell",
            "command": "D:/QSec/Code-Audit/PHP/PHP-Source-Code/php-7.2.9-windows-debug/Debug_TS/php.exe",
            "args": [
                "${file}"
            ]
        }
    ]
}运行任务Windows php7.2.9.exe x.php来执行特定PHP程序文件
插件执行
除了上方创建任务执行程序外,还可以借助插件code runner更加方便的去执行程序。
code runner扩展自带的默认对PHP运行的配置规则如下
"code-runner.executorMap": {
     "php": "php"
}
默认配置使用的是环境变量中的php.exe去执行的,可以更改设置为自己的php.exe路径【避免与环境变量中其它的php.exe发生冲突】
点击File->Preferences->settings->Extensions->Run Code configuration->Executor Map->Edit in settings.json进行设置
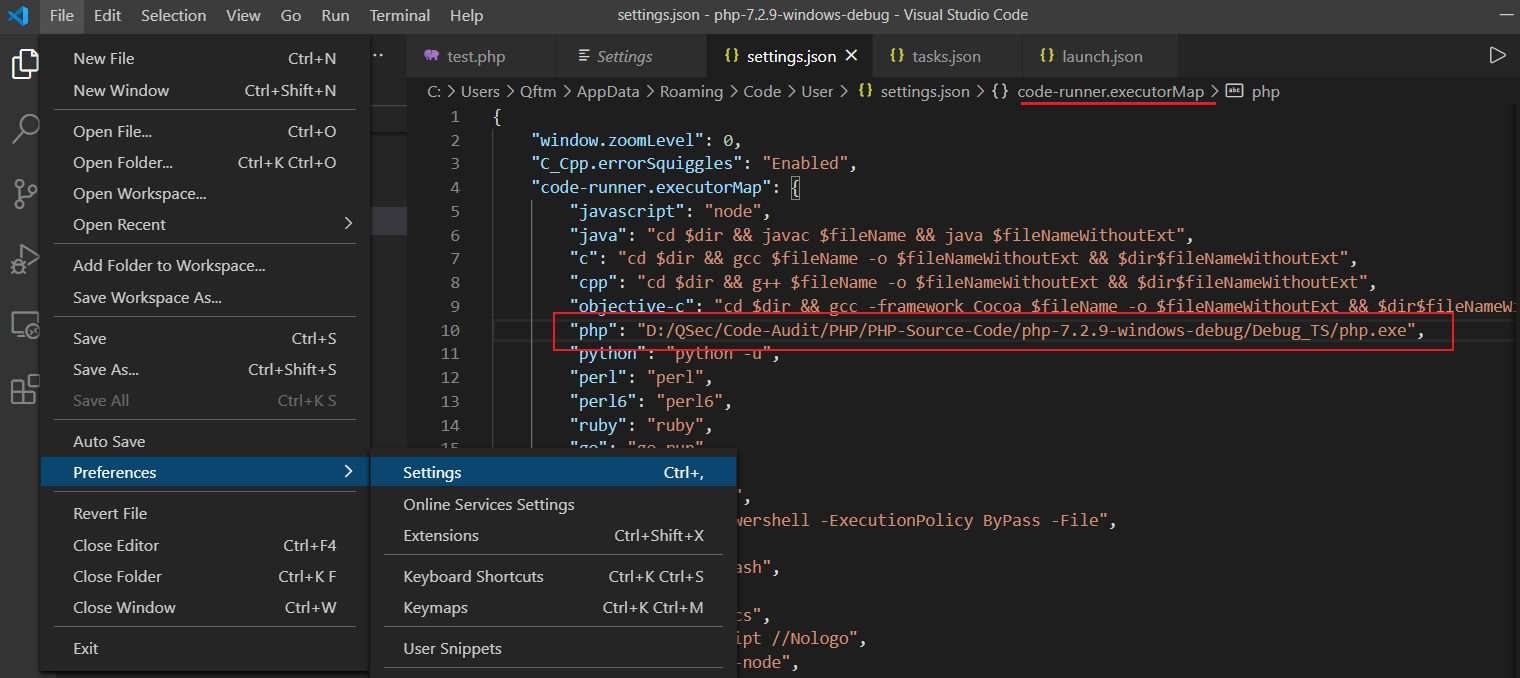
插件运行效果
疑难杂症
针对调试编译的源码所要注意的问题,由于在编译期间会对源代码的路径等信息进行配置,写入编译后的Debug_TS\php.exe以及Debug_TS\resp\*等文件中,使得其可以协助我们进行源代码的调试工作。但是,这里就会出现一个问题:如果以后对源码的路径进行了任何改动都会导致对源代码调试出错。
Debug_TS\php.exe中有关PHP源代码路径信息
Debug_TS\resp\*中有关PHP源代码路径信息
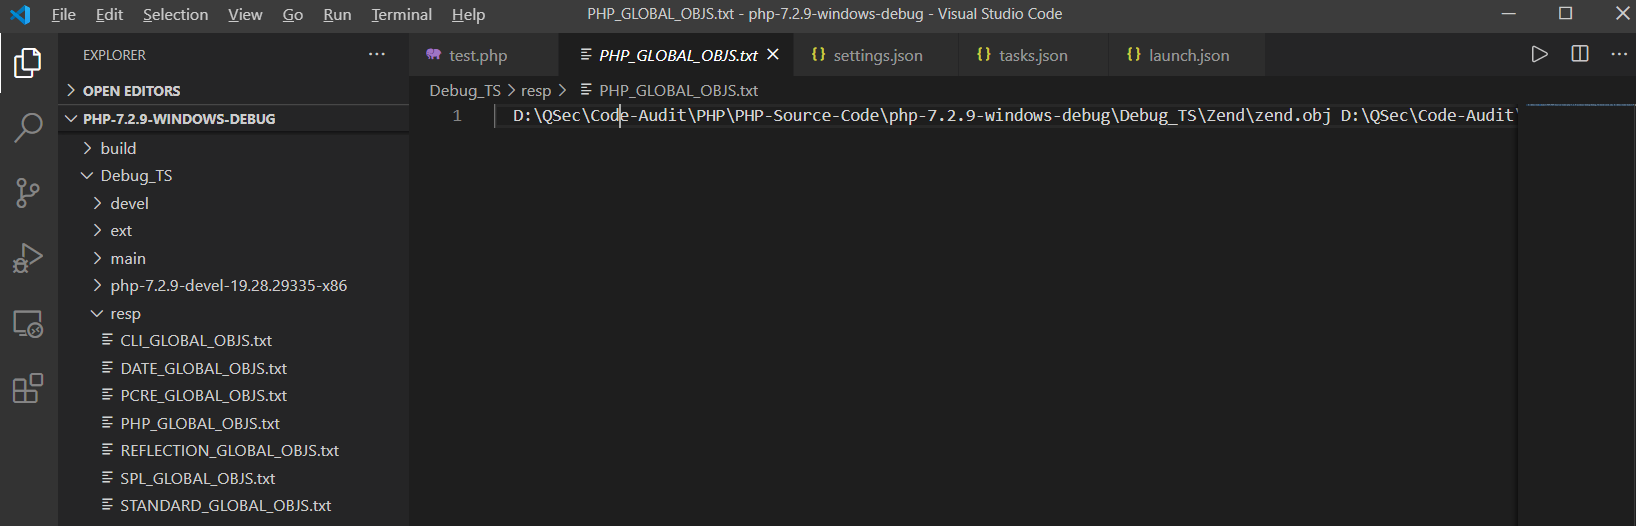
这里如果对路径稍作修改则会调试出错(找不到源码文件):php-7.2.9-windows-debug ==> php-7.2.9-windows-debugs
命令执行底层分析
针对命令执行函数的底层分析,这里主要采用两种手段去分析:静态审计(静态审计内核源码)、动态审计(动态调试内核源码)。
静态审计
PHP命令执行函数有很多
system
exec
passthru
shell_exec
proc_open
popen
pcntl_exec
escapeshellarg
escapeshellcmd
、、、、大部分命令执行函数于ext/standard/exec.c源码中实现
/* {{{ proto string exec(string command [, array &output [, int &return_value]])
   Execute an external program */
PHP_FUNCTION(exec)
{
	php_exec_ex(INTERNAL_FUNCTION_PARAM_PASSTHRU, 0);
}
/* }}} */

/* {{{ proto int system(string command [, int &return_value])
   Execute an external program and display output */
PHP_FUNCTION(system)
{
	php_exec_ex(INTERNAL_FUNCTION_PARAM_PASSTHRU, 1);
}
/* }}} */

/* {{{ proto void passthru(string command [, int &return_value])
   Execute an external program and display raw output */
PHP_FUNCTION(passthru)
{
	php_exec_ex(INTERNAL_FUNCTION_PARAM_PASSTHRU, 3);
}
/* }}} */

/* {{{ proto string shell_exec(string cmd)
   Execute command via shell and return complete output as string */
PHP_FUNCTION(shell_exec)
{
	FILE *in;
	char *command;
	size_t command_len;
	zend_string *ret;
	php_stream *stream;

	ZEND_PARSE_PARAMETERS_START(1, 1)
		Z_PARAM_STRING(command, command_len)
	ZEND_PARSE_PARAMETERS_END();

#ifdef PHP_WIN32
	if ((in=VCWD_POPEN(command, "rt"))==NULL) {
#else
	if ((in=VCWD_POPEN(command, "r"))==NULL) {
#endif
		php_error_docref(NULL, E_WARNING, "Unable to execute '%s'", command);
		RETURN_FALSE;
	}

	stream = php_stream_fopen_from_pipe(in, "rb");
	ret = php_stream_copy_to_mem(stream, PHP_STREAM_COPY_ALL, 0);
	php_stream_close(stream);

	if (ret && ZSTR_LEN(ret) > 0) {
		RETVAL_STR(ret);
	}
}
/* }}} */观察上面代码部分,可以发现system、exec、passthru这三个命令执行函数调用函数一样,皆为php_exec_ex()函数,不同点只在于调用函数的第二个参数mode不同0、1、3作为标识。而shell_exec函数则是调用VCWD_POPEN()函数去实现。
下面以system()命令执行函数执行whoami指令为例:
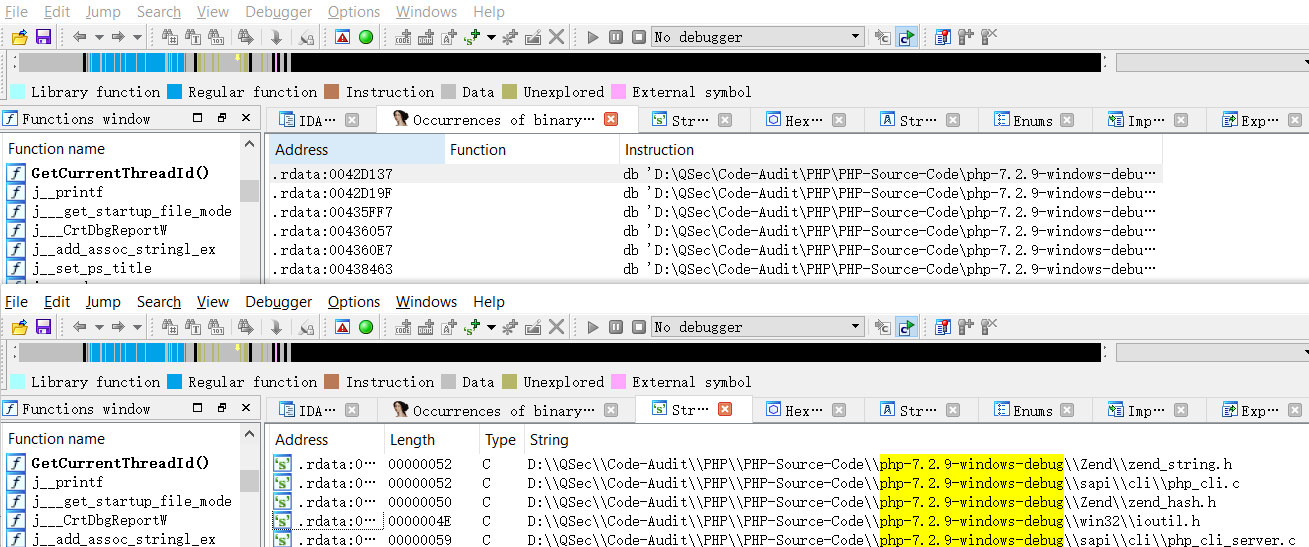
system('whoami');借助源码审查工具Source Insight【导入php7.2.9源码项目】进行底层函数跟踪分析
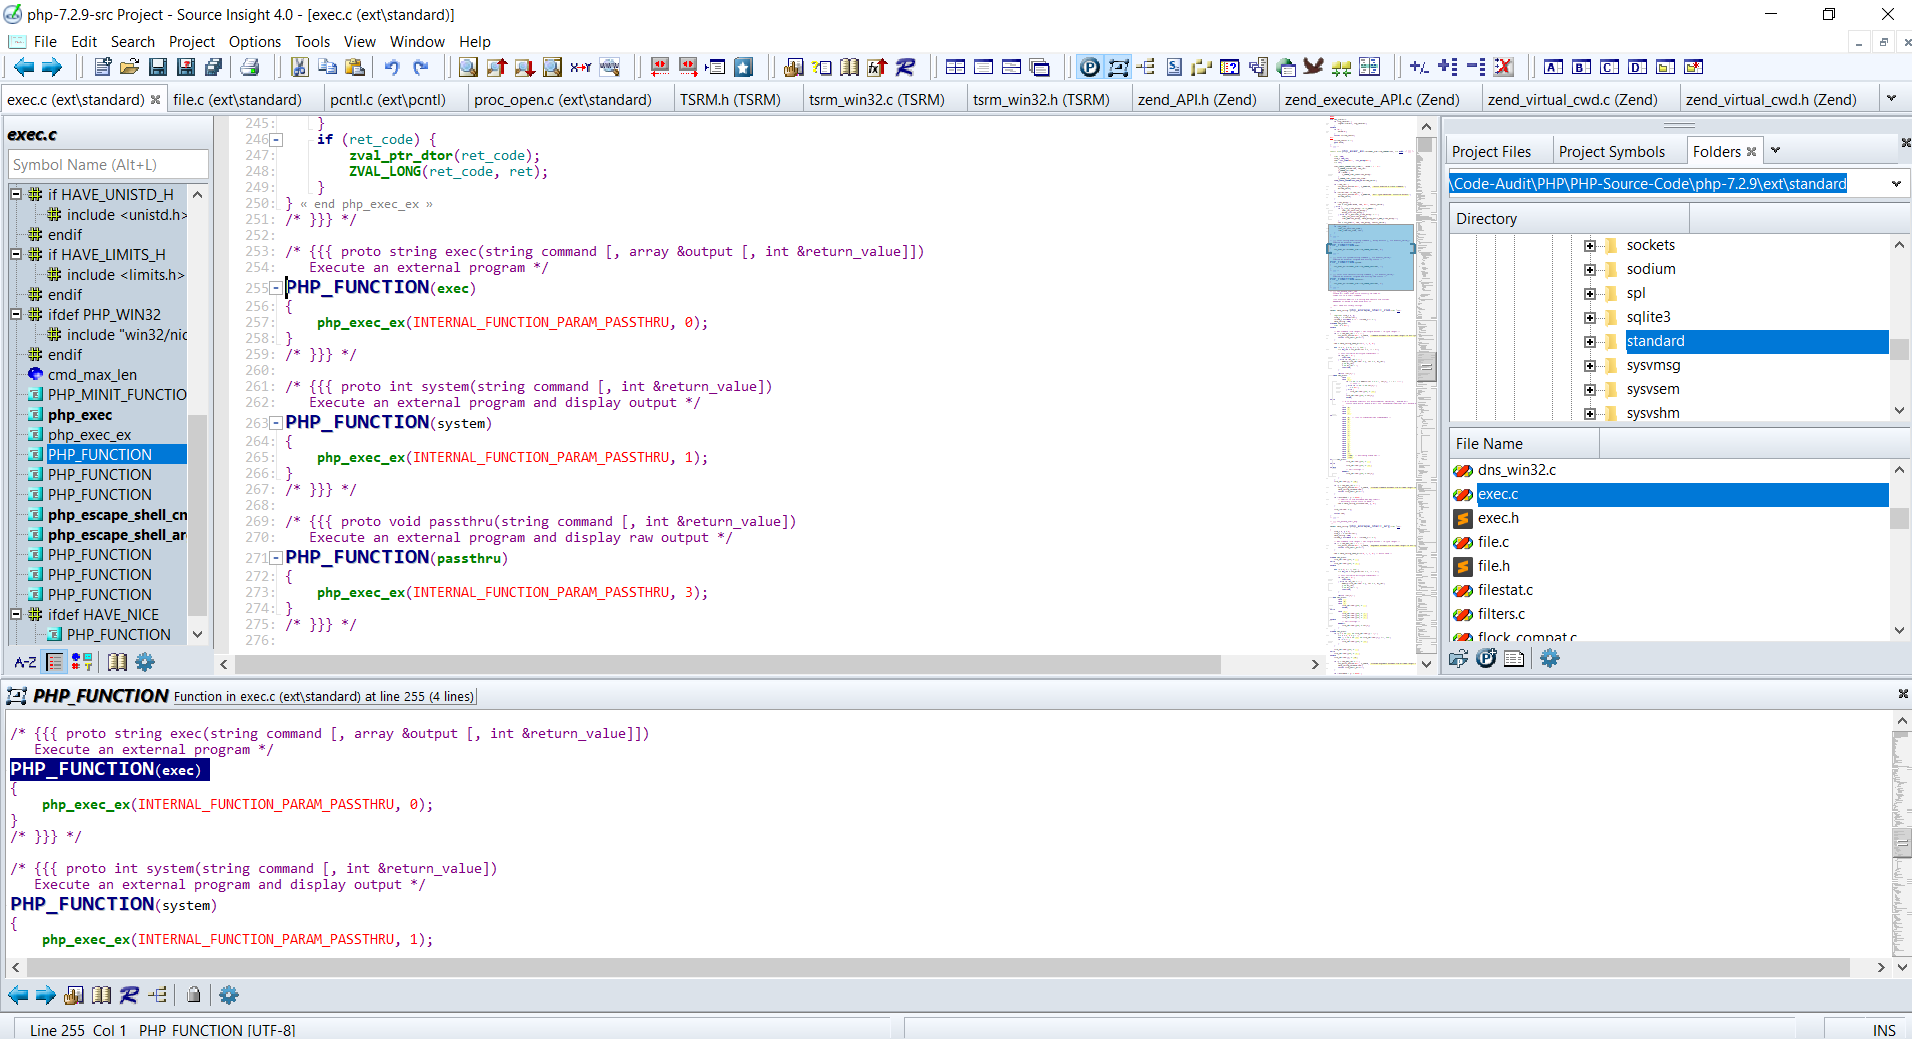
首先找到php中system()函数声明处:ext\standard\exec.c:263
PHP_FUNCTION(system)
{
    php_exec_ex(INTERNAL_FUNCTION_PARAM_PASSTHRU, 1);
}很明显system函数由php_exec_ex()函数实现,跟进同文件下找到php_exec_ex()函数实现【在Source Insight下面可以使用Ctrl+鼠标左键点击定位函数位置】:ext\standard\exec.c:209
static void php_exec_ex(INTERNAL_FUNCTION_PARAMETERS, int mode) /* {{{ */
{
	char *cmd;
	size_t cmd_len;
	zval *ret_code=NULL, *ret_array=NULL;
	int ret;

	ZEND_PARSE_PARAMETERS_START(1, (mode ? 2 : 3))
		Z_PARAM_STRING(cmd, cmd_len)
		Z_PARAM_OPTIONAL
		if (!mode) {
			Z_PARAM_ZVAL_DEREF(ret_array)
		}
		Z_PARAM_ZVAL_DEREF(ret_code)
	ZEND_PARSE_PARAMETERS_END_EX(RETURN_FALSE);

	if (!cmd_len) {
		php_error_docref(NULL, E_WARNING, "Cannot execute a blank command");
		RETURN_FALSE;
	}
	if (strlen(cmd) != cmd_len) {
		php_error_docref(NULL, E_WARNING, "NULL byte detected. Possible attack");
		RETURN_FALSE;
	}

	if (!ret_array) {
		ret = php_exec(mode, cmd, NULL, return_value);
	} else {
		if (Z_TYPE_P(ret_array) != IS_ARRAY) {
			zval_ptr_dtor(ret_array);
			array_init(ret_array);
		} else if (Z_REFCOUNT_P(ret_array) > 1) {
			zval_ptr_dtor(ret_array);
			ZVAL_ARR(ret_array, zend_array_dup(Z_ARR_P(ret_array)));
		}
		ret = php_exec(2, cmd, ret_array, return_value);
	}
	if (ret_code) {
		zval_ptr_dtor(ret_code);
		ZVAL_LONG(ret_code, ret);
	}
}
/* }}} */阅读php_exec_ex()函数实现,会对cmd参数进行初始化处理,然后调用php_exec(mode, cmd, NULL, return_value)函数,mode为不同执行函数标识、cmd为指令参数。
跟踪php_exec()函数调用:ext\standard\exec.c:97
/* {{{ php_exec
* If type==0, only last line of output is returned (exec)
* If type==1, all lines will be printed and last lined returned (system)
* If type==2, all lines will be saved to given array (exec with &$array)
* If type==3, output will be printed binary, no lines will be saved or returned (passthru)
*
*/
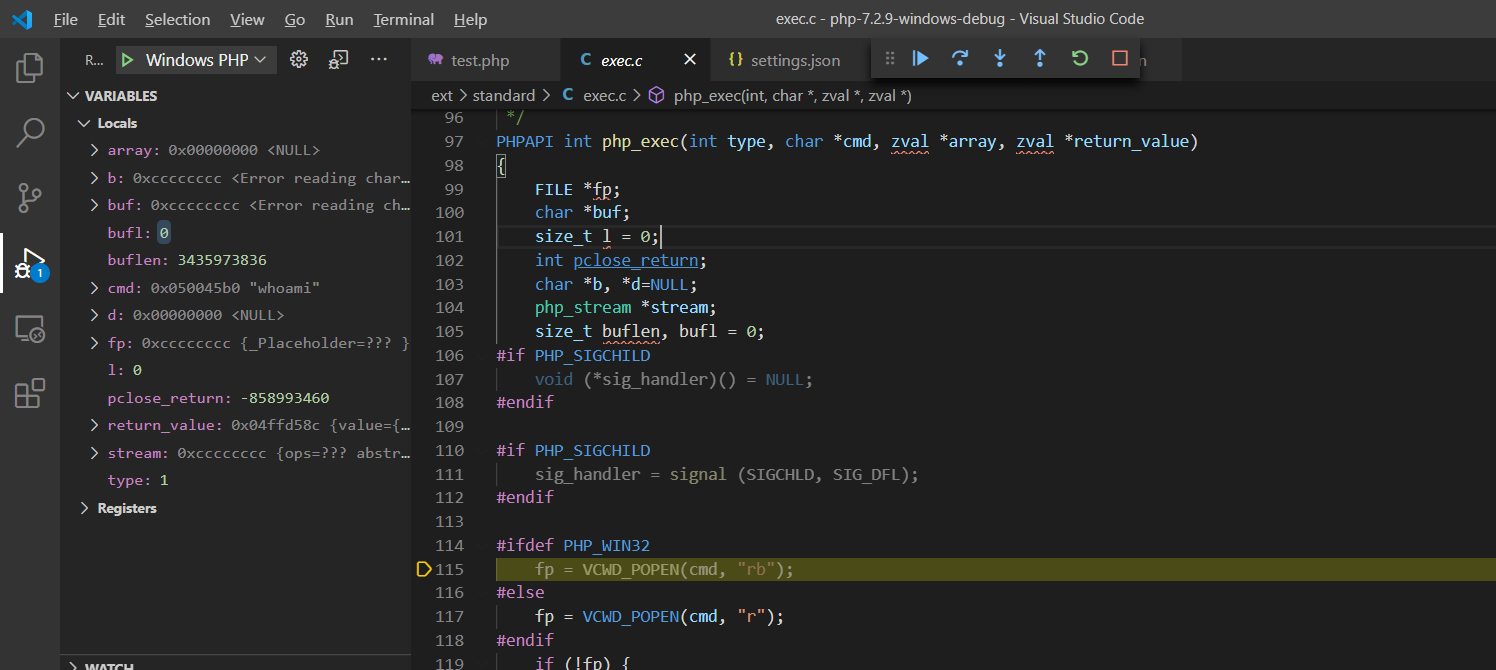
PHPAPI int php_exec(int type, char *cmd, zval *array, zval *return_value)
{
FILE *fp;
char *buf;
size_t l = 0;
int pclose_return;
char *b, *d=NULL;
php_stream *stream;
size_t buflen, bufl = 0;
#if PHP_SIGCHILD
void (*sig_handler)() = NULL;
#endif
#if PHP_SIGCHILD
sig_handler = signal (SIGCHLD, SIG_DFL);
#endif
#ifdef PHP_WIN32
fp = VCWD_POPEN(cmd, "rb");
#else
fp = VCWD_POPEN(cmd, "r");
#endif
if (!fp) {
php_error_docref(NULL, E_WARNING, "Unable to fork [%s]", cmd);
goto err;
}
stream = php_stream_fopen_from_pipe(fp, "rb");
buf = (char *) emalloc(EXEC_INPUT_BUF);
buflen = EXEC_INPUT_BUF;
if (type != 3) {
b = buf;
while (php_stream_get_line(stream, b, EXEC_INPUT_BUF, &bufl)) {
/* no new line found, let's read some more */
if (b[bufl - 1] != '\n' && !php_stream_eof(stream)) {
if (buflen < (bufl + (b - buf) + EXEC_INPUT_BUF)) {
bufl += b - buf;
buflen = bufl + EXEC_INPUT_BUF;
buf = erealloc(buf, buflen);
b = buf + bufl;
} else {
b += bufl;
}
continue;
} else if (b != buf) {
bufl += b - buf;
}
if (type == 1) {
PHPWRITE(buf, bufl);
if (php_output_get_level() < 1) {
sapi_flush();
}
} else if (type == 2) {
/* strip trailing whitespaces */
l = bufl;
while (l-- > 0 && isspace(((unsigned char *)buf)[l]));
if (l != (bufl - 1)) {
bufl = l + 1;
buf[bufl] = '\0';
}
add_next_index_stringl(array, buf, bufl);
}
b = buf;
}
if (bufl) {
/* strip trailing whitespaces if we have not done so already */
if ((type == 2 && buf != b) || type != 2) {
l = bufl;
while (l-- > 0 && isspace(((unsigned char *)buf)[l]));
if (l != (bufl - 1)) {
bufl = l + 1;
buf[bufl] = '\0';
}
if (type == 2) {
add_next_index_stringl(array, buf, bufl);
}
}
/* Return last line from the shell command */
RETVAL_STRINGL(buf, bufl);
} else { /* should return NULL, but for BC we return "" */
RETVAL_EMPTY_STRING();
}
} else {
while((bufl = php_stream_read(stream, buf, EXEC_INPUT_BUF)) > 0) {
PHPWRITE(buf, bufl);
}
}
pclose_return = php_stream_close(stream);
efree(buf);
done:
#if PHP_SIGCHILD
if (sig_handler) {
signal(SIGCHLD, sig_handler);
}
#endif
if (d) {
efree(d);
}
return pclose_return;
err:
pclose_return = -1;
goto done;
}
/* }}} */审计int php_exec(int type, char *cmd, zval *array, zval *return_value)函数代码,发现函数内部会首先调用VCWD_POPEN()函数去处理cmd指令【在这里不难发现该部分函数VCWD_POPEN()调用同shell_exec()可执行函数实现原理相同,也就说明system、exec、passthru、shell_exec这类命令执行函数原理相同,底层都调用了相同函数VCWD_POPEN()去执行系统指令】。
这里的VCWD_POPEN()函数调用会通过相应的平台去执行:PHP_WIN32为Windows平台、另一个为Unix平台
#ifdef PHP_WIN32
fp = VCWD_POPEN(cmd, "rb");
#else
fp = VCWD_POPEN(cmd, "r");
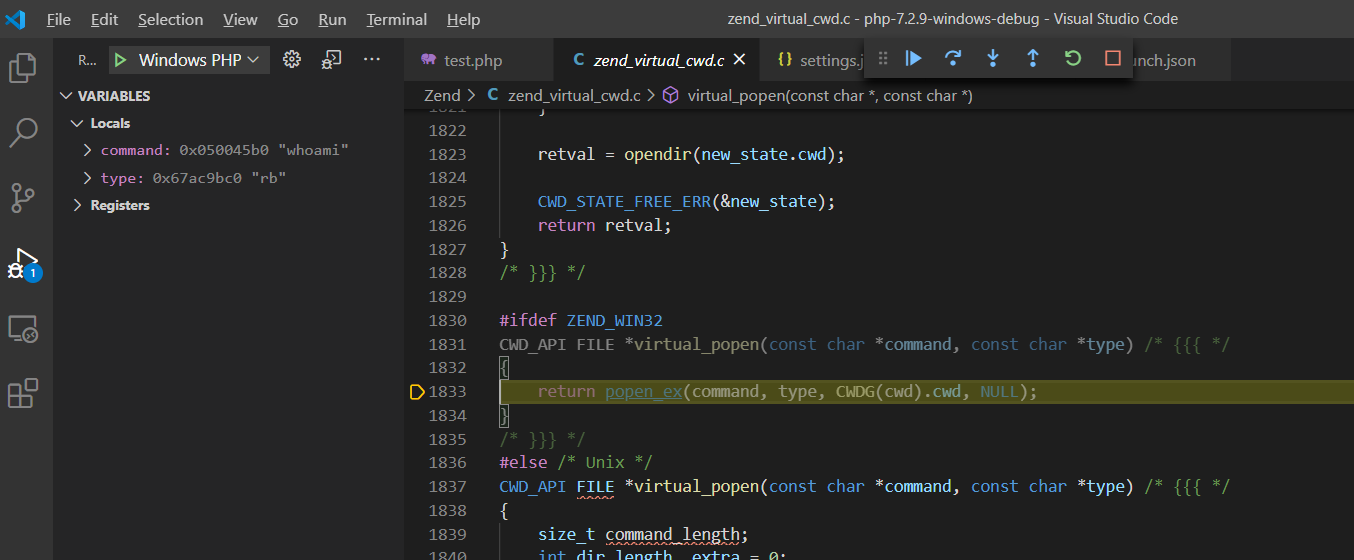
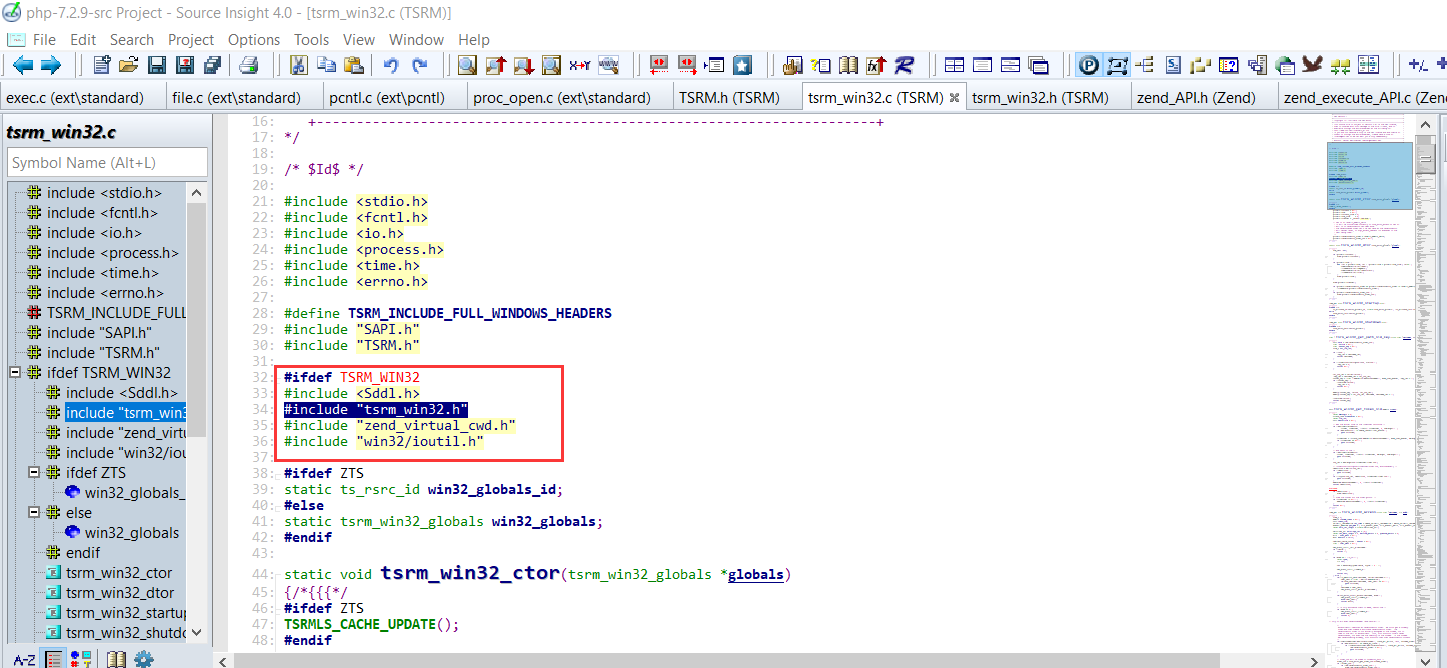
#endif进入VCWD_POPEN(cmd, "rb")函数: Zend\zend_virtual_cwd.h:269
#define VCWD_POPEN(command, type) virtual_popen(command, type)由于VCWD_POPEN函数为virtual_popen实现,直接进入virtual_popen()函数实现:Zend\zend_virtual_cwd.c:1831
#ifdef ZEND_WIN32
CWD_API FILE *virtual_popen(const char *command, const char *type) /* {{{ */
{
	return popen_ex(command, type, CWDG(cwd).cwd, NULL);
}
/* }}} */
#else /* Unix */
CWD_API FILE *virtual_popen(const char *command, const char *type) /* {{{ */
{
	size_t command_length;
	int dir_length, extra = 0;
	char *command_line;
	char *ptr, *dir;
	FILE *retval;

	command_length = strlen(command);

	dir_length = CWDG(cwd).cwd_length;
	dir = CWDG(cwd).cwd;
	while (dir_length > 0) {
		if (*dir == '\'') extra+=3;
		dir++;
		dir_length--;
	}
	dir_length = CWDG(cwd).cwd_length;
	dir = CWDG(cwd).cwd;

	ptr = command_line = (char *) emalloc(command_length + sizeof("cd '' ; ") + dir_length + extra+1+1);
	memcpy(ptr, "cd ", sizeof("cd ")-1);
	ptr += sizeof("cd ")-1;

	if (CWDG(cwd).cwd_length == 0) {
		*ptr++ = DEFAULT_SLASH;
	} else {
		*ptr++ = '\'';
		while (dir_length > 0) {
			switch (*dir) {
			case '\'':
				*ptr++ = '\'';
				*ptr++ = '\\';
				*ptr++ = '\'';
				/* fall-through */
			default:
				*ptr++ = *dir;
			}
			dir++;
			dir_length--;
		}
		*ptr++ = '\'';
	}

	*ptr++ = ' ';
	*ptr++ = ';';
	*ptr++ = ' ';

	memcpy(ptr, command, command_length+1);
	retval = popen(command_line, type);

	efree(command_line);
	return retval;
}
/* }}} */
#endif不难发现,针对virtual_popen()函数实现,也存在于不同平台,这里主要分析Windows平台,针对Unix平台在下面PHP for Linux部分会详细讲述。
针对Windows平台,virtual_popen()函数实现非常简单,直接调用popen_ex()函数进行返回。
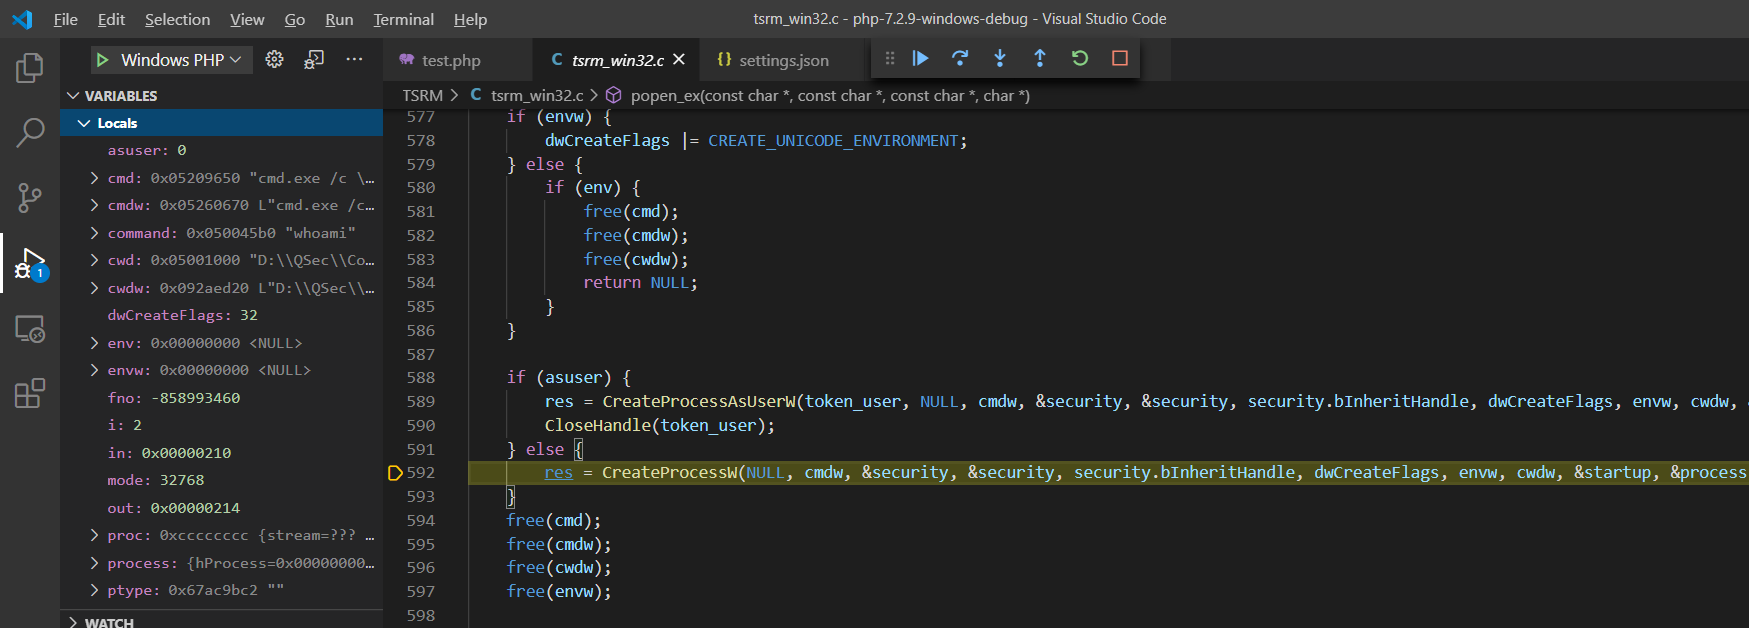
进入popen_ex()函数实现:TSRM\tsrm_win32.c:473
TSRM_API FILE *popen_ex(const char *command, const char *type, const char *cwd, char *env)
{/*{{{*/
	FILE *stream = NULL;
	int fno, type_len, read, mode;
	STARTUPINFOW startup;
	PROCESS_INFORMATION process;
	SECURITY_ATTRIBUTES security;
	HANDLE in, out;
	DWORD dwCreateFlags = 0;
	BOOL res;
	process_pair *proc;
	char *cmd = NULL;
	wchar_t *cmdw = NULL, *cwdw = NULL, *envw = NULL;
	int i;
	char *ptype = (char *)type;
	HANDLE thread_token = NULL;
	HANDLE token_user = NULL;
	BOOL asuser = TRUE;

	if (!type) {
		return NULL;
	}

	/*The following two checks can be removed once we drop XP support */
	type_len = (int)strlen(type);
	if (type_len <1 || type_len> 2) {
		return NULL;
	}

	for (i=0; i < type_len; i++) {
		if (!(*ptype == 'r' || *ptype == 'w' || *ptype == 'b' || *ptype == 't')) {
			return NULL;
		}
		ptype++;
	}

	cmd = (char*)malloc(strlen(command)+strlen(TWG(comspec))+sizeof(" /c ")+2);
	if (!cmd) {
		return NULL;
	}

	sprintf(cmd, "%s /c \"%s\"", TWG(comspec), command);
	cmdw = php_win32_cp_any_to_w(cmd);
	if (!cmdw) {
		free(cmd);
		return NULL;
	}

	if (cwd) {
		cwdw = php_win32_ioutil_any_to_w(cwd);
		if (!cwdw) {
			free(cmd);
			free(cmdw);
			return NULL;
		}
	}

	security.nLength				= sizeof(SECURITY_ATTRIBUTES);
	security.bInheritHandle			= TRUE;
	security.lpSecurityDescriptor	= NULL;

	if (!type_len || !CreatePipe(&in, &out, &security, 2048L)) {
		free(cmdw);
		free(cwdw);
		free(cmd);
		return NULL;
	}

	memset(&startup, 0, sizeof(STARTUPINFOW));
	memset(&process, 0, sizeof(PROCESS_INFORMATION));

	startup.cb			= sizeof(STARTUPINFOW);
	startup.dwFlags		= STARTF_USESTDHANDLES;
	startup.hStdError	= GetStdHandle(STD_ERROR_HANDLE);

	read = (type[0] == 'r') ? TRUE : FALSE;
	mode = ((type_len == 2) && (type[1] == 'b')) ? O_BINARY : O_TEXT;

	if (read) {
		in = dupHandle(in, FALSE);
		startup.hStdInput  = GetStdHandle(STD_INPUT_HANDLE);
		startup.hStdOutput = out;
	} else {
		out = dupHandle(out, FALSE);
		startup.hStdInput  = in;
		startup.hStdOutput = GetStdHandle(STD_OUTPUT_HANDLE);
	}

	dwCreateFlags = NORMAL_PRIORITY_CLASS;
	if (strcmp(sapi_module.name, "cli") != 0) {
		dwCreateFlags |= CREATE_NO_WINDOW;
	}

	/* Get a token with the impersonated user. */
	if(OpenThreadToken(GetCurrentThread(), TOKEN_ALL_ACCESS, TRUE, &thread_token)) {
		DuplicateTokenEx(thread_token, MAXIMUM_ALLOWED, &security, SecurityImpersonation, TokenPrimary, &token_user);
	} else {
		DWORD err = GetLastError();
		if (err == ERROR_NO_TOKEN) {
			asuser = FALSE;
		}
	}

	envw = php_win32_cp_env_any_to_w(env);
	if (envw) {
		dwCreateFlags |= CREATE_UNICODE_ENVIRONMENT;
	} else {
		if (env) {
			free(cmd);
			free(cmdw);
			free(cwdw);
			return NULL;
		}
	}

	if (asuser) {
		res = CreateProcessAsUserW(token_user, NULL, cmdw, &security, &security, security.bInheritHandle, dwCreateFlags, envw, cwdw, &startup, &process);
		CloseHandle(token_user);
	} else {
		res = CreateProcessW(NULL, cmdw, &security, &security, security.bInheritHandle, dwCreateFlags, envw, cwdw, &startup, &process);
	}
	free(cmd);
	free(cmdw);
	free(cwdw);
	free(envw);

	if (!res) {
		return NULL;
	}

	CloseHandle(process.hThread);
	proc = process_get(NULL);

	if (read) {
		fno = _open_osfhandle((tsrm_intptr_t)in, _O_RDONLY | mode);
		CloseHandle(out);
	} else {
		fno = _open_osfhandle((tsrm_intptr_t)out, _O_WRONLY | mode);
		CloseHandle(in);
	}

	stream = _fdopen(fno, type);
	proc->prochnd = process.hProcess;
	proc->stream = stream;
	return stream;
}/*}}}*/</1>从TSRM\tsrm_win32.c文件不难发现,由virtual_popen()函数不同平台到popen_ex()函数可知,virtual_popen()函数是作为不同平台的分割点,此时的调用链已经到了仅和windows平台有联系。
接着对*popen_ex()函数进行分析,参数:command为指令参数、cwd为当前工作目录、env为环境变量信息。
为cmd变量动态分配空间:这里不得不说把cmd变量的空间分配的刚刚好
cmd = (char*)malloc(strlen(command)+strlen(TWG(comspec))+sizeof(" /c ")+2);分配空间后,为cmd变量赋值
sprintf(cmd, "%s /c \"%s\"", TWG(comspec), command);

=> cmd = "cmd.exe /c whoami"这部分其实在PHP官方手册的可执行函数中也有说明

到这里也就会发现system、exec、passthru、shell_exec这类命令执行函数底层都会调用系统终端cmd.exe来执行传入的指令参数。那么既然会调用系统cmd,就要将cmd进程启动起来。
继续向后分析*popen_ex()函数,会找到相关Windows系统API来启动cmd.exe进程,然后由cmd进程执行指令参数(内部|外部指令)。
    if (asuser) {
        res = CreateProcessAsUserW(token_user, NULL, cmdw, &security, &security, security.bInheritHandle, dwCreateFlags, envw, cwdw, &startup, &process);
        CloseHandle(token_user);
    } else {
        res = CreateProcessW(NULL, cmdw, &security, &security, security.bInheritHandle, dwCreateFlags, envw, cwdw, &startup, &process);
    }
在 Windows 平台上,创建进程有
WinExec,system,_spawn/_wspawn,CreateProcess,ShellExecute等多种途径,但上述函数基本上还是由CreateProcess Family封装的。在 Windows 使用C/C++创建进程应当优先使用CreateProcess,CreateProcess有三个变体,主要是为了支持以其他权限启动进程,CreateProcess及其变体如下:
| Function | Feature | Details |
|---|---|---|
| CreateProcessW/A | 创建常规进程,权限继承父进程权限 | |
| CreateProcessAsUserW/A | 使用主 Token 创建进程,子进程权限与 Token 限定一致 | 必须开启 SE_INCREASE_QUOTA_NAME |
| CreateProcessWithTokenW | 使用主 Token 创建进程,子进程权限与 Token 限定一致 | 必须开启 SE_IMPERSONATE_NAME |
| CreateProcessWithLogonW/A | 使用指定用户凭据启动进程 |
PS:有关Windows系统API的调用情况,一般编程语言启动某个可执行程序的进程,都会调用CreateProcessW系统API,而不使用CreateProcessAsUserW系统API。同时在cmd终端进程下,启动外部指令程序所调用的系统API一般为CreateProcessInternalW。
接着将进程运行的结果信息以流的形式返回,最终完成PHP命令执行函数的整个调用过程。
if (read) {
fno = _open_osfhandle((tsrm_intptr_t)in, _O_RDONLY | mode);
CloseHandle(out);
} else {
fno = _open_osfhandle((tsrm_intptr_t)out, _O_WRONLY | mode);
CloseHandle(in);
}
stream = _fdopen(fno, type);
proc->prochnd = process.hProcess;
proc->stream = stream;
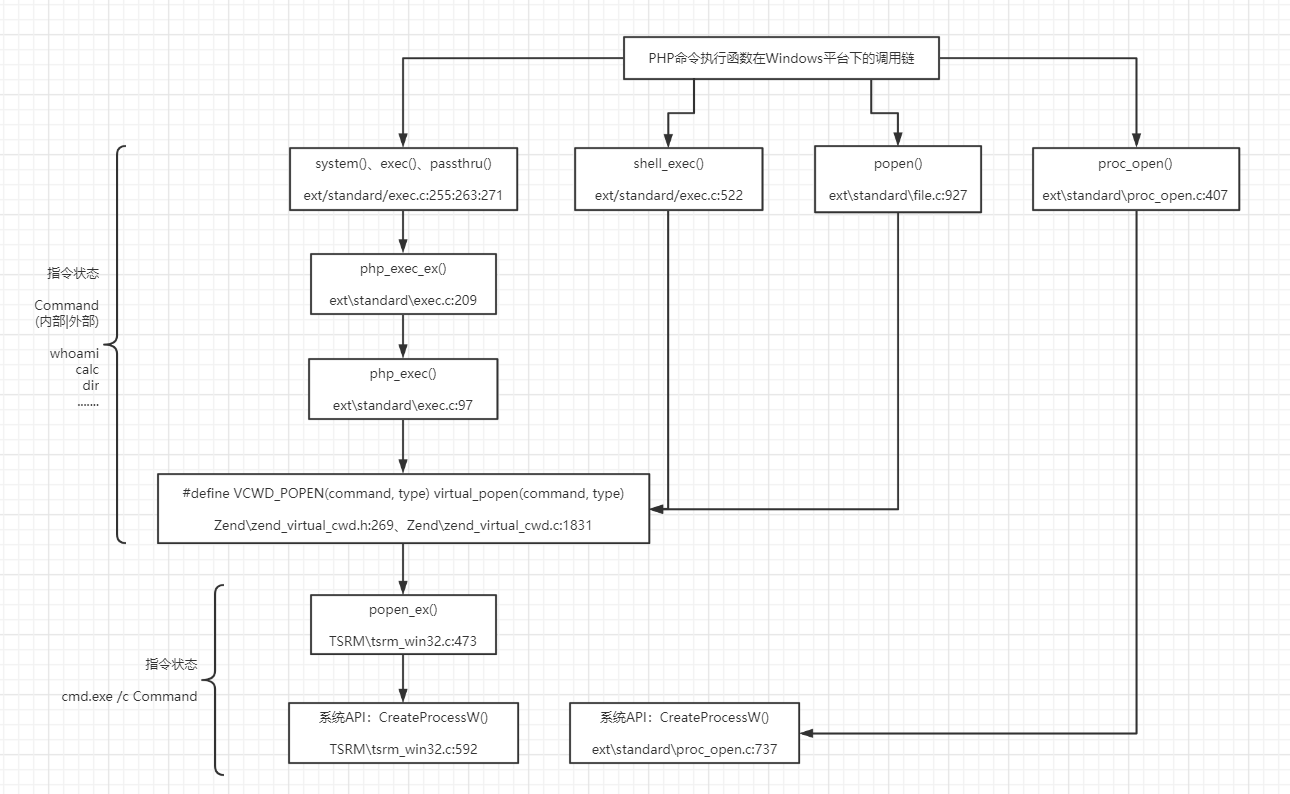
return stream;同理,按照上述整个审计思路,可整理出PHP常见命令执行函数在Windows平台下的底层调用链
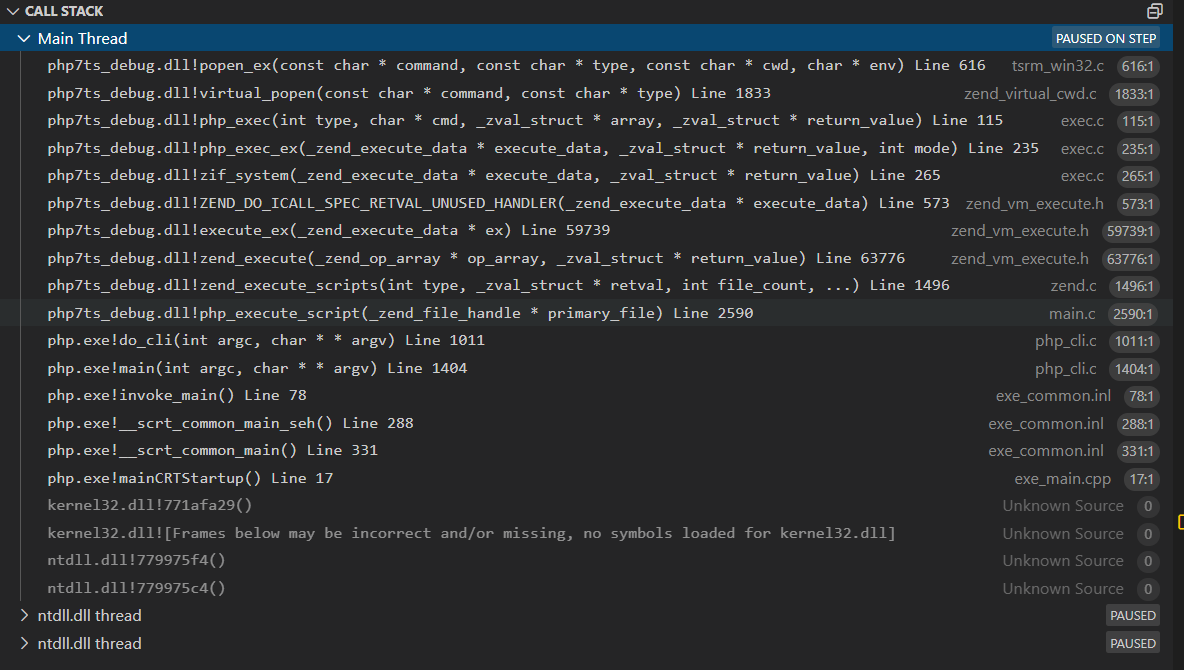
动态审计
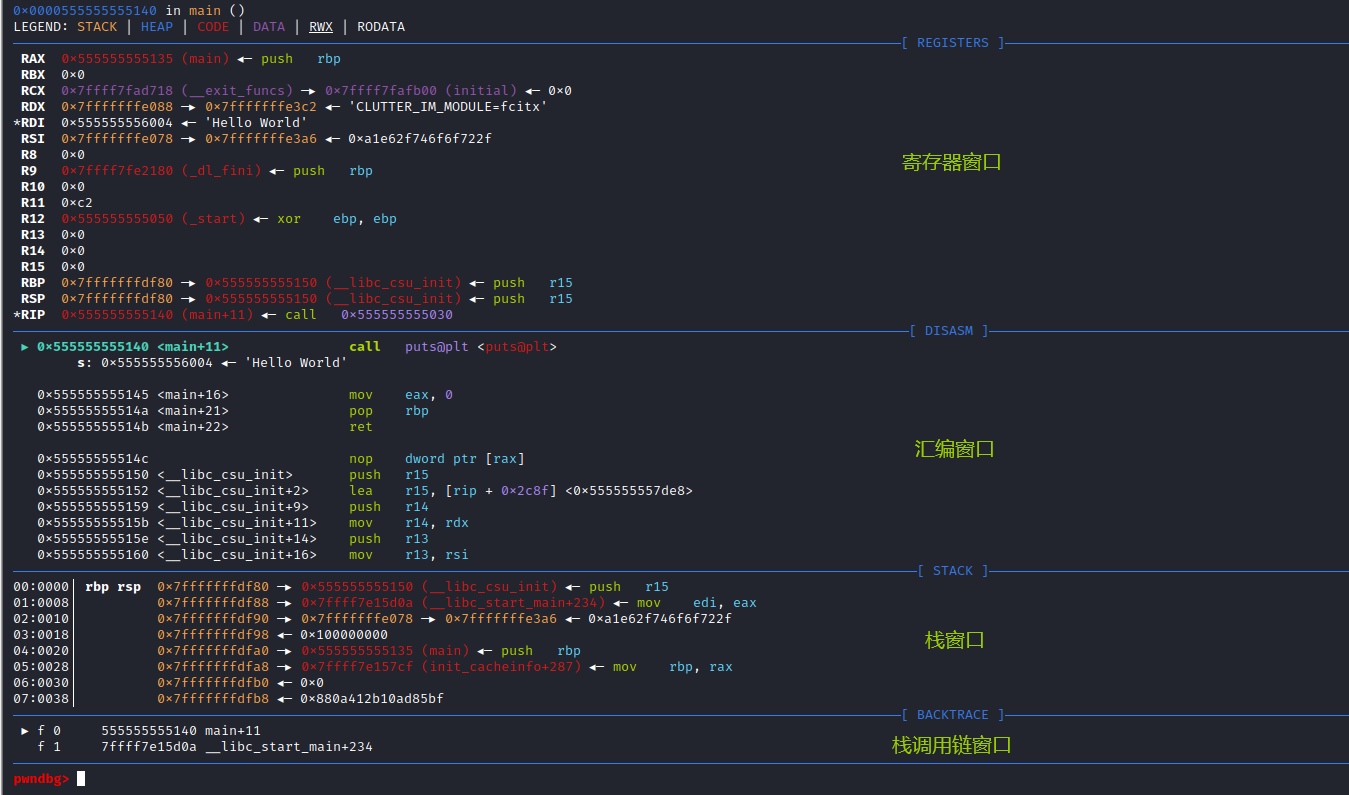
有了上面静态审计部分的分析,后续进行动态调试会很方便。这里同样以system()函数执行whoami指令为例来进行动态调试,其它函数调试原理类似。
// test.php

<?php
system("whoami");
?>在ext/standard/exec.c:265中对system()函数实现入口处下断点,F5启动调试,运行至断点处
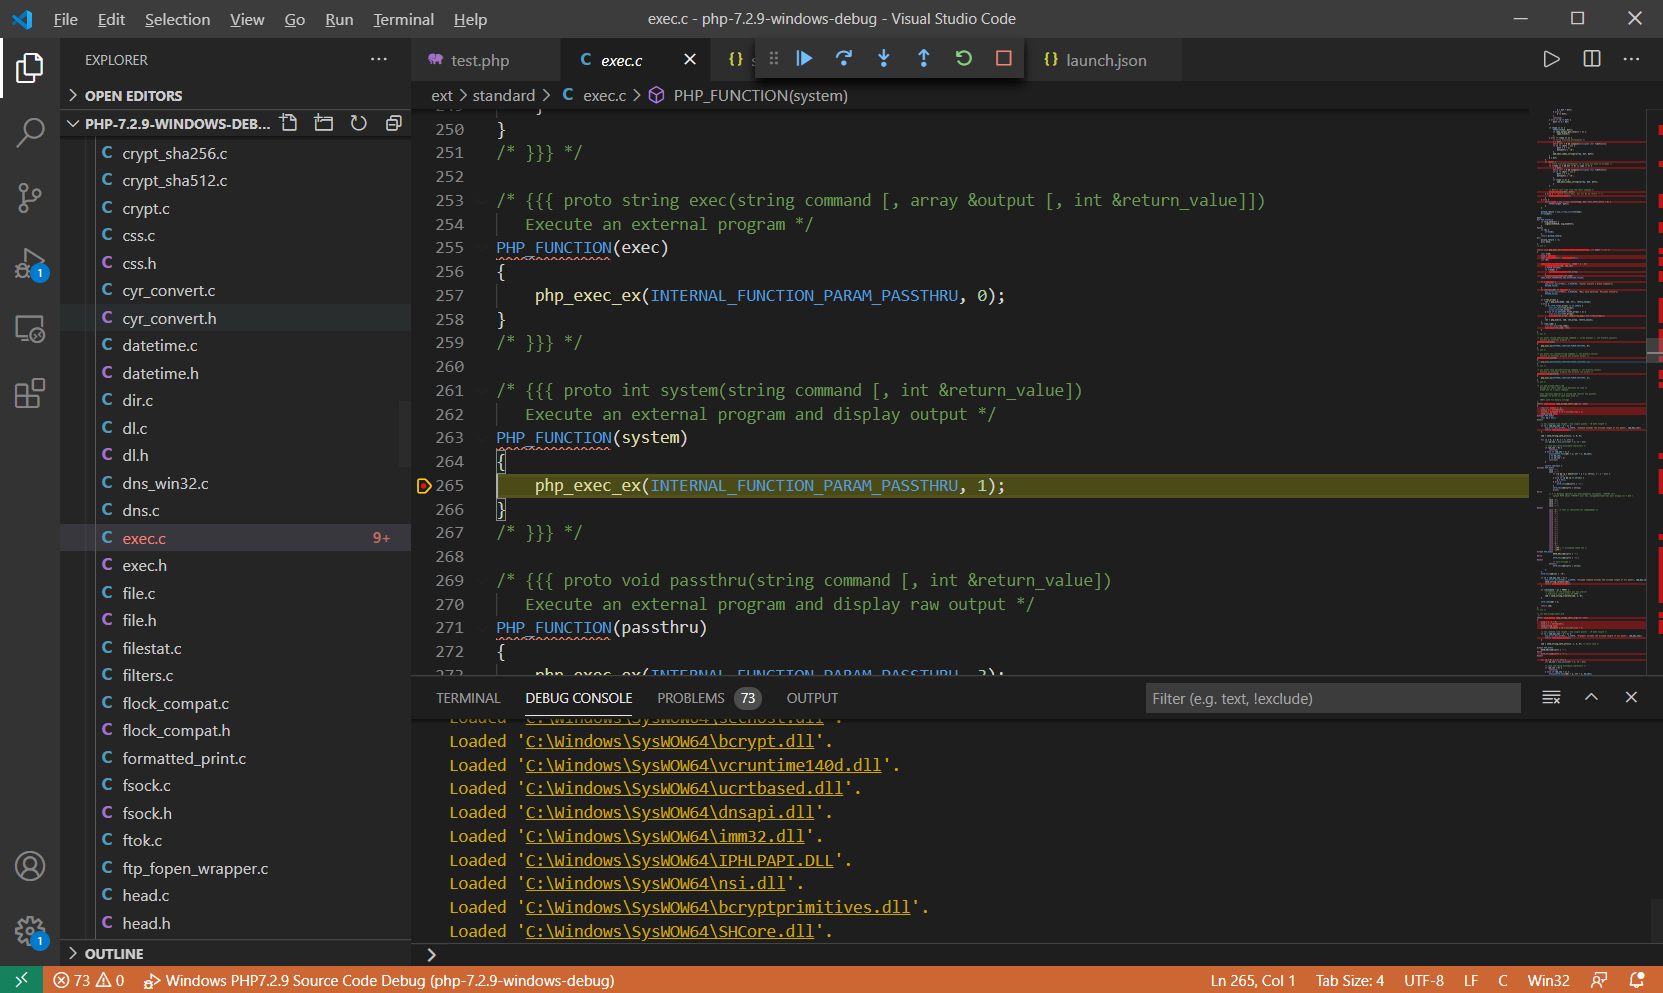
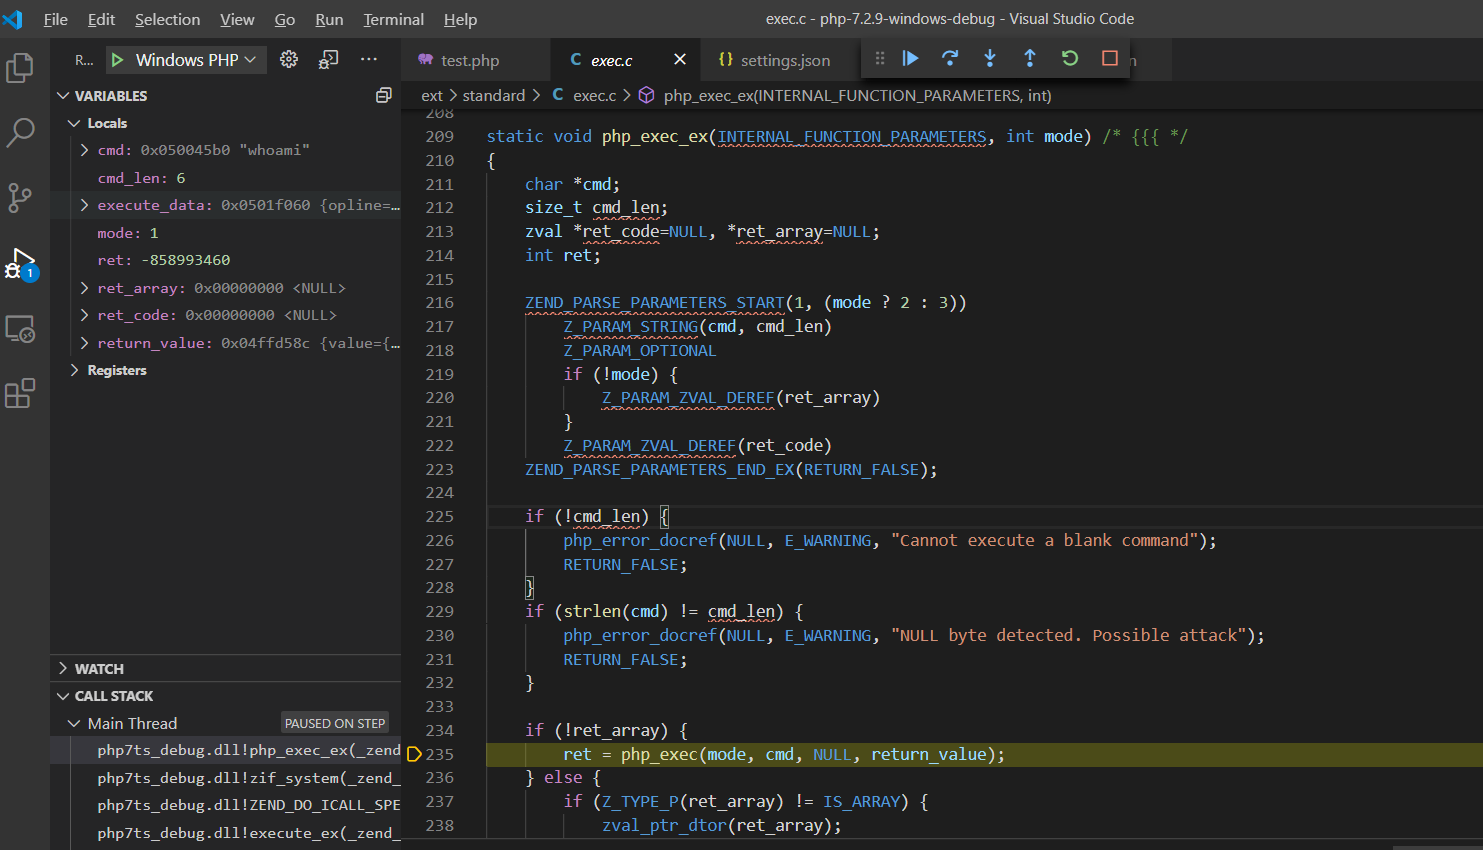
F11步入函数php_exec_ex(INTERNAL_FUNCTION_PARAM_PASSTHRU, 1)内部:ext\standard\exec.c:209
php_exec_ex()对cmd参数初始化处理后调用php_exec(mode, cmd, NULL, return_value)函数
F11步入php_exec()函数:ext\standard\exec.c:97,php_exec()函数会传入cmd指令调用VCWD_POPEN()函数
F11步入VCWD_POPEN()函数实现:
#define VCWD_POPEN(command, type) virtual_popen(command, type)

Zend\zend_virtual_cwd.h:269由于VCWD_POPEN函数为virtual_popen实现,直接进入virtual_popen()函数实现:Zend\zend_virtual_cwd.c:1831
virtual_popen()函数将cmd指令、当前工作空间等参数传给popen_ex(command, type, CWDG(cwd).cwd, NULL)函数执行返回。
F11步入popen_ex()函数实现:TSRM\tsrm_win32.c:473
跟进popen_ex()函数,对cmd进行动态分配空间及赋值
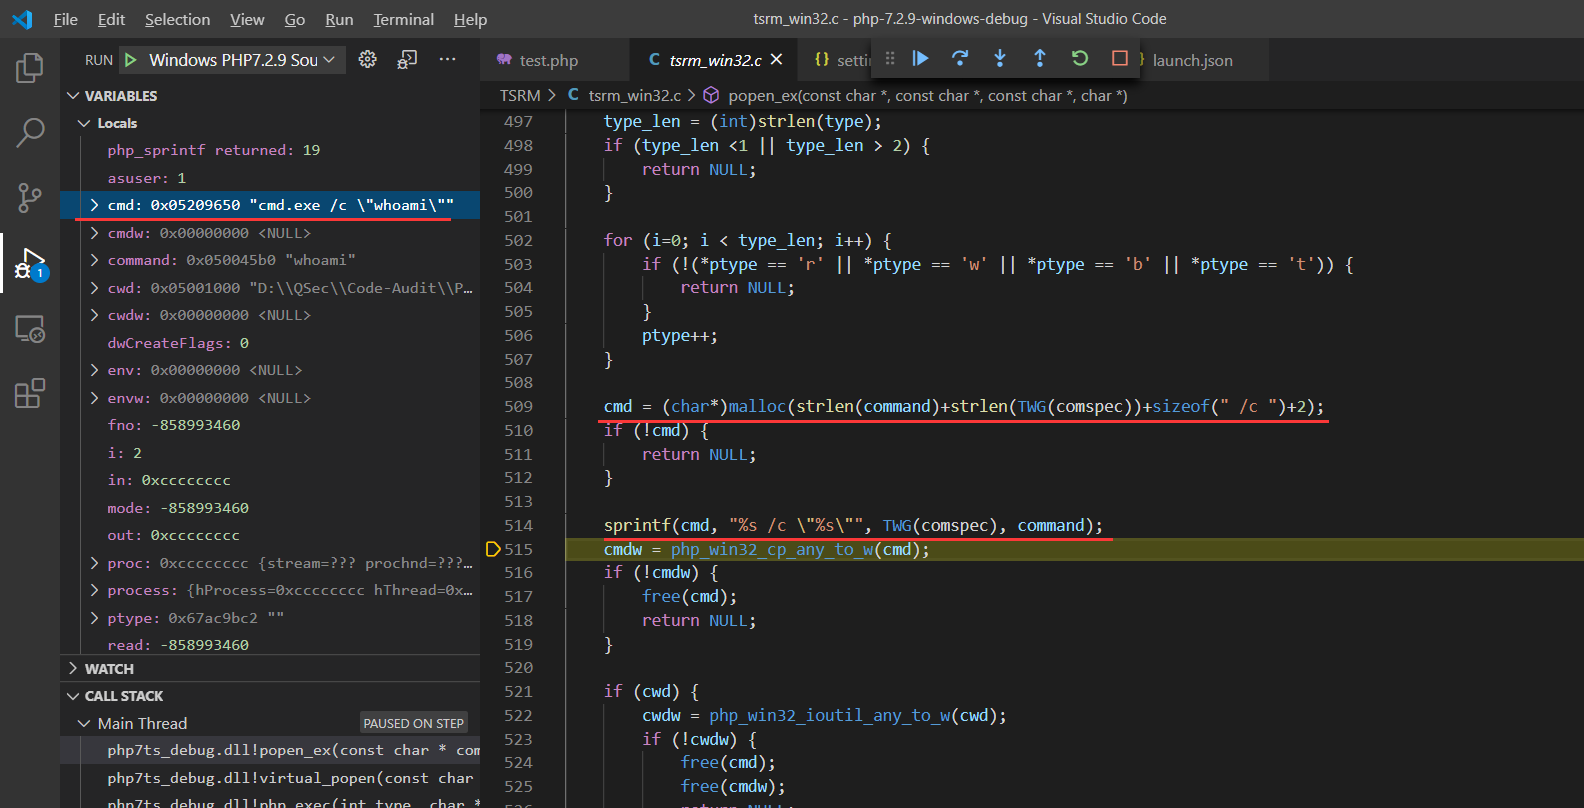
从cmd赋值的结果上来看,命令执行函数执行命令由底层调用cmd.exe来执行相应系统指令(内部|外部)。
后续调用CreateProcessW()系统API来启动cmd.exe进程,执行相应的指令即可。
查看函数之间的调用栈
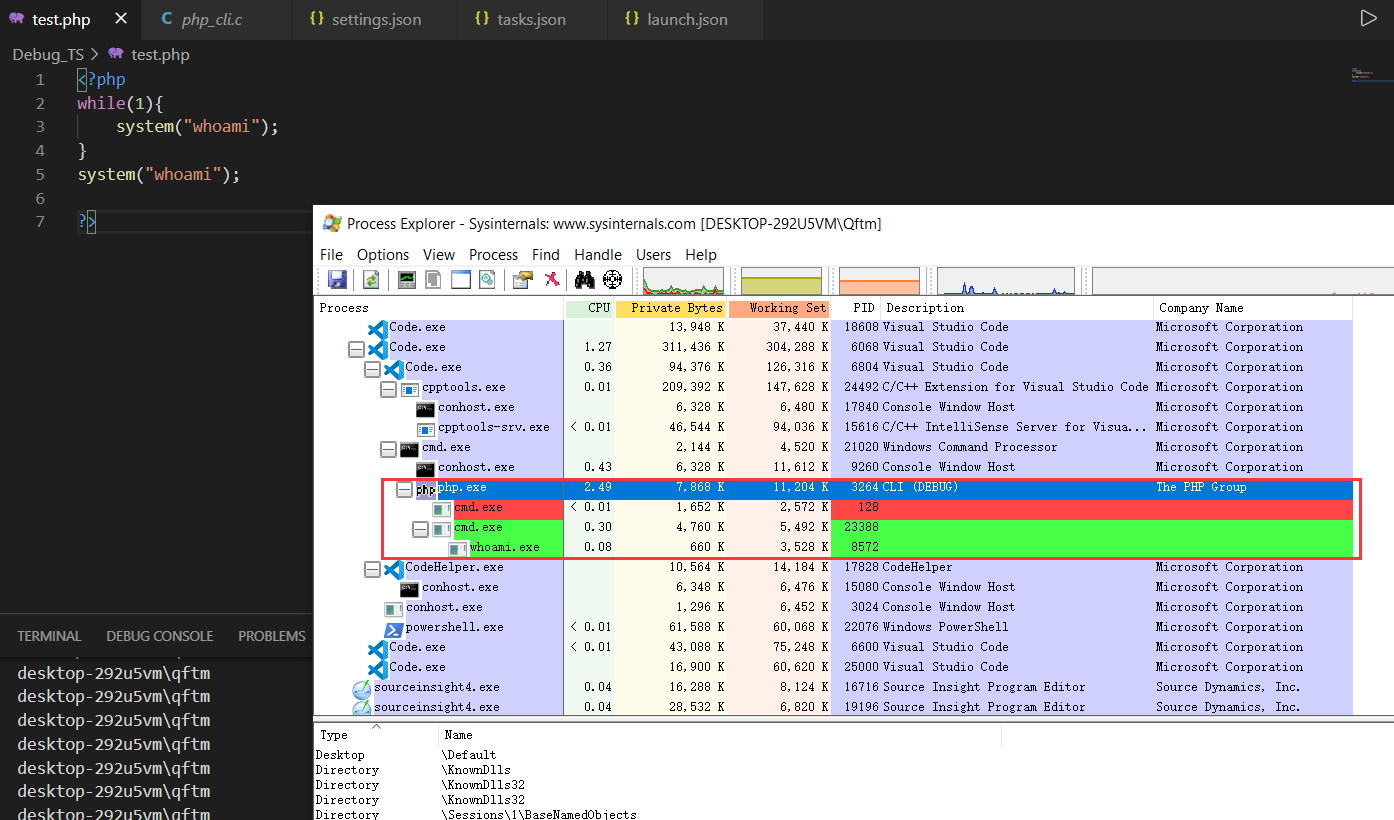
如果单纯的是想知道某个命令执行函数是否调用cmd.exe终端去执行系统指令的话,可以在php脚本里面写一个循环,然后观察进程创建情况即可:简单、粗暴。
PHP for Linux
针对Linux平台下:PHP命令执行函数的底层分析。
环境准备
环境部署情况:
Linux (kali-linux-2020.4-amd64)
Visual Studio Code (code-stable-x64-1605051992)
PHP Source Code (PHP 7.2.9)
Make (GNU Make 4.3 Built for x86_64-pc-linux-gnu)
GDB (GNU gdb (Debian 10.1-1+b1) 10.1)
Source Insight (Windows Source Insight 4.0)
Visual Studio Code
Visual Studio Code 常用于不同语言的项目开发、源代码编辑调试等工作。
- 官网:介绍、下载
https://code.visualstudio.com/下载deb免安装版本类别,之后解压并配置环境变量
# 下载解压
tar -zxvf code-stable-x64-1605051992.tar.gz

# 配置环境变量
vim ~/.bashrc
export PATH="/mnt/hgfs/QSec/Pentest/Red-Team/神兵利器/Windows/VSCode/VSCode-linux-x64:$PATH"

# 启动文件重命名
cd VSCode-linux-x64
mv code vscode
测试使用
- 添加相应扩展:c/c++扩展、代码辅助运行扩展
C/C++
Code Runner
PHP Source Code
- PHP官方各个版本源代码下载
https://www.php.net/releases/
or
https://github.com/php/php-src/releases这里下载的版本为:PHP 7.2.9
Make
代码变成可执行文件,叫做编译(compile),同C编译型语言,由c代码编译生成可执行文件(PE、ELF);先编译这个,还是先编译那个(即编译的安排),叫做构建(build)。
Make是最常用的构建工具,诞生于1977年,主要用于C语言的项目。但是实际上 ,任何只要某个文件有变化,就要重新构建的项目,都可以用Make构建。
有关Make资料可参考:《Makefile文件教程》、《GNU Make手册》、《Make 命令教程》
┌──(root💀toor)-[~/桌面]
└─# make -v
GNU Make 4.3
为 x86_64-pc-linux-gnu 编译
Copyright (C) 1988-2020 Free Software Foundation, Inc.
许可证:GPLv3+:GNU 通用公共许可证第 3 版或更新版本<http://gnu.org/licenses/gpl.html>。
本软件是自由软件:您可以自由修改和重新发布它。
在法律允许的范围内没有其他保证。

┌──(root💀toor)-[~/桌面]
└─#
GDB
基础介绍
GDB是一个由GNU开源组织发布的、UNIX/LINUX操作系统下的、基于命令行的、功能强大的程序调试工具。 它使您可以查看一个程序正在执行时的状态或该程序崩溃时正在执行的操作。
官方:介绍、Wiki
支持语言:
Ada
Assembly
C
C++
D
Fortran
Go
Objective-C
OpenCL
Modula-2
Pascal
Rust
查看GDB调试窗口布局
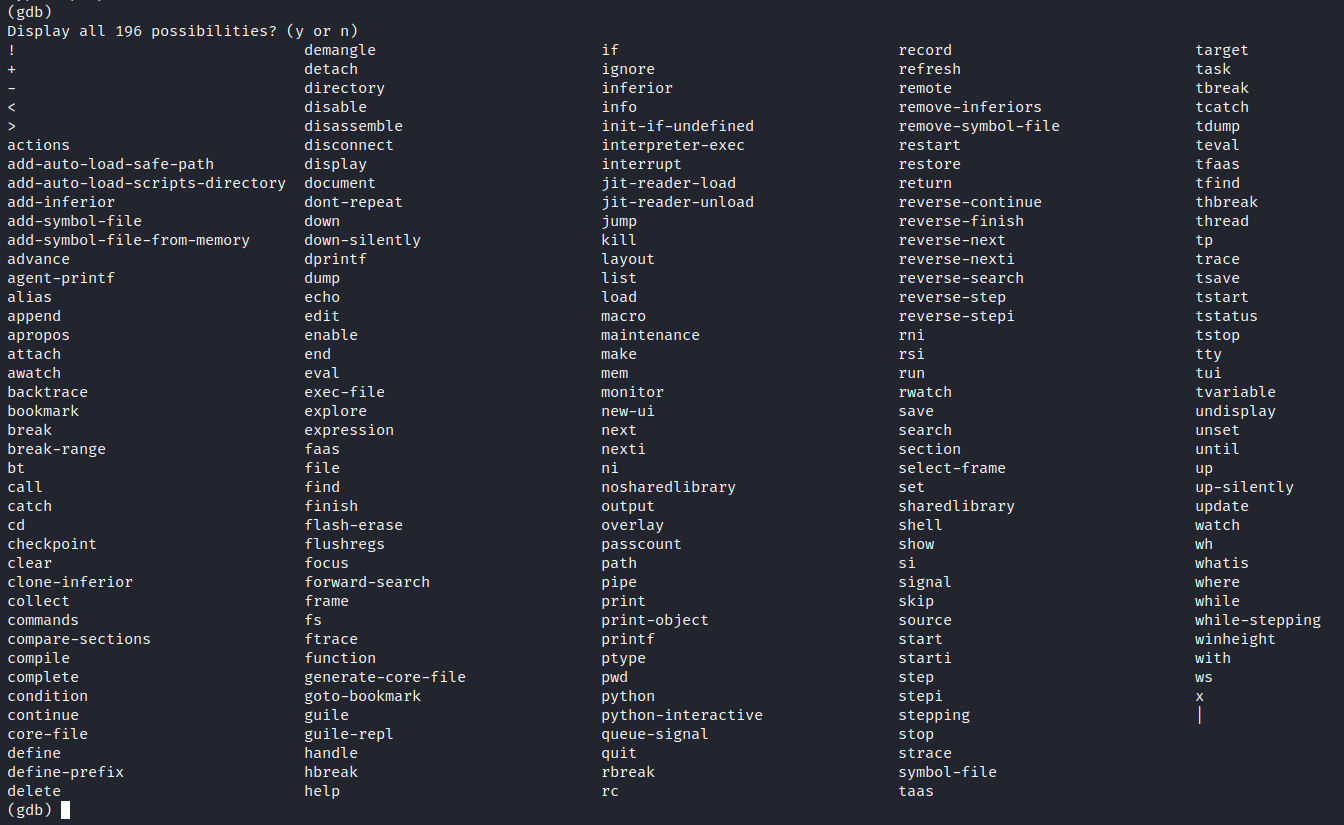
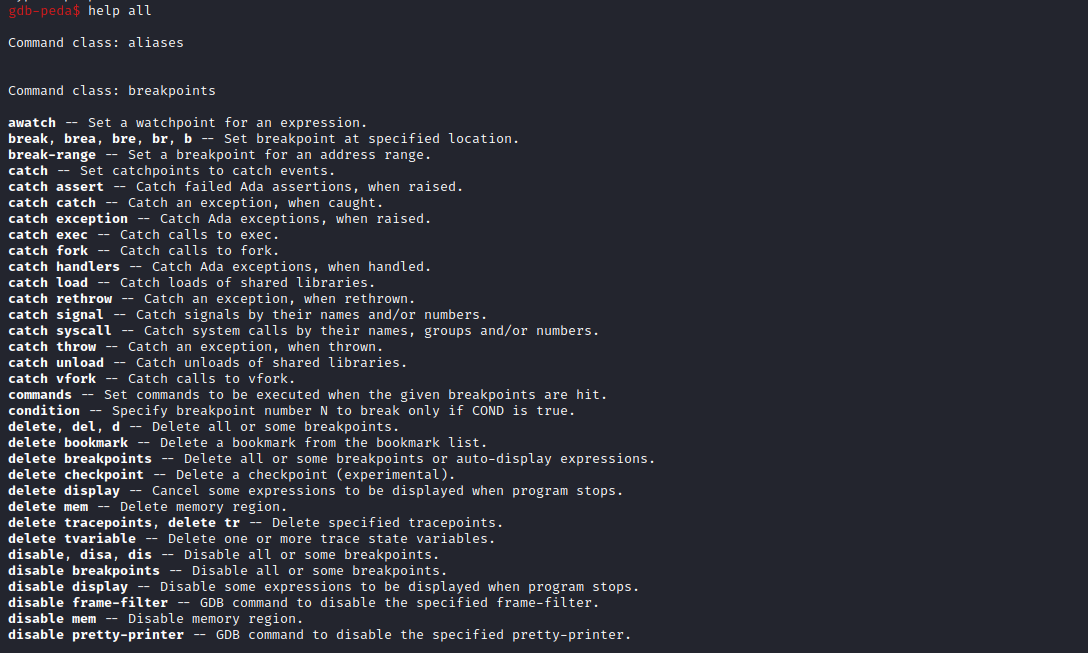
命令列表
- Tab键两次补全显示所有指令
- help all 显示所有指令(带注解)
命令详解
通过GDB帮助手册总结以下常用调试指令:
《调试程序》
- gdb binary_file_path:使用gdb载入binary_file_path指定的程序进行调试。
- gdb –pid PID:使用gdb attach到指定pid的进程进行调试。
- gdb $ file binary_file_path:在gdb中载入binary_file_path指定的程序进行调试。
《帮助指令》
- help command:查看gdb下command指令的帮助信息。
《运行指令》
- start:运行被调试的程序,断在程序入口-main函数,可带参数。
- run(简写 r): 运行被调试的程序。 如果此前没有下过断点,则执行完整个程序;如果有断点,则程序暂停在第一个可用断点处,等待用户输入下一步命令。
- continue(简写 c) : 继续执行,到下一个断点停止(或运行结束)
- next(简写 n) : C语言级的断点定位。相当于其它调试器中的“Step Over (单步跟踪)”。单步跟踪程序,当遇到函数调用时,也不进入此函数体;此命令同 step 的主要区别是,step 遇到用户自定义的函数,将步进到函数中去运行,而 next 则直接调用函数,不会进入到函数体内。
- step (简写 s):C语言级的断点定位。相当于其它调试器中的“Step Into (单步跟踪进入)”。单步调试如果有函数调用,则进入函数;与命令n不同,n是不进入调用的函数体。【前提: s会进入C函数内部,但是不会进入没有定位信息的函数(比如没有加-g编译的代码,因为其没有C代码的行数标记,没办法定位)。(比如:调试编译PHP内核源码,然后调试php代码底层实现,跟踪到了libc函数后,由于libc没有标记信息,导致s或n之后直接打印输出完成程序的调试)】
- nexti(简写 ni):Next one instruction exactly。汇编级别的断点定位。作用和next指令相同,只是单步跟踪汇编代码,碰到call调用,不会进入汇编函数体。
- stepi(简写 si):Step one instruction exactly。汇编级别的断点定位。作用和step指令相同,只是单步跟踪汇编代码,碰到call调用,会进入汇编函数体。【前提:当要进入没有调试信息的库函数调试的时候,用si是唯一的方法。当进入有调试信息的函数,用si和s都可以进入函数体,但是他们不同,si是定位到汇编级别的第一个语句,但是s是进入到C级别的第一个语句。】
- until(简写 u):跳出当前循环。当你厌倦了在一个循环体内单步跟踪时,这个命令可以运行程序直到退出循环体。
- until n(简写 u n):运行至第n行,不仅仅用来跳出循环。
- finish:跳出当前函数。运行程序,直到当前函数完成返回,并打印函数返回时的堆栈地址和返回值及参数值等信息。
- return:跳出当前函数。忽略之后的语句,强制函数返回。
- call function(arg):调用程序中可见的函数,并传递“参数”,如:call gdb_test(55)。
- quit(简写 q):退出GDB调试环境。
《断点指令》
break, brea, bre, br, b:设置断点。break设置断点对象包括:行号、函数、地址等。
break n(简写 b n):在第n行处设置断点(可以带上代码路径和代码名称:b OAGUPDATE.cpp:578)
break function(简写 b function):在函数function()的入口处设置断点,如:break cb_button。
break *function(简写 b *function):将断点设置在“由编译器生成的prolog代码处”。
break *address(简写 b *address):在指定地址下断点(地址必须是可执行代码段)
catch event:设置捕捉点。捕捉点用来补捉程序运行时的一些事件。如:载入共享库(动态链接库)、C++的异常、新的进程、系统调用等。
catch fork、vfork、exec:捕捉新创建的进程事件,对新进程继续调试。
catch syscall <names|SyscallNumbers>:捕捉系统调用事件。(比如:创建新的进程事件,在libc中由execve()函数调用内核入口{系统调用号对应的系统内核调用函数}进行创建)(catch syscall execve)(捕捉execve()系统调用事件)(catch syscall 59)
info breakpoints(简写 info b、i b) :查看当前程序设置的断点列表信息。
disable:对已设置的特定断点使其失效(可使用info b指令查看Enb列情况)。
- disable index:使第index个断点失效。
- disable breakpoints:使所有断点失效。
enable:对已设置失效的特定断点使其生效(默认调试设置的断点是生效的)(可使用info b指令查看Enb列情况)。
enable index:使第index个断点生效。
enable breakpoints:使所有断点生效。
watchpoint:设置观察点。
watch expression:当表达式被写入,并且值被改变时中断。
rwatch expression:当表达式被读时中断。
awatch expression:当表达式被读或写时中断。
delete:删除breakpoints、display等设置的信息。
delete index(简写 d index):删除指定断点(index可使用info b查看)。
delete breakpoints(简写 d breakpoints):删除所有断点,包括 断点、捕捉点、观察点。
《文件指令》
list、l:源代码显示。
- list(简写l):列出当前程序执行处的源代码,默认每次显示10行。
list line(简写l line):将显示当前文件以“行号 line”为中心的前后10行代码,如:list 12。
- list function(简写l function):将显示当前文件“函数名”所在函数的源代码,如:list main。
list file_path:line_number:将显示指定file_path的文件,以line_number行为中心的前后10行源代码。
- list(简写l):不带参数,将接着上一次 list 命令的,输出下边的内容。
disassemble:汇编代码显示。列出当前程序执行处的汇编代码。
cd:切换工作目录。
file binary_file_path:在gdb中载入binary_file_path指定的程序进行调试。
pwd:查看工作目录。
edit:编辑当前程序所运行到的文件或源码。
dump filename addr1 addr2:dump指定内存到文件中,dump命令之后还会跟一些其他指令用于特定的操作,具体可到GDB中查看。
《数据指令》
print、inspect、p:打印表达式的值。
- print expression(简写 p expression):其中“表达式”可以是任何当前正在被测试程序的有效表达式,比如当前正在调试C语言的程序,那么“表达式”可以是任何C语言的有效表达式,包括数字,变量甚至是函数调用。
print a(简写 p a):将显示整数 a 的值。
- print ++a(简写 p ++a):将把 a 中的值加1,并显示出来。
print name(简写 p name):将显示字符串 name 的值。
- print gdb_test(22)(简写 p gdb_test(22)):将以整数22作为参数调用 gdb_test() 函数。
print gdb_test(a)(简写 p gdb_test(a)):将以变量 a 作为参数调用 gdb_test() 函数。
- print *argv@70(简写 p *argv@70):打印指针argv的值以数组形式显示。
display:随程序的单步调试,在上下文中打印表达式的值。
display expression:在单步运行时将非常有用,使用display命令设置一个表达式后,它将在每次单步进行指令后,紧接着输出被设置的表达式及值。如:display a。(在当前设置的文件或程序上下文中,相当于实时跟踪被设置的表达式的变化情况,每单步执行调试一次程序,都会执行显示一次display设置的表达式的结果)。
info display(简写 i display):查看display设置要查询的表达式列表信息。
delete display n(简写 d diplay n):删除display设置要查询的第n个表达式。
delete display(简写 d display): 删除所有display设置要查询的表达式。
x/nf address|寄存器($esi $rsi等):打印指定地址开始n个单元的的内存数据,f可表示单元大小(x为默认大小,b为一个字节,h为双字节,wx为四字节,gx为八字节,i表示查看指令(汇编),c表示查看字符,s表示查看字符串)
- x/x 0x7fffffffdfc8:显示地址0x7fffffffdfc8(指针)指向的地址。
- x/x $rsi:显示寄存器$rsi指向的地址。
- x/74s 0x7fffffffe307:以字符串形式打印地址0x7fffffffe307所存储的74个数据(数组长度74)。
- x/10i 0x7fffffffe307:打印地址0x7fffffffe307处的10条汇编指令。
find expr:在当前进程内存搜索expr的值,可以是整数或是字符串(在peda下使用,对应pwndbg的命令是search)。
set {type} $reg/mem=expr:设置对应寄存器或内存指向的值为expr,type可为int、long long等。
set $reg=expr:设置对应寄存器的值为expr。
《状态指令》
- info program(简写 i program):查看程序是否在运行,进程号,被暂停的原因等。
- backtrace, where, bt, info stack, i stack, i s:显示当前上下文堆栈调用情况(常用于回溯跟踪,pwndbg可直接在工作窗口显示)
- thread apply all bt:查看所用线程堆栈调用信息。
- info locals(简写 i locals):显示当前堆栈页的所有变量。
- info functions sefunction:查询函数sefunction的信息(函数定义实现的位置信息:文件、行号、代码)。
- stack n: 显示n个单元的栈信息。
《扩展指令》
- peda/pwndbg:查看可用命令(使用对应插件时使用)
插件辅助
GDB调试常用插件:peda、pwndbg、gef,每次启动GDB只能加载一个插件,针对多个插件的处理可以写一个启动选择脚本或者在gdb的配置文件中手动生效某个插件(看个人习惯)。
peda
- 安装
git clone https://github.com/longld/peda.git ~/peda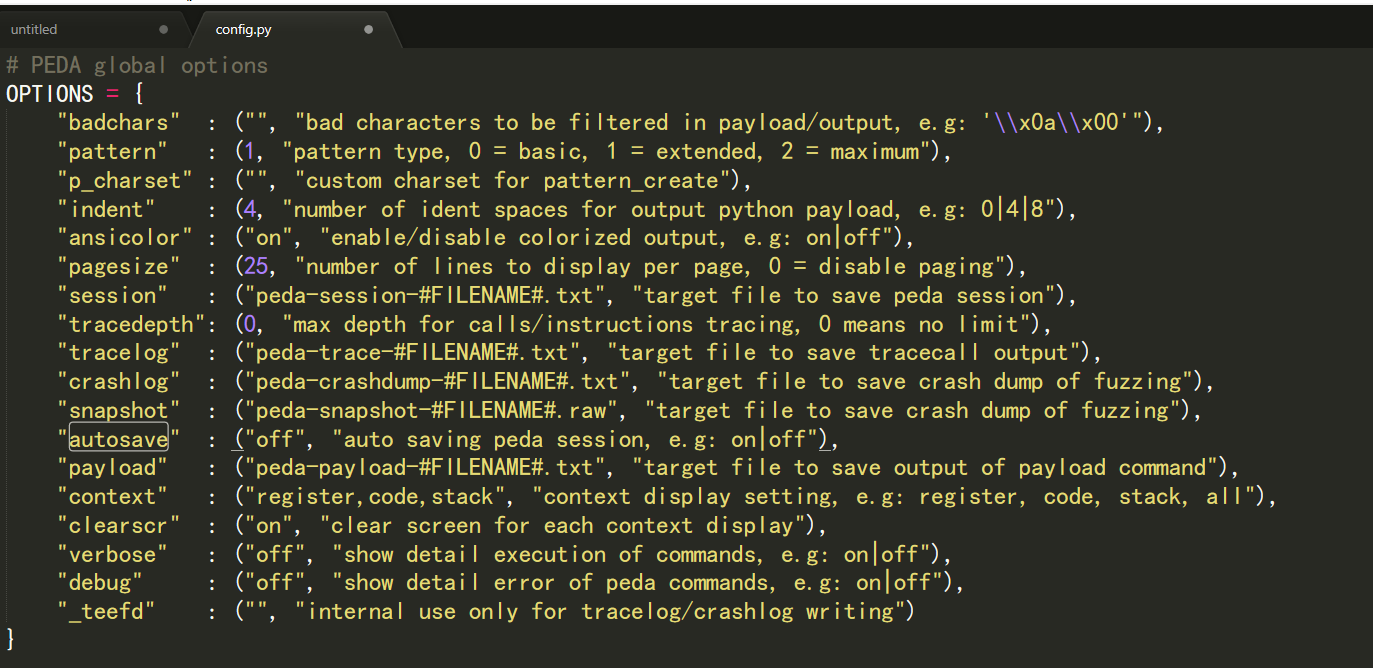
echo "source ~/peda/peda.py" >> ~/.gdbinit- 关闭peda插件因每次启动使用而自动生成session文件
在peda目录下,cd lib进入lib目录,在config.py里找到autosave选项,然后找到on这个词,改成off,即可关闭。
pwndbg
- 安装
git clone https://github.com/pwndbg/pwndbg
cd pwndbg
./setup.sh
gef
- 安装
$ wget -O ~/gdbinit-gef.py --no-check-certificate http://gef.blah.cat/py
$ echo source ~/gdbinit-gef.py >> ~/.gdbinit
Glibc
1、基础介绍
GNU C库项目提供了GNU系统和GNU/Linux系统以及使用Linux作为内核的许多其他系统的核心库。这些库提供了关键的API,包括ISO C11,POSIX.1-2008,BSD,特定于操作系统的API等。
官方:介绍、Wiki
2、系统查看
- 查看系统信息:GNU/Linux
 → Qftm :/# uname -a
Linux toor 5.9.0-kali1-amd64 #1 SMP Debian 5.9.1-1kali2 (2020-10-29) x86_64 GNU/Linux
→ Qftm :/#- Debian下查看共享链接库
查看共享链接库版本信息
 → Qftm :~/Desktop# dpkg -l libc6
Desired=Unknown/Install/Remove/Purge/Hold
| Status=Not/Inst/Conf-files/Unpacked/halF-conf/Half-inst/trig-aWait/Trig-pend
|/ Err?=(none)/Reinst-required (Status,Err: uppercase=bad)
||/ Name           Version      Architecture Description
+++-==============-============-============-=================================
ii  libc6:amd64    2.31-5       amd64        GNU C Library: Shared libraries
 → Qftm :~/Desktop#
编写简单的C程序来查看系统的动态链接库位置
#include<stdio.h>
int main(){
    printf("Hello World!\n");
    return 0;
}
编译运行
 → Qftm ← :~/桌面# gcc te.c -o te
 → Qftm ← :~/桌面# ./te
Hello World!
 → Qftm ← :~/桌面#
查看系统的动态链接库位置
 → Qftm ← :~/桌面# ldd te
    linux-vdso.so.1 (0x00007ffee03a7000)
    libc.so.6 => /lib/x86_64-linux-gnu/libc.so.6 (0x00007fc1bf9b2000)
    /lib64/ld-linux-x86-64.so.2 (0x00007fc1bfb8d000)
 → Qftm ← :~/桌面#
3、在线源码
woboq提供的项目,可以在线查看glibc源代码
https://code.woboq.org/userspace/glibc/4、源码下载
各版本glibc源码下载地址
官方镜像仓库:http://ftp.gnu.org/gnu/glibc/

华中科技大学镜像仓库:http://mirror.hust.edu.cn/gnu/glibc/由于测试系统Glibc版本为2.31,所以这里下载glibc-2.31源代码项目,后续底层审计分析需要用到。
Source Insigh
在Windows平台使用Source Insight 4进行PHP内核源码的审计工作,具体参考上述PHP for Windows部分介绍。
源码编译
进入php7.2.9源码项目中,先构建生成configure文件:默认官方下载的源码项目中包含configure,这里为了避免出现不必要的错误,采取强制重新生成configure文件。
~/php-7.2.9-linux-debug# ./buildconf --force生成configure脚本文件后,就可以开始编译了。为了调式PHP源码,这里同PHP for Windows部分,编译disable所有的扩展(除了一些必须包含的),使用下面的命令来完成编译安装的工作,安装的路径为/mnt/hgfs/QSec/Code-Audit/PHP/PHP-Source-Code/php-7.2.9-linux-debug/Debug:
~/php-7.2.9-linux-debug# ./configure --disable-all --enable-debug --prefix=/mnt/hgfs/QSec/Code-Audit/PHP/PHP-Source-Code/php-7.2.9-linux-debug/Debug
............
~/php-7.2.9-linux-debug# make -j4
............
~/php-7.2.9-linux-debug# make install
............注意这里的prefix的参数必须为绝对路径,所以不能写成./Debug这类形式。需要注意一下,这里是以调试模式在编译PHP内核源码,所以需要设置一下prefix参数,不然PHP会被安装到系统默认路径中,影响后续的调试。另外两个编译参数,一个是--disable-all,这个表示禁止安装所有扩展(除了一个必须安装的),另外一个就是--enable-debug,这个选项表示以debug模式编译PHP源码,相当于gcc的-g选项编译c代码,它会把调试信息编译进最终的二进制程序中以方便对程序的调试。
上面的命令make -jN,N表示你的CPU数量(或者是CPU核心的数量),设置了这个参数后就可以使用多个CPU进行并行编译,这可以提高编译效率。
编译完成后,最终用于调式的PHP二进制可执行程序会安装在./Debug这个文件夹中。
查看编译的php.exe
 → Qftm :/mnt/hgfs/QSec/Code-Audit/PHP/PHP-Source-Code/php-7.2.9-linux-debug/Debug/bin# ./php -v
PHP 7.2.9 (cli) (built: Nov 20 2020 01:34:01) ( NTS DEBUG )
Copyright (c) 1997-2018 The PHP Group
Zend Engine v3.2.0, Copyright (c) 1998-2018 Zend Technologies
 → Qftm :/mnt/hgfs/QSec/Code-Audit/PHP/PHP-Source-Code/php-7.2.9-linux-debug/Debug/bin#
源码调试
Visual Studio Code
同PHP for Windows->源码调试创建相应的launch.json调试配置文件,修改配置如下
{
    "version": "0.2.0",
    "configurations": [
        {
            "name": "Linux PHP7.2.9 Source Code Debug",
            "type": "cppdbg",
            "request": "launch",
            "program": "${workspaceRoot}/Debug/bin/php",
            "args": ["${file}"],
            "stopAtEntry": false,
            "cwd": "${workspaceRoot}/Debug/bin",
            "environment": [],
            "externalConsole": false,
            "MIMode": "gdb",
            "miDebuggerPath": "/bin/gdb",
            "setupCommands": [
                {
                    "description": "Enable pretty-printing for gdb",
                    "text": "-enable-pretty-printing",
                    "ignoreFailures": true
                }
            ]
        }
    ]
}
PS:注意这里需要存在扩展 C/C++。
打开php-7.2.9-linux-debug/sapi/cli/php_cli.c源文件,定位到1200行的main函数内打上断点。【在想要调试的源代码特定位置上打上特定的断点即可】
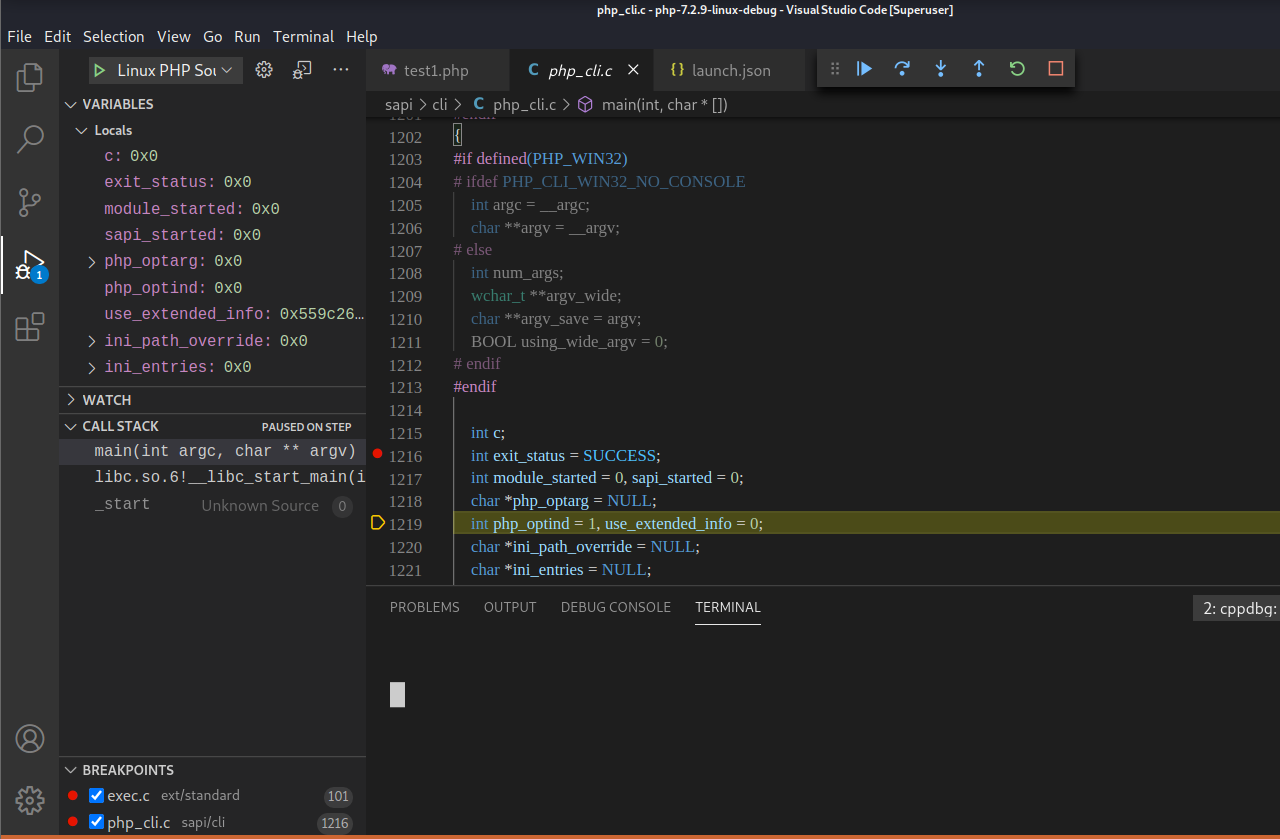
GDB
进入编译好的PHP可执行文件目录下
$ cd Debug/bin加载待调式的PHP文件
# gdb --args ./php -f test1.php

GNU gdb (Debian 10.1-1+b1) 10.1
Copyright (C) 2020 Free Software Foundation, Inc.
License GPLv3+: GNU GPL version 3 or later <http://gnu.org/licenses/gpl.html>
This is free software: you are free to change and redistribute it.
There is NO WARRANTY, to the extent permitted by law.
Type "show copying" and "show warranty" for details.
This GDB was configured as "x86_64-linux-gnu".
Type "show configuration" for configuration details.
For bug reporting instructions, please see:
<https://www.gnu.org/software/gdb/bugs/>.
Find the GDB manual and other documentation resources online at:
    <http://www.gnu.org/software/gdb/documentation/>.

For help, type "help".
Type "apropos word" to search for commands related to "word"...
pwndbg: loaded 188 commands. Type pwndbg [filter] for a list.
pwndbg: created $rebase, $ida gdb functions (can be used with print/break)
Reading symbols from ./php...
pwndbg>
对程序入口函数下断点,并查看断点信息
pwndbg> b main
Breakpoint 1 at 0x46430e: file /mnt/hgfs/QSec/Code-Audit/PHP/PHP-Source-Code/php-7.2.9-linux-debug/sapi/cli/php_cli.c, line 1216.
pwndbg> i b
Num     Type           Disp Enb Address            What
1       breakpoint     keep y   0x000000000046430e in main at /mnt/hgfs/QSec/Code-Audit/PHP/PHP-Source-Code/php-7.2.9-linux-debug/sapi/cli/php_cli.c:1216
pwndbg>
运行至断点处
pwndbg> r单步调式:n、ni、s、si
pwndbg> n源码执行
任务执行
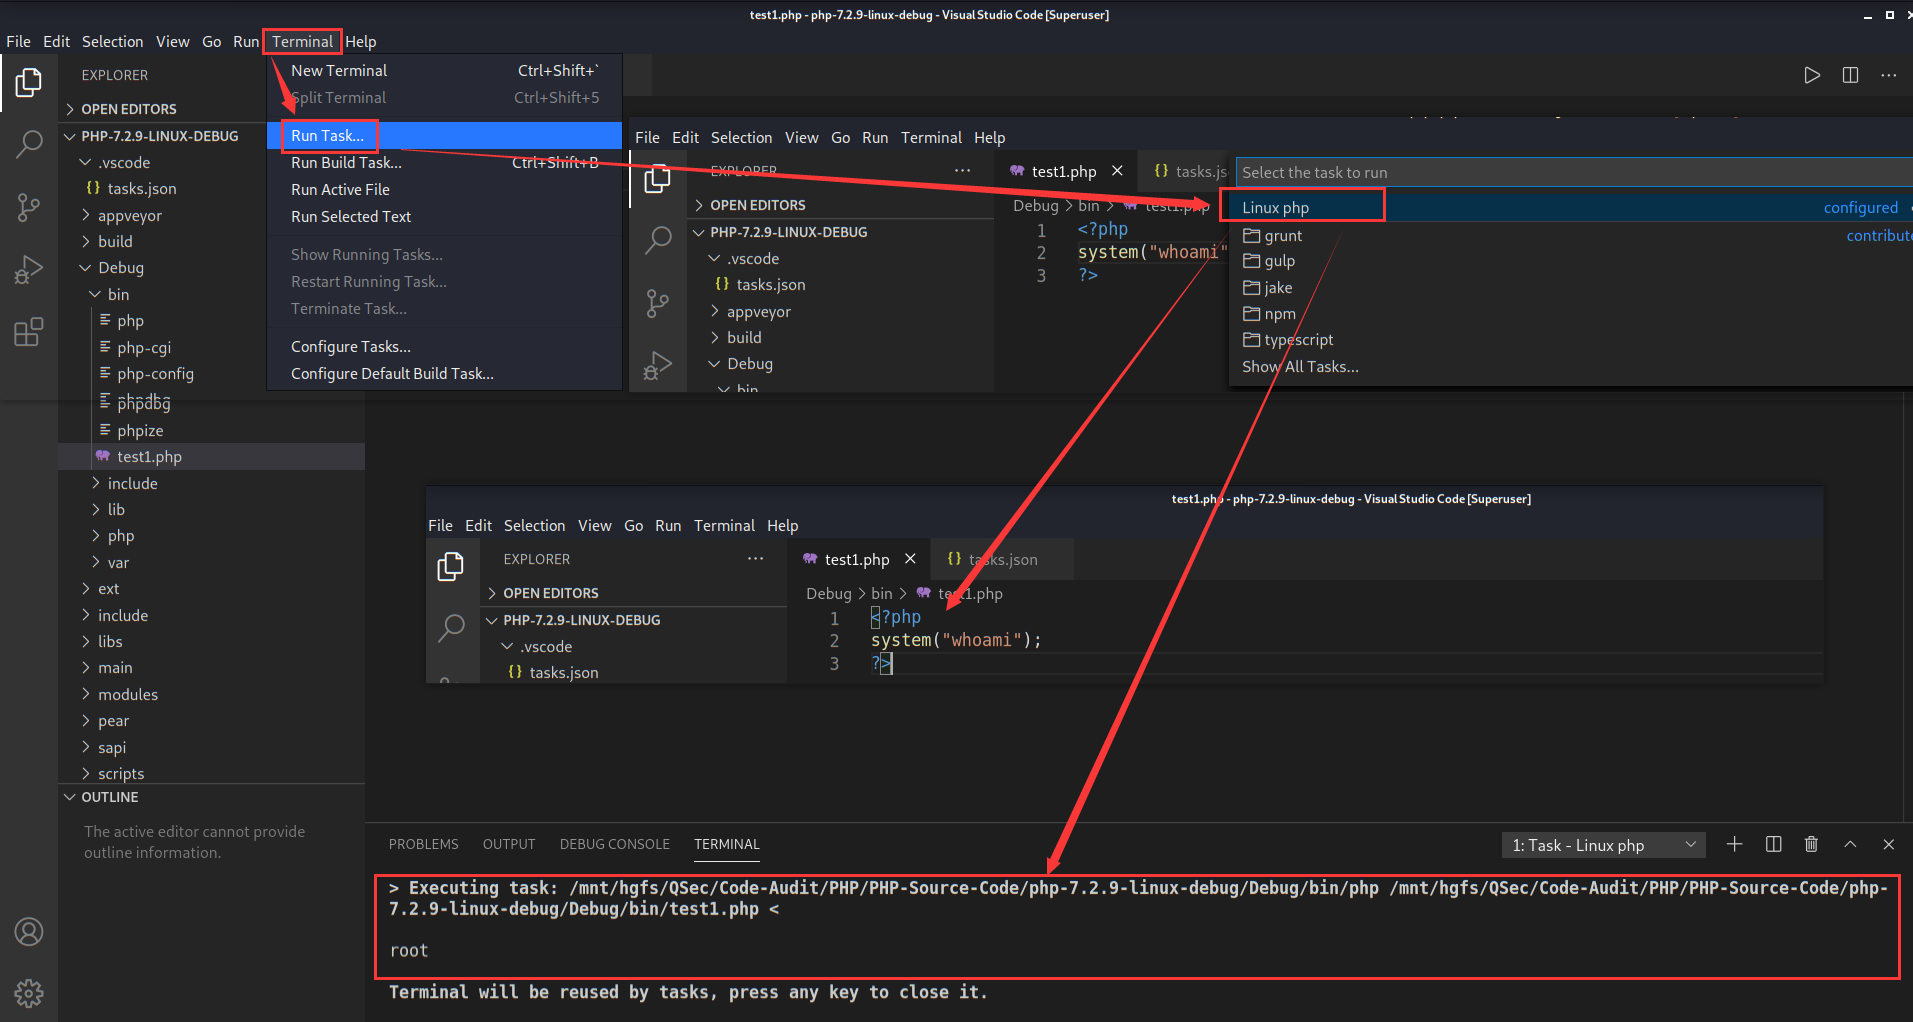
同PHP for Windows->源码执行->任务执行创建相应的tasks.json任务文件,修改配置如下
// tasks.json

{
    "version": "2.0.0",
    "tasks": [
        {
            "label": "Linux php",
            "type": "shell",
            "command": "/mnt/hgfs/QSec/Code-Audit/PHP/PHP-Source-Code/php-7.2.9-linux-debug/Debug/bin/php",
            "args": [
                "${file}"
            ]
        }
    ]
}
任务执行效果
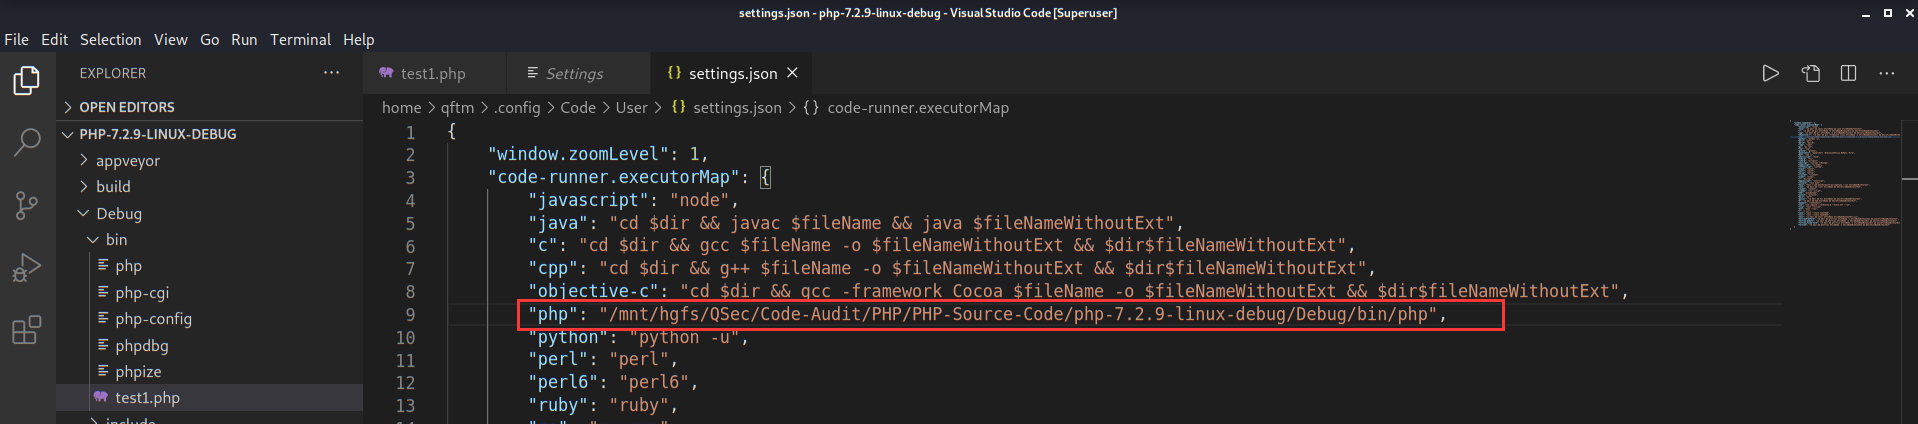
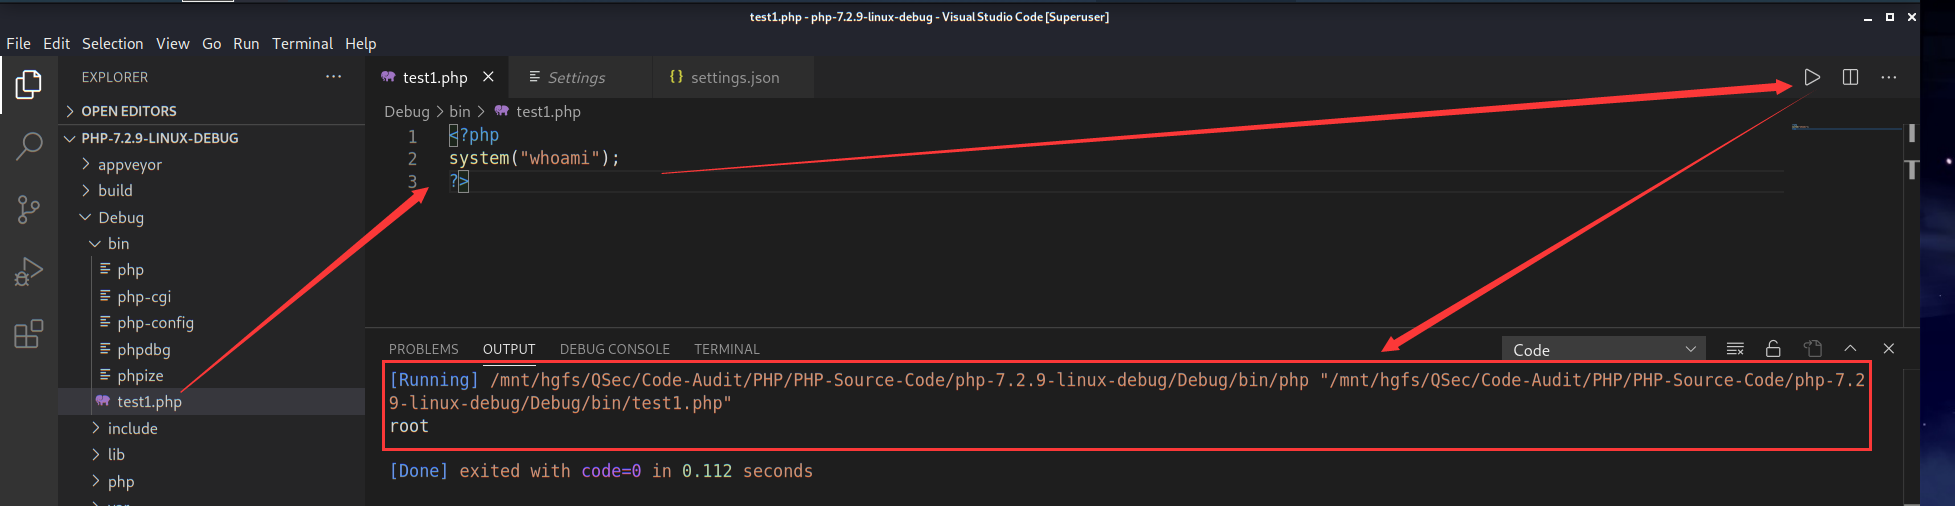
插件执行
除了上方创建任务执行程序外,还可以借助插件code runner更加方便的去执行程序
code runner自带的默认对PHP运行的配置规则如下
"code-runner.executorMap": {
     "php": "php"
}
默认配置使用的是环境变量中的php去执行的,可以更改设置为自己的php路径【避免与环境变量中其它的php发生冲突】
点击settings->Extensions->Run Code configuration->Executor Map->Edit in settings.json进行设置
插件运行效果
命令执行底层分析
同样,针对命令执行函数的底层分析,这里主要采用两种手段去分析:静态审计(静态审计内核源码)、动态审计(动态调试内核源码)。
静态审计
接着PHP for Windows->命令执行底层分析->静态审计部分,里面写到system、exec、passthru、shell_exec这类命令执行函数原理相同,底层都调用了相同函数VCWD_POPEN()去执行系统指令,VCWD_POPEN()函数由virtual_popen()函数实现。
同时,virtual_popen()函数是作为不同平台的分割点,那么针对Linux平台下的PHP命令执行函数底层实现就可以从这里继续分析。
由于VCWD_POPEN函数为virtual_popen实现,直接进入virtual_popen()函数实现:Zend\zend_virtual_cwd.c:1831
#ifdef ZEND_WIN32
CWD_API FILE *virtual_popen(const char *command, const char *type) /* {{{ */
{
	return popen_ex(command, type, CWDG(cwd).cwd, NULL);
}
/* }}} */
#else /* Unix */
CWD_API FILE *virtual_popen(const char *command, const char *type) /* {{{ */
{
	size_t command_length;
	int dir_length, extra = 0;
	char *command_line;
	char *ptr, *dir;
	FILE *retval;

	command_length = strlen(command);

	dir_length = CWDG(cwd).cwd_length;
	dir = CWDG(cwd).cwd;
	while (dir_length > 0) {
		if (*dir == '\'') extra+=3;
		dir++;
		dir_length--;
	}
	dir_length = CWDG(cwd).cwd_length;
	dir = CWDG(cwd).cwd;

	ptr = command_line = (char *) emalloc(command_length + sizeof("cd '' ; ") + dir_length + extra+1+1);
	memcpy(ptr, "cd ", sizeof("cd ")-1);
	ptr += sizeof("cd ")-1;

	if (CWDG(cwd).cwd_length == 0) {
		*ptr++ = DEFAULT_SLASH;
	} else {
		*ptr++ = '\'';
		while (dir_length > 0) {
			switch (*dir) {
			case '\'':
				*ptr++ = '\'';
				*ptr++ = '\\';
				*ptr++ = '\'';
				/* fall-through */
			default:
				*ptr++ = *dir;
			}
			dir++;
			dir_length--;
		}
		*ptr++ = '\'';
	}

	*ptr++ = ' ';
	*ptr++ = ';';
	*ptr++ = ' ';

	memcpy(ptr, command, command_length+1);
	retval = popen(command_line, type);

	efree(command_line);
	return retval;
}
/* }}} */
#endif不难发现,针对virtual_popen()函数实现,存在于不同平台,这里主要分析Linux平台。
针对Linux平台分析,可发现virtual_popen()函数不像WIN平台那样直接调用popen_ex()函数,而是自身进行了很多处理,事实上看过PHP for Windows->命令执行底层分析->静态审计部分,就会发现Linux平台下的virtual_popen()函数实现和windows中TSRM\tsrm_win32.c下的popen_ex()函数实现功能类似,都是对命令参数、当前工作空间等进行处理(分配空间、赋值),然后去启动相应的进程来完成命令执行过程。
继续向后跟进分析virtual_popen()函数,最终会调用popen(command_line, type)函数来执行命令。到了这里可能会有人疑惑,这里的popen()函数是谁实现的:是平常php里面用的popen()函数吗、是TSRM\tsrm_win32.c:467中的TSRM_API FILE *popen(const char *command, const char *type)函数吗,答案都是否定的,下面来看一下这几种猜想为什么是错误的。
第一种:php中的popen()函数。首先你要明白,你现在审计的是PHP内核源码,而不是在编写php程序代码。在PHP内核源码中,里面大部分都是定义与实现的PHP各种函数。
有关php中的popen()函数定义与实现在源码ext\standard\file.c:927中
/* {{{ proto resource popen(string command, string mode)
   Execute a command and open either a read or a write pipe to it */
PHP_FUNCTION(popen)
{
	char *command, *mode;
	size_t command_len, mode_len;
	FILE *fp;
	php_stream *stream;
	char *posix_mode;

	ZEND_PARSE_PARAMETERS_START(2, 2)
		Z_PARAM_PATH(command, command_len)
		Z_PARAM_STRING(mode, mode_len)
	ZEND_PARSE_PARAMETERS_END();

	posix_mode = estrndup(mode, mode_len);
#ifndef PHP_WIN32
	{
		char *z = memchr(posix_mode, 'b', mode_len);
		if (z) {
			memmove(z, z + 1, mode_len - (z - posix_mode));
		}
	}
#endif

	fp = VCWD_POPEN(command, posix_mode);
	if (!fp) {
		php_error_docref2(NULL, command, posix_mode, E_WARNING, "%s", strerror(errno));
		efree(posix_mode);
		RETURN_FALSE;
	}

	stream = php_stream_fopen_from_pipe(fp, mode);

	if (stream == NULL)	{
		php_error_docref2(NULL, command, mode, E_WARNING, "%s", strerror(errno));
		RETVAL_FALSE;
	} else {
		php_stream_to_zval(stream, return_value);
	}

	efree(posix_mode);
}
/* }}} */第二种:TSRM\tsrm_win32.c:467中的*popen()函数。细心的话你会发现在Linux平台编译下,根本不会去加载编译TSRM\tsrm_win32.c:467文件。
继续分析为什么,首先*popen()函数定义是在TSRM\tsrm_win32.h:104头文件中,那么查看TSRM\tsrm_win32.c文件是否包含该头文件
从包含结果可以发现,TSRM\tsrm_win32.c文件只在Windows平台下才会去包含TSRM\tsrm_win32.h头文件,这就说明在Linux平台下无法加载TSRM\tsrm_win32.c:467中的函数。
既然这两种猜想都不对那么*virtual_popen()中的poen()函数是由谁实现的,如果你对Linux平台熟悉的话,就会知道这里的poen()函数是在Linux下共享链接库glibc中实现的。
借助Windows平台下源码审查工具Source Insight【导入glibc-2.31源码项目】进行底层函数poen()跟踪分析
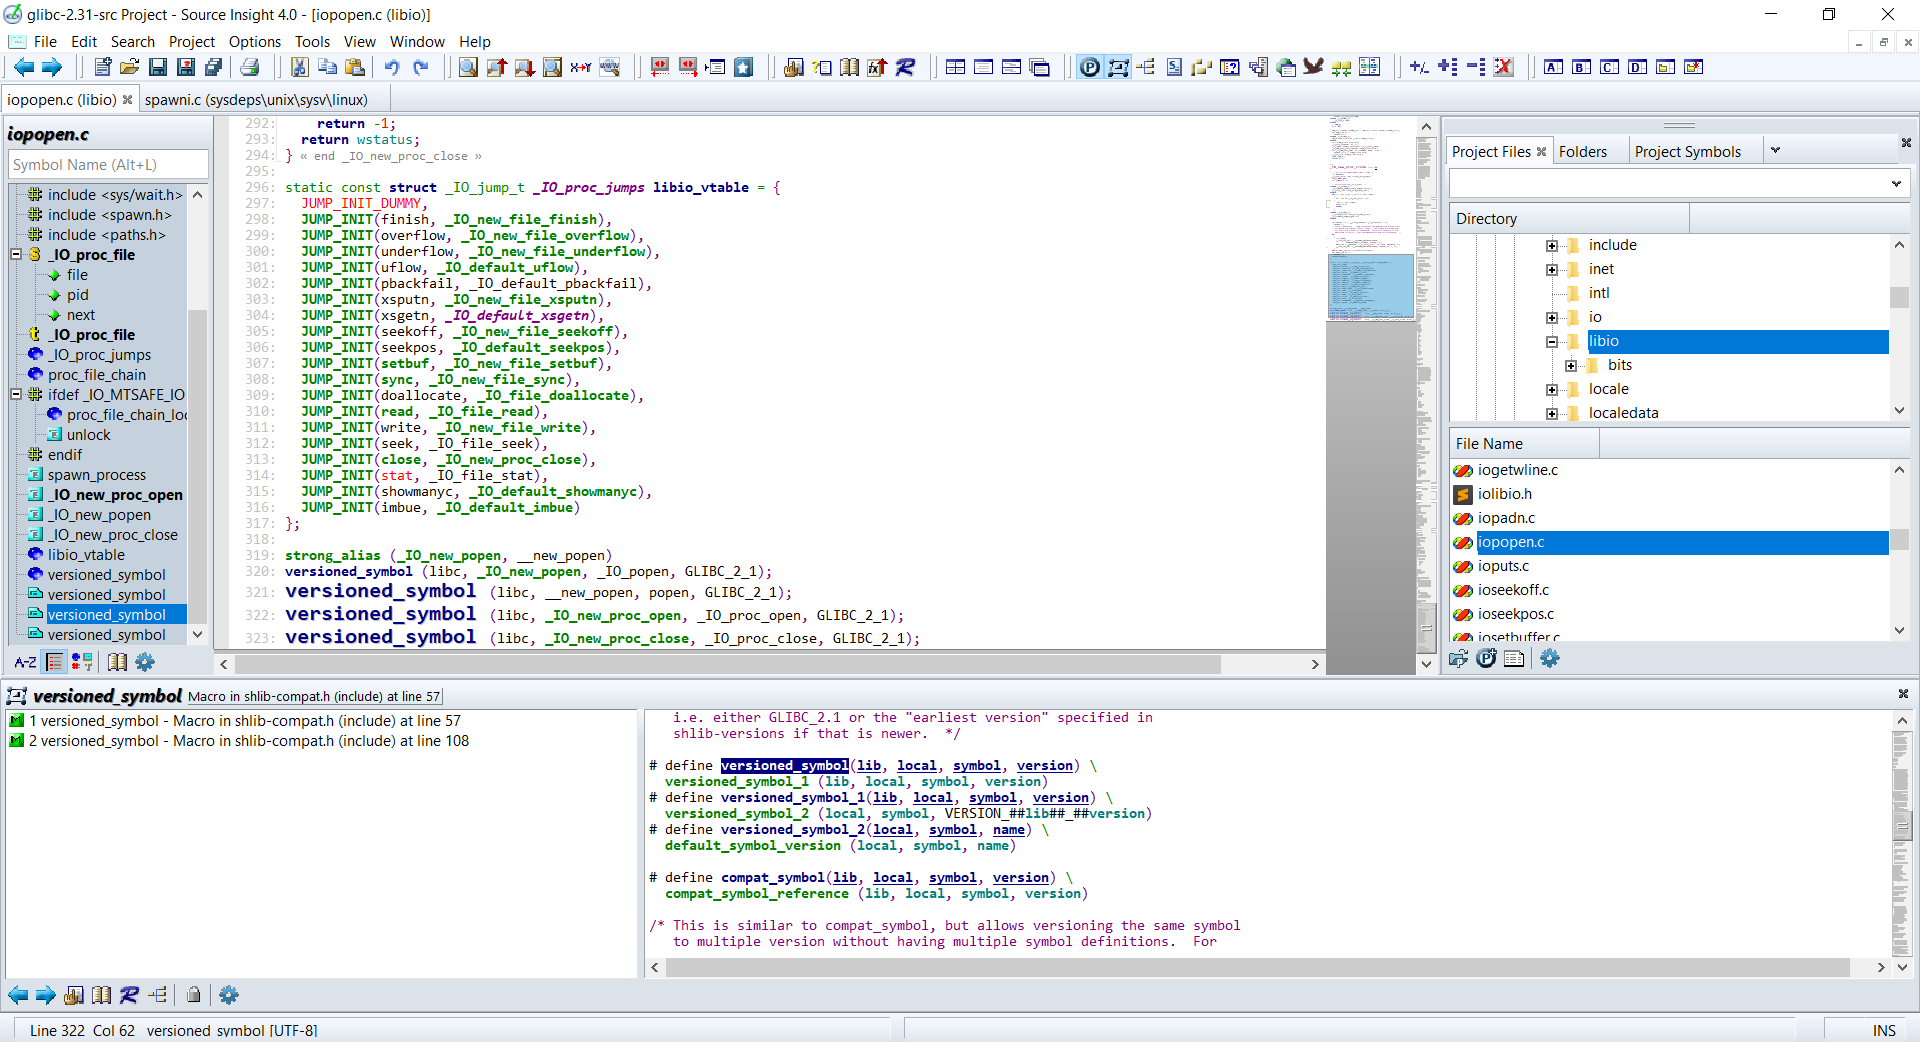
搜索整个项目定位popen()函数定义与实现位置:libio\iopopen.c:321
strong_alias (_IO_new_popen, __new_popen)
versioned_symbol (libc, _IO_new_popen, _IO_popen, GLIBC_2_1);
versioned_symbol (libc, __new_popen, popen, GLIBC_2_1);
versioned_symbol (libc, _IO_new_proc_open, _IO_proc_open, GLIBC_2_1);
versioned_symbol (libc, _IO_new_proc_close, _IO_proc_close, GLIBC_2_1);从上代码片段可以看出,popen()最终的实现为_IO_new_popen(),向上索引找到_IO_new_popen()函数实现:libio\iopopen.c:220
FILE *
_IO_new_popen (const char *command, const char *mode)
{
  struct locked_FILE
  {
    struct _IO_proc_file fpx;
#ifdef _IO_MTSAFE_IO
    _IO_lock_t lock;
#endif
  } *new_f;
  FILE *fp;

  new_f = (struct locked_FILE *) malloc (sizeof (struct locked_FILE));
  if (new_f == NULL)
    return NULL;
#ifdef _IO_MTSAFE_IO
  new_f->fpx.file.file._lock = &new_f->lock;
#endif
  fp = &new_f->fpx.file.file;
  _IO_init_internal (fp, 0);
  _IO_JUMPS (&new_f->fpx.file) = &_IO_proc_jumps;
  _IO_new_file_init_internal (&new_f->fpx.file);
  if (_IO_new_proc_open (fp, command, mode) != NULL)
    return (FILE *) &new_f->fpx.file;
  _IO_un_link (&new_f->fpx.file);
  free (new_f);
  return NULL;
}在_IO_new_popen()函数中,除了变量的定义与处理,核心的地方是将command指令参数传给_IO_new_proc_open (fp, command, mode)函数去实现,所以跟进_IO_new_proc_open()函数实现:libio\iopopen.c:109
FILE *
_IO_new_proc_open (FILE *fp, const char *command, const char *mode)
{
  int read_or_write;
  /* These are indexes for pipe_fds.  */
  int parent_end, child_end;
  int pipe_fds[2];
  int child_pipe_fd;
  bool spawn_ok;

  int do_read = 0;
  int do_write = 0;
  int do_cloexec = 0;
  while (*mode != '\0')
    switch (*mode++)
      {
      case 'r':
    do_read = 1;
    break;
      case 'w':
    do_write = 1;
    break;
      case 'e':
    do_cloexec = 1;
    break;
      default:
      errout:
    __set_errno (EINVAL);
    return NULL;
      }

  if ((do_read ^ do_write) == 0)
    goto errout;

  if (_IO_file_is_open (fp))
    return NULL;

  /* Atomically set the O_CLOEXEC flag for the pipe end used by the
     child process (to avoid leaking the file descriptor in case of a
     concurrent fork).  This is later reverted in the child process.
     When popen returns, the parent pipe end can be O_CLOEXEC or not,
     depending on the 'e' open mode, but there is only one flag which
     controls both descriptors.  The parent end is adjusted below,
     after creating the child process.  (In the child process, the
     parent end should be closed on execve, so O_CLOEXEC remains set
     there.)  */
  if (__pipe2 (pipe_fds, O_CLOEXEC) < 0)
    return NULL;

  if (do_read)
    {
      parent_end = 0;
      child_end = 1;
      read_or_write = _IO_NO_WRITES;
      child_pipe_fd = 1;
    }
  else
    {
      parent_end = 1;
      child_end = 0;
      read_or_write = _IO_NO_READS;
      child_pipe_fd = 0;
    }

  posix_spawn_file_actions_t fa;
  /* posix_spawn_file_actions_init does not fail.  */
  __posix_spawn_file_actions_init (&fa);

  /* The descriptor is already the one the child will use.  In this case
     it must be moved to another one otherwise, there is no safe way to
     remove the close-on-exec flag in the child without creating a FD leak
     race in the parent.  */
  if (pipe_fds[child_end] == child_pipe_fd)
    {
      int tmp = __fcntl (child_pipe_fd, F_DUPFD_CLOEXEC, 0);
      if (tmp < 0)
    goto spawn_failure;
      __close_nocancel (pipe_fds[child_end]);
      pipe_fds[child_end] = tmp;
    }

  if (__posix_spawn_file_actions_adddup2 (&fa, pipe_fds[child_end],
      child_pipe_fd) != 0)
    goto spawn_failure;

#ifdef _IO_MTSAFE_IO
  _IO_cleanup_region_start_noarg (unlock);
  _IO_lock_lock (proc_file_chain_lock);
#endif
  spawn_ok = spawn_process (&fa, fp, command, do_cloexec, pipe_fds,
                parent_end, child_end, child_pipe_fd);
#ifdef _IO_MTSAFE_IO
  _IO_lock_unlock (proc_file_chain_lock);
  _IO_cleanup_region_end (0);
#endif

  __posix_spawn_file_actions_destroy (&fa);

  if (!spawn_ok)
    {
    spawn_failure:
      __close_nocancel (pipe_fds[child_end]);
      __close_nocancel (pipe_fds[parent_end]);
      __set_errno (ENOMEM);
      return NULL;
    }

  _IO_mask_flags (fp, read_or_write, _IO_NO_READS|_IO_NO_WRITES);
  return fp;
}可以看到_IO_new_proc_open()函数代码开始部分对mode参数进行了处理,接着后面核心代码处调用了spawn_process (&fa, fp, command, do_cloexec, pipe_fds, parent_end, child_end, child_pipe_fd)函数,这个函数很明显看起来和进程有关系,不出意外后续代码的实现与调用肯定是创建command进程相关,进入spawn_process()函数实现:libio\iopopen.c:71
/* POSIX states popen shall ensure that any streams from previous popen()
   calls that remain open in the parent process should be closed in the new
   child process.
   To avoid a race-condition between checking which file descriptors need to
   be close (by transversing the proc_file_chain list) and the insertion of a
   new one after a successful posix_spawn this function should be called
   with proc_file_chain_lock acquired.  */
static bool
spawn_process (posix_spawn_file_actions_t *fa, FILE *fp, const char *command,
           int do_cloexec, int pipe_fds[2], int parent_end, int child_end,
           int child_pipe_fd)
{

  for (struct _IO_proc_file *p = proc_file_chain; p; p = p->next)
    {
      int fd = _IO_fileno ((FILE *) p);

      /* If any stream from previous popen() calls has fileno
     child_pipe_fd, it has been already closed by the adddup2 action
     above.  */
      if (fd != child_pipe_fd
      && __posix_spawn_file_actions_addclose (fa, fd) != 0)
    return false;
    }

  if (__posix_spawn (&((_IO_proc_file *) fp)->pid, _PATH_BSHELL, fa, 0,
             (char *const[]){ (char*) "sh", (char*) "-c",
             (char *) command, NULL }, __environ) != 0)
    return false;

  __close_nocancel (pipe_fds[child_end]);

  if (!do_cloexec)
    /* Undo the effects of the pipe2 call which set the
       close-on-exec flag.  */
    __fcntl (pipe_fds[parent_end], F_SETFD, 0);

  _IO_fileno (fp) = pipe_fds[parent_end];

  ((_IO_proc_file *) fp)->next = proc_file_chain;
  proc_file_chain = (_IO_proc_file *) fp;

  return true;
}这里很明显spawn_process()函数的实现是由__posix_spawn()函数来完成的
  if (__posix_spawn (&((_IO_proc_file *) fp)->pid, _PATH_BSHELL, fa, 0,
             (char *const[]){ (char*) "sh", (char*) "-c",
(char *) command, NULL }, __environ) != 0)查看_PATH_BSHELL预定义参数值:sysdeps\unix\sysv\linux\paths.h:41
#define _PATH_BSHELL "/bin/sh"不难看出PHP命令执行函数传入的系统指令参数,底层将调用/bin/sh可执行程序来执行
/bin/sh -c command注意:这里的/bin/sh在不同平台中所指向的链接不同。
Linux系统,主要分为debian系(主要有Debian,Ubuntu,Mint等及其衍生版本)和redhat系(主要有RedHat,Fedora,CentOs等),还有其它自由的发布版本。debian系默认/bin/sh指向/bin/dash;redhat系默认/bin/sh指向/bin/bash。
Debian Almquist Shell 简称 dash,主要存在于debian类别的Linux系统中。
最初,bash是GNU/Linux 操作系统中 /bin/sh 的符号链接,但由于bash过于复杂,有人把 bash 从 NetBSD 移植到 Linux 并更名为 dash,且/bin/sh符号连接到dash。Dash Shell 比 Bash Shell 小的多(ubuntu16.04上,bash大概1M,dash只有150K),符合POSIX标准。Ubuntu 6.10开始默认是Dash。
跟进__posix_spawn()函数实现:posix\spawn.c:25
/* Spawn a new process executing PATH with the attributes describes in *ATTRP.
   Before running the process perform the actions described in FILE-ACTIONS. */
int
__posix_spawn (pid_t *pid, const char *path,
           const posix_spawn_file_actions_t *file_actions,
           const posix_spawnattr_t *attrp, char *const argv[],
           char *const envp[])
{
  return __spawni (pid, path, file_actions, attrp, argv, envp, 0);
}__posix_spawn()函数直接调用__spawni()函数来实现,根据__posix_spawn()函数注释描述可知,该函数功能为创建一个新的可执行程序进程也就是/bin/sh进程。
进入__spawni()函数实现:sysdeps\unix\sysv\linux\spawni.c:424
/* Spawn a new process executing PATH with the attributes describes in *ATTRP.
   Before running the process perform the actions described in FILE-ACTIONS. */
int
__spawni (pid_t * pid, const char *file,
      const posix_spawn_file_actions_t * acts,
      const posix_spawnattr_t * attrp, char *const argv[],
      char *const envp[], int xflags)
{
  /* It uses __execvpex to avoid run ENOEXEC in non compatibility mode (it
     will be handled by maybe_script_execute).  */
  return __spawnix (pid, file, acts, attrp, argv, envp, xflags,
            xflags & SPAWN_XFLAGS_USE_PATH ? __execvpex :__execve);
}可以看到__spawni()函数的实现,直接调用__spawnix()函数返回。
查看__spawnix()函数的实现:sysdeps\unix\sysv\linux\spawni.c:312
/* Spawn a new process executing PATH with the attributes describes in *ATTRP.
   Before running the process perform the actions described in FILE-ACTIONS. */
static int
__spawnix (pid_t * pid, const char *file,
       const posix_spawn_file_actions_t * file_actions,
       const posix_spawnattr_t * attrp, char *const argv[],
       char *const envp[], int xflags,
       int (*exec) (const char *, char *const *, char *const *))
{
  pid_t new_pid;
  struct posix_spawn_args args;
  int ec;

  /* To avoid imposing hard limits on posix_spawn{p} the total number of
     arguments is first calculated to allocate a mmap to hold all possible
     values.  */
  ptrdiff_t argc = 0;
  /* Linux allows at most max (0x7FFFFFFF, 1/4 stack size) arguments
     to be used in a execve call.  We limit to INT_MAX minus one due the
     compatiblity code that may execute a shell script (maybe_script_execute)
     where it will construct another argument list with an additional
     argument.  */
  ptrdiff_t limit = INT_MAX - 1;
  while (argv[argc++] != NULL)
    if (argc == limit)
      {
    errno = E2BIG;
    return errno;
      }

  int prot = (PROT_READ | PROT_WRITE
         | ((GL (dl_stack_flags) & PF_X) ? PROT_EXEC : 0));

  /* Add a slack area for child's stack.  */
  size_t argv_size = (argc * sizeof (void *)) + 512;
  /* We need at least a few pages in case the compiler's stack checking is
     enabled.  In some configs, it is known to use at least 24KiB.  We use
     32KiB to be "safe" from anything the compiler might do.  Besides, the
     extra pages won't actually be allocated unless they get used.  */
  argv_size += (32 * 1024);
  size_t stack_size = ALIGN_UP (argv_size, GLRO(dl_pagesize));
  void *stack = __mmap (NULL, stack_size, prot,
            MAP_PRIVATE | MAP_ANONYMOUS | MAP_STACK, -1, 0);
  if (__glibc_unlikely (stack == MAP_FAILED))
    return errno;

  /* Disable asynchronous cancellation.  */
  int state;
  __libc_ptf_call (__pthread_setcancelstate,
                   (PTHREAD_CANCEL_DISABLE, &state), 0);

  /* Child must set args.err to something non-negative - we rely on
     the parent and child sharing VM.  */
  args.err = 0;
  args.file = file;
  args.exec = exec;
  args.fa = file_actions;
  args.attr = attrp ? attrp : &(const posix_spawnattr_t) { 0 };
  args.argv = argv;
  args.argc = argc;
  args.envp = envp;
  args.xflags = xflags;

  __libc_signal_block_all (&args.oldmask);

  /* The clone flags used will create a new child that will run in the same
     memory space (CLONE_VM) and the execution of calling thread will be
     suspend until the child calls execve or _exit.

     Also since the calling thread execution will be suspend, there is not
     need for CLONE_SETTLS.  Although parent and child share the same TLS
     namespace, there will be no concurrent access for TLS variables (errno
     for instance).  */
  new_pid = CLONE (__spawni_child, STACK (stack, stack_size), stack_size,
           CLONE_VM | CLONE_VFORK | SIGCHLD, &args);

  /* It needs to collect the case where the auxiliary process was created
     but failed to execute the file (due either any preparation step or
     for execve itself).  */
  if (new_pid > 0)
    {
      /* Also, it handles the unlikely case where the auxiliary process was
     terminated before calling execve as if it was successfully.  The
     args.err is set to 0 as default and changed to a positive value
     only in case of failure, so in case of premature termination
     due a signal args.err will remain zeroed and it will be up to
     caller to actually collect it.  */
      ec = args.err;
      if (ec > 0)
    /* There still an unlikely case where the child is cancelled after
       setting args.err, due to a positive error value.  Also there is
       possible pid reuse race (where the kernel allocated the same pid
       to an unrelated process).  Unfortunately due synchronization
       issues where the kernel might not have the process collected
       the waitpid below can not use WNOHANG.  */
    __waitpid (new_pid, NULL, 0);
    }
  else
    ec = -new_pid;

  __munmap (stack, stack_size);

  if ((ec == 0) && (pid != NULL))
    *pid = new_pid;

  __libc_signal_restore_set (&args.oldmask);

  __libc_ptf_call (__pthread_setcancelstate, (state, NULL), 0);

  return ec;
}忽略__spawnix()函数内部变量处理外,核心代码在于调用CLONE()函数,作用为克隆父进程以创建新的子进程。
  /* The clone flags used will create a new child that will run in the same
     memory space (CLONE_VM) and the execution of calling thread will be
     suspend until the child calls execve or _exit.

     Also since the calling thread execution will be suspend, there is not
     need for CLONE_SETTLS.  Although parent and child share the same TLS
     namespace, there will be no concurrent access for TLS variables (errno
     for instance).  */
  new_pid = CLONE (__spawni_child, STACK (stack, stack_size), stack_size,
CLONE_VM | CLONE_VFORK | SIGCHLD, &args);CLONE()函数实现通常位于sysdeps\unix\sysv\linux\平台架构(arm、i386、x86、x86_64等)\clone.S汇编代码文件中。
由于这里测试的平台为x86_64,所以CLONE()函数实现位置为:sysdeps\unix\sysv\linux\x86_64\clone.S
/* Copyright (C) 2001-2020 Free Software Foundation, Inc.
   This file is part of the GNU C Library.

   The GNU C Library is free software; you can redistribute it and/or
   modify it under the terms of the GNU Lesser General Public
   License as published by the Free Software Foundation; either
   version 2.1 of the License, or (at your option) any later version.

   The GNU C Library is distributed in the hope that it will be useful,
   but WITHOUT ANY WARRANTY; without even the implied warranty of
   MERCHANTABILITY or FITNESS FOR A PARTICULAR PURPOSE.  See the GNU
   Lesser General Public License for more details.

   You should have received a copy of the GNU Lesser General Public
   License along with the GNU C Library; if not, see
   <https://www.gnu.org/licenses/>.  */

/* clone() is even more special than fork() as it mucks with stacks
   and invokes a function in the right context after its all over.  */

#include <sysdep.h>
#define _ERRNO_H    1
#include <bits/errno.h>
#include <asm-syntax.h>

/* The userland implementation is:
   int clone (int (*fn)(void *arg), void *child_stack, int flags, void *arg),
   the kernel entry is:
   int clone (long flags, void *child_stack).

   The parameters are passed in register and on the stack from userland:
   rdi: fn
   rsi: child_stack
   rdx:    flags
   rcx: arg
   r8d:    TID field in parent
   r9d: thread pointer
%esp+8:    TID field in child

   The kernel expects:
   rax: system call number
   rdi: flags
   rsi: child_stack
   rdx: TID field in parent
   r10: TID field in child
   r8:    thread pointer  */


        .text
ENTRY (__clone)
    /* Sanity check arguments.  */
    movq    $-EINVAL,%rax
    testq    %rdi,%rdi        /* no NULL function pointers */
    jz    SYSCALL_ERROR_LABEL
    testq    %rsi,%rsi        /* no NULL stack pointers */
    jz    SYSCALL_ERROR_LABEL

    /* Insert the argument onto the new stack.  */
    subq    $16,%rsi
    movq    %rcx,8(%rsi)

    /* Save the function pointer.  It will be popped off in the
       child in the ebx frobbing below.  */
    movq    %rdi,0(%rsi)

    /* Do the system call.  */
    movq    %rdx, %rdi
    movq    %r8, %rdx
    movq    %r9, %r8
    mov    8(%rsp), %R10_LP
    movl    $SYS_ify(clone),%eax

    /* End FDE now, because in the child the unwind info will be
       wrong.  */
    cfi_endproc;
    syscall

    testq    %rax,%rax
    jl    SYSCALL_ERROR_LABEL
    jz    L(thread_start)

    ret

L(thread_start):
    cfi_startproc;
    /* Clearing frame pointer is insufficient, use CFI.  */
    cfi_undefined (rip);
    /* Clear the frame pointer.  The ABI suggests this be done, to mark
       the outermost frame obviously.  */
    xorl    %ebp, %ebp

    /* Set up arguments for the function call.  */
    popq    %rax        /* Function to call.  */
    popq    %rdi        /* Argument.  */
    call    *%rax
    /* Call exit with return value from function call. */
    movq    %rax, %rdi
    movl    $SYS_ify(exit), %eax
    syscall
    cfi_endproc;

    cfi_startproc;
PSEUDO_END (__clone)

libc_hidden_def (__clone)
weak_alias (__clone, clone)审计CLONE()函数实现的clone.S汇编代码,由weak_alias (__clone, clone)可知,clone()函数别名为__clone()函数。
跟进分析__clone()函数的实现
ENTRY (__clone)
    /* Sanity check arguments.  */
    movq    $-EINVAL,%rax
    testq    %rdi,%rdi        /* no NULL function pointers */
    jz    SYSCALL_ERROR_LABEL
    testq    %rsi,%rsi        /* no NULL stack pointers */
    jz    SYSCALL_ERROR_LABEL

    /* Insert the argument onto the new stack.  */
    subq    $16,%rsi
    movq    %rcx,8(%rsi)

    /* Save the function pointer.  It will be popped off in the
       child in the ebx frobbing below.  */
    movq    %rdi,0(%rsi)

    /* Do the system call.  */
    movq    %rdx, %rdi
    movq    %r8, %rdx
    movq    %r9, %r8
    mov    8(%rsp), %R10_LP
    movl    $SYS_ify(clone),%eax

    /* End FDE now, because in the child the unwind info will be
       wrong.  */
    cfi_endproc;
    syscall

    testq    %rax,%rax
    jl    SYSCALL_ERROR_LABEL
    jz    L(thread_start)

ret__clone()函数核心代码为系统调用部分
    /* Do the system call.  */
    movq    %rdx, %rdi
    movq    %r8, %rdx
    movq    %r9, %r8
    mov    8(%rsp), %R10_LP
    movl    $SYS_ify(clone),%eax

    /* End FDE now, because in the child the unwind info will be
       wrong.  */
    cfi_endproc;
syscall事实上这里clone()函数是一个系统调用函数,内核入口为sys_clone(),系统调用号为0x38,主要作用是创建子进程:克隆父进程。
有关Linux下系统调用号的查询,根据不同平台查看不同文件:unistd.h(x86)、unistd_64.h(x86_64),针对该Linux系统平台存储在:/usr/include/x86_64-linux-gnu/asm/unistd_64.h
#ifndef _ASM_X86_UNISTD_64_H
#define _ASM_X86_UNISTD_64_H 1

#define __NR_read 0
#define __NR_write 1
#define __NR_open 2
#define __NR_close 3
#define __NR_stat 4
#define __NR_fstat 5
#define __NR_lstat 6
#define __NR_poll 7
#define __NR_lseek 8
#define __NR_mmap 9
#define __NR_mprotect 10
#define __NR_munmap 11
#define __NR_brk 12
#define __NR_rt_sigaction 13
#define __NR_rt_sigprocmask 14
#define __NR_rt_sigreturn 15
#define __NR_ioctl 16
#define __NR_pread64 17
#define __NR_pwrite64 18
#define __NR_readv 19
#define __NR_writev 20
#define __NR_access 21
#define __NR_pipe 22
#define __NR_select 23
#define __NR_sched_yield 24
#define __NR_mremap 25
#define __NR_msync 26
#define __NR_mincore 27
#define __NR_madvise 28
#define __NR_shmget 29
#define __NR_shmat 30
#define __NR_shmctl 31
#define __NR_dup 32
#define __NR_dup2 33
#define __NR_pause 34
#define __NR_nanosleep 35
#define __NR_getitimer 36
#define __NR_alarm 37
#define __NR_setitimer 38
#define __NR_getpid 39
#define __NR_sendfile 40
#define __NR_socket 41
#define __NR_connect 42
#define __NR_accept 43
#define __NR_sendto 44
#define __NR_recvfrom 45
#define __NR_sendmsg 46
#define __NR_recvmsg 47
#define __NR_shutdown 48
#define __NR_bind 49
#define __NR_listen 50
#define __NR_getsockname 51
#define __NR_getpeername 52
#define __NR_socketpair 53
#define __NR_setsockopt 54
#define __NR_getsockopt 55
#define __NR_clone 56
#define __NR_fork 57
#define __NR_vfork 58
#define __NR_execve 59
#define __NR_exit 60
#define __NR_wait4 61
#define __NR_kill 62
#define __NR_uname 63
#define __NR_semget 64
#define __NR_semop 65
#define __NR_semctl 66
#define __NR_shmdt 67
#define __NR_msgget 68
#define __NR_msgsnd 69
#define __NR_msgrcv 70
#define __NR_msgctl 71
#define __NR_fcntl 72
#define __NR_flock 73
#define __NR_fsync 74
#define __NR_fdatasync 75
#define __NR_truncate 76
#define __NR_ftruncate 77
#define __NR_getdents 78
#define __NR_getcwd 79
#define __NR_chdir 80
#define __NR_fchdir 81
#define __NR_rename 82
#define __NR_mkdir 83
#define __NR_rmdir 84
#define __NR_creat 85
#define __NR_link 86
#define __NR_unlink 87
#define __NR_symlink 88
#define __NR_readlink 89
#define __NR_chmod 90
#define __NR_fchmod 91
#define __NR_chown 92
#define __NR_fchown 93
#define __NR_lchown 94
#define __NR_umask 95
#define __NR_gettimeofday 96
#define __NR_getrlimit 97
#define __NR_getrusage 98
#define __NR_sysinfo 99
#define __NR_times 100
#define __NR_ptrace 101
#define __NR_getuid 102
#define __NR_syslog 103
#define __NR_getgid 104
#define __NR_setuid 105
#define __NR_setgid 106
#define __NR_geteuid 107
#define __NR_getegid 108
#define __NR_setpgid 109
#define __NR_getppid 110
#define __NR_getpgrp 111
#define __NR_setsid 112
#define __NR_setreuid 113
#define __NR_setregid 114
#define __NR_getgroups 115
#define __NR_setgroups 116
#define __NR_setresuid 117
#define __NR_getresuid 118
#define __NR_setresgid 119
#define __NR_getresgid 120
#define __NR_getpgid 121
#define __NR_setfsuid 122
#define __NR_setfsgid 123
#define __NR_getsid 124
#define __NR_capget 125
#define __NR_capset 126
#define __NR_rt_sigpending 127
#define __NR_rt_sigtimedwait 128
#define __NR_rt_sigqueueinfo 129
#define __NR_rt_sigsuspend 130
#define __NR_sigaltstack 131
#define __NR_utime 132
#define __NR_mknod 133
#define __NR_uselib 134
#define __NR_personality 135
#define __NR_ustat 136
#define __NR_statfs 137
#define __NR_fstatfs 138
#define __NR_sysfs 139
#define __NR_getpriority 140
#define __NR_setpriority 141
#define __NR_sched_setparam 142
#define __NR_sched_getparam 143
#define __NR_sched_setscheduler 144
#define __NR_sched_getscheduler 145
#define __NR_sched_get_priority_max 146
#define __NR_sched_get_priority_min 147
#define __NR_sched_rr_get_interval 148
#define __NR_mlock 149
#define __NR_munlock 150
#define __NR_mlockall 151
#define __NR_munlockall 152
#define __NR_vhangup 153
#define __NR_modify_ldt 154
#define __NR_pivot_root 155
#define __NR__sysctl 156
#define __NR_prctl 157
#define __NR_arch_prctl 158
#define __NR_adjtimex 159
#define __NR_setrlimit 160
#define __NR_chroot 161
#define __NR_sync 162
#define __NR_acct 163
#define __NR_settimeofday 164
#define __NR_mount 165
#define __NR_umount2 166
#define __NR_swapon 167
#define __NR_swapoff 168
#define __NR_reboot 169
#define __NR_sethostname 170
#define __NR_setdomainname 171
#define __NR_iopl 172
#define __NR_ioperm 173
#define __NR_create_module 174
#define __NR_init_module 175
#define __NR_delete_module 176
#define __NR_get_kernel_syms 177
#define __NR_query_module 178
#define __NR_quotactl 179
#define __NR_nfsservctl 180
#define __NR_getpmsg 181
#define __NR_putpmsg 182
#define __NR_afs_syscall 183
#define __NR_tuxcall 184
#define __NR_security 185
#define __NR_gettid 186
#define __NR_readahead 187
#define __NR_setxattr 188
#define __NR_lsetxattr 189
#define __NR_fsetxattr 190
#define __NR_getxattr 191
#define __NR_lgetxattr 192
#define __NR_fgetxattr 193
#define __NR_listxattr 194
#define __NR_llistxattr 195
#define __NR_flistxattr 196
#define __NR_removexattr 197
#define __NR_lremovexattr 198
#define __NR_fremovexattr 199
#define __NR_tkill 200
#define __NR_time 201
#define __NR_futex 202
#define __NR_sched_setaffinity 203
#define __NR_sched_getaffinity 204
#define __NR_set_thread_area 205
#define __NR_io_setup 206
#define __NR_io_destroy 207
#define __NR_io_getevents 208
#define __NR_io_submit 209
#define __NR_io_cancel 210
#define __NR_get_thread_area 211
#define __NR_lookup_dcookie 212
#define __NR_epoll_create 213
#define __NR_epoll_ctl_old 214
#define __NR_epoll_wait_old 215
#define __NR_remap_file_pages 216
#define __NR_getdents64 217
#define __NR_set_tid_address 218
#define __NR_restart_syscall 219
#define __NR_semtimedop 220
#define __NR_fadvise64 221
#define __NR_timer_create 222
#define __NR_timer_settime 223
#define __NR_timer_gettime 224
#define __NR_timer_getoverrun 225
#define __NR_timer_delete 226
#define __NR_clock_settime 227
#define __NR_clock_gettime 228
#define __NR_clock_getres 229
#define __NR_clock_nanosleep 230
#define __NR_exit_group 231
#define __NR_epoll_wait 232
#define __NR_epoll_ctl 233
#define __NR_tgkill 234
#define __NR_utimes 235
#define __NR_vserver 236
#define __NR_mbind 237
#define __NR_set_mempolicy 238
#define __NR_get_mempolicy 239
#define __NR_mq_open 240
#define __NR_mq_unlink 241
#define __NR_mq_timedsend 242
#define __NR_mq_timedreceive 243
#define __NR_mq_notify 244
#define __NR_mq_getsetattr 245
#define __NR_kexec_load 246
#define __NR_waitid 247
#define __NR_add_key 248
#define __NR_request_key 249
#define __NR_keyctl 250
#define __NR_ioprio_set 251
#define __NR_ioprio_get 252
#define __NR_inotify_init 253
#define __NR_inotify_add_watch 254
#define __NR_inotify_rm_watch 255
#define __NR_migrate_pages 256
#define __NR_openat 257
#define __NR_mkdirat 258
#define __NR_mknodat 259
#define __NR_fchownat 260
#define __NR_futimesat 261
#define __NR_newfstatat 262
#define __NR_unlinkat 263
#define __NR_renameat 264
#define __NR_linkat 265
#define __NR_symlinkat 266
#define __NR_readlinkat 267
#define __NR_fchmodat 268
#define __NR_faccessat 269
#define __NR_pselect6 270
#define __NR_ppoll 271
#define __NR_unshare 272
#define __NR_set_robust_list 273
#define __NR_get_robust_list 274
#define __NR_splice 275
#define __NR_tee 276
#define __NR_sync_file_range 277
#define __NR_vmsplice 278
#define __NR_move_pages 279
#define __NR_utimensat 280
#define __NR_epoll_pwait 281
#define __NR_signalfd 282
#define __NR_timerfd_create 283
#define __NR_eventfd 284
#define __NR_fallocate 285
#define __NR_timerfd_settime 286
#define __NR_timerfd_gettime 287
#define __NR_accept4 288
#define __NR_signalfd4 289
#define __NR_eventfd2 290
#define __NR_epoll_create1 291
#define __NR_dup3 292
#define __NR_pipe2 293
#define __NR_inotify_init1 294
#define __NR_preadv 295
#define __NR_pwritev 296
#define __NR_rt_tgsigqueueinfo 297
#define __NR_perf_event_open 298
#define __NR_recvmmsg 299
#define __NR_fanotify_init 300
#define __NR_fanotify_mark 301
#define __NR_prlimit64 302
#define __NR_name_to_handle_at 303
#define __NR_open_by_handle_at 304
#define __NR_clock_adjtime 305
#define __NR_syncfs 306
#define __NR_sendmmsg 307
#define __NR_setns 308
#define __NR_getcpu 309
#define __NR_process_vm_readv 310
#define __NR_process_vm_writev 311
#define __NR_kcmp 312
#define __NR_finit_module 313
#define __NR_sched_setattr 314
#define __NR_sched_getattr 315
#define __NR_renameat2 316
#define __NR_seccomp 317
#define __NR_getrandom 318
#define __NR_memfd_create 319
#define __NR_kexec_file_load 320
#define __NR_bpf 321
#define __NR_execveat 322
#define __NR_userfaultfd 323
#define __NR_membarrier 324
#define __NR_mlock2 325
#define __NR_copy_file_range 326
#define __NR_preadv2 327
#define __NR_pwritev2 328
#define __NR_pkey_mprotect 329
#define __NR_pkey_alloc 330
#define __NR_pkey_free 331
#define __NR_statx 332
#define __NR_io_pgetevents 333
#define __NR_rseq 334
#define __NR_pidfd_send_signal 424
#define __NR_io_uring_setup 425
#define __NR_io_uring_enter 426
#define __NR_io_uring_register 427
#define __NR_open_tree 428
#define __NR_move_mount 429
#define __NR_fsopen 430
#define __NR_fsconfig 431
#define __NR_fsmount 432
#define __NR_fspick 433
#define __NR_pidfd_open 434
#define __NR_clone3 435
#define __NR_close_range 436
#define __NR_openat2 437
#define __NR_pidfd_getfd 438
#define __NR_faccessat2 439


#endif /* _ASM_X86_UNISTD_64_H */或者通过在线平台进行查询:各种平台下的系统调用号
这里系统调用之后仅仅是克隆了一个父进程,要想将一个子进程正真启动起来,还需要去调用__spawni_child()函数。
    /* Set up arguments for the function call.  */
    popq    %rax        /* Function to call.  */
    popq    %rdi        /* Argument.  */
    call    *%rax
    /* Call exit with return value from function call. */
    movq    %rax, %rdi
    movl    $SYS_ify(exit), %eax
    syscall
cfi_endproc;这里L(thread_start):中的call指令会调用最初CLONE()函数的第一个参数:__spawni_child()函数。
定位__spawni_child()函数的实现:sysdeps\unix\sysv\linux\spawni.c:121
/* Function used in the clone call to setup the signals mask, posix_spawn
   attributes, and file actions.  It run on its own stack (provided by the
   posix_spawn call).  */
static int
__spawni_child (void *arguments)
{
  struct posix_spawn_args *args = arguments;
  const posix_spawnattr_t *restrict attr = args->attr;
  const posix_spawn_file_actions_t *file_actions = args->fa;

  /* The child must ensure that no signal handler are enabled because it shared
     memory with parent, so the signal disposition must be either SIG_DFL or
     SIG_IGN.  It does by iterating over all signals and although it could
     possibly be more optimized (by tracking which signal potentially have a
     signal handler), it might requires system specific solutions (since the
     sigset_t data type can be very different on different architectures).  */
  struct sigaction sa;
  memset (&sa, '\0', sizeof (sa));

  sigset_t hset;
  __sigprocmask (SIG_BLOCK, 0, &hset);
  for (int sig = 1; sig < _NSIG; ++sig)
    {
      if ((attr->__flags & POSIX_SPAWN_SETSIGDEF)
      && __sigismember (&attr->__sd, sig))
    {
      sa.sa_handler = SIG_DFL;
    }
      else if (__sigismember (&hset, sig))
    {
      if (__is_internal_signal (sig))
        sa.sa_handler = SIG_IGN;
      else
        {
          __libc_sigaction (sig, 0, &sa);
          if (sa.sa_handler == SIG_IGN)
        continue;
          sa.sa_handler = SIG_DFL;
        }
    }
      else
    continue;

      __libc_sigaction (sig, &sa, 0);
    }

#ifdef _POSIX_PRIORITY_SCHEDULING
  /* Set the scheduling algorithm and parameters.  */
  if ((attr->__flags & (POSIX_SPAWN_SETSCHEDPARAM | POSIX_SPAWN_SETSCHEDULER))
      == POSIX_SPAWN_SETSCHEDPARAM)
    {
      if (__sched_setparam (0, &attr->__sp) == -1)
    goto fail;
    }
  else if ((attr->__flags & POSIX_SPAWN_SETSCHEDULER) != 0)
    {
      if (__sched_setscheduler (0, attr->__policy, &attr->__sp) == -1)
    goto fail;
    }
#endif

  if ((attr->__flags & POSIX_SPAWN_SETSID) != 0
      && __setsid () < 0)
    goto fail;

  /* Set the process group ID.  */
  if ((attr->__flags & POSIX_SPAWN_SETPGROUP) != 0
      && __setpgid (0, attr->__pgrp) != 0)
    goto fail;

  /* Set the effective user and group IDs.  */
  if ((attr->__flags & POSIX_SPAWN_RESETIDS) != 0
      && (local_seteuid (__getuid ()) != 0
      || local_setegid (__getgid ()) != 0))
    goto fail;

  /* Execute the file actions.  */
  if (file_actions != 0)
    {
      int cnt;
      struct rlimit64 fdlimit;
      bool have_fdlimit = false;

      for (cnt = 0; cnt < file_actions->__used; ++cnt)
    {
      struct __spawn_action *action = &file_actions->__actions[cnt];

      switch (action->tag)
        {
        case spawn_do_close:
          if (__close_nocancel (action->action.close_action.fd) != 0)
        {
          if (!have_fdlimit)
            {
              __getrlimit64 (RLIMIT_NOFILE, &fdlimit);
              have_fdlimit = true;
            }

          /* Signal errors only for file descriptors out of range.  */
          if (action->action.close_action.fd < 0
              || action->action.close_action.fd >= fdlimit.rlim_cur)
            goto fail;
        }
          break;

        case spawn_do_open:
          {
        /* POSIX states that if fildes was already an open file descriptor,
           it shall be closed before the new file is opened.  This avoid
           pontential issues when posix_spawn plus addopen action is called
           with the process already at maximum number of file descriptor
           opened and also for multiple actions on single-open special
           paths (like /dev/watchdog).  */
        __close_nocancel (action->action.open_action.fd);

        int ret = __open_nocancel (action->action.open_action.path,
                       action->action.
                       open_action.oflag | O_LARGEFILE,
                       action->action.open_action.mode);

        if (ret == -1)
          goto fail;

        int new_fd = ret;

        /* Make sure the desired file descriptor is used.  */
        if (ret != action->action.open_action.fd)
          {
            if (__dup2 (new_fd, action->action.open_action.fd)
            != action->action.open_action.fd)
              goto fail;

            if (__close_nocancel (new_fd) != 0)
              goto fail;
          }
          }
          break;

        case spawn_do_dup2:
          /* Austin Group issue #411 requires adddup2 action with source
         and destination being equal to remove close-on-exec flag.  */
          if (action->action.dup2_action.fd
          == action->action.dup2_action.newfd)
        {
          int fd = action->action.dup2_action.newfd;
          int flags = __fcntl (fd, F_GETFD, 0);
          if (flags == -1)
            goto fail;
          if (__fcntl (fd, F_SETFD, flags & ~FD_CLOEXEC) == -1)
            goto fail;
        }
          else if (__dup2 (action->action.dup2_action.fd,
                   action->action.dup2_action.newfd)
               != action->action.dup2_action.newfd)
        goto fail;
          break;

        case spawn_do_chdir:
          if (__chdir (action->action.chdir_action.path) != 0)
        goto fail;
          break;

        case spawn_do_fchdir:
          if (__fchdir (action->action.fchdir_action.fd) != 0)
        goto fail;
          break;
        }
    }
    }

  /* Set the initial signal mask of the child if POSIX_SPAWN_SETSIGMASK
     is set, otherwise restore the previous one.  */
  __sigprocmask (SIG_SETMASK, (attr->__flags & POSIX_SPAWN_SETSIGMASK)
         ? &attr->__ss : &args->oldmask, 0);

  args->exec (args->file, args->argv, args->envp);

  /* This is compatibility function required to enable posix_spawn run
     script without shebang definition for older posix_spawn versions
     (2.15).  */
  maybe_script_execute (args);

fail:
  /* errno should have an appropriate non-zero value; otherwise,
     there's a bug in glibc or the kernel.  For lack of an error code
     (EINTERNALBUG) describing that, use ECHILD.  Another option would
     be to set args->err to some negative sentinel and have the parent
     abort(), but that seems needlessly harsh.  */
  args->err = errno ? : ECHILD;
  _exit (SPAWN_ERROR);
}审计__spawni_child()函数,核心代码位于
args->exec (args->file, args->argv, args->envp);该部分为动态函数调用,那么args->exec为什么呢,回头向上追溯该值的传递过程:首先__spawni_child (void *arguments)中arguments的参数由clone()函数传递
new_pid = CLONE (__spawni_child, STACK (stack, stack_size), stack_size,
CLONE_VM | CLONE_VFORK | SIGCHLD, &args);而CLONE()中的args参数由__spawnix()函数传递
__spawnix (pid_t * pid, const char *file,
       const posix_spawn_file_actions_t * file_actions,
       const posix_spawnattr_t * attrp, char *const argv[],
       char *const envp[], int xflags,
       int (*exec) (const char *, char *const *, char *const *)){
    、、、、、
  args.err = 0;
  args.file = file;
  args.exec = exec;
  args.fa = file_actions;
  args.attr = attrp ? attrp : &(const posix_spawnattr_t) { 0 };
  args.argv = argv;
  args.argc = argc;
  args.envp = envp;
  args.xflags = xflags;
    、、、、、、
  new_pid = CLONE (__spawni_child, STACK (stack, stack_size), stack_size,CLONE_VM | CLONE_VFORK | SIGCHLD, &args);

}在__spawnix()函数参数中发现exec参数,继续向上追溯到__spawni()的函数调用
__spawni (pid_t * pid, const char *file,
      const posix_spawn_file_actions_t * acts,
      const posix_spawnattr_t * attrp, char *const argv[],
      char *const envp[], int xflags)
{
  /* It uses __execvpex to avoid run ENOEXEC in non compatibility mode (it
     will be handled by maybe_script_execute).  */
  return __spawnix (pid, file, acts, attrp, argv, envp, xflags,
            xflags & SPAWN_XFLAGS_USE_PATH ? __execvpex :__execve);
}在__spawni()函数调用__spawnix()函数的传参过程中,可追溯到exec的参数值,其值由一个三目运算表达式来决定
xflags & SPAWN_XFLAGS_USE_PATH ? __execvpex :__execve表达式的核心在于:与运算,所以分别追溯xflags 与 SPAWN_XFLAGS_USE_PATH的参数值。
追溯xflags:__spawni()函数由__posix_spawn()函数传参调用,得到xflags参数的值为0
__posix_spawn (pid_t *pid, const char *path,
           const posix_spawn_file_actions_t *file_actions,
           const posix_spawnattr_t *attrp, char *const argv[],
           char *const envp[])
{
  return __spawni (pid, path, file_actions, attrp, argv, envp, 0);
}追溯SPAWN_XFLAGS_USE_PATH:SPAWN_XFLAGS_USE_PATH参数的预定义位于:posix\spawn_int.h:66
#define SPAWN_XFLAGS_USE_PATH 0x1知道两个参数值后:与运算的结果为0,exec参数赋值为__execve()。
继续回到上面动态调用部分,可知__spawni_child()函数实现会调用__execve()函数
args->exec (args->file, args->argv, args->envp);__execve()函数为execve()函数的别名
weak_alias (__execve, execve)此时execve()函数接收的参数:file为/bin/sh、argv为sh -c whoami。
execve()函数主要用于创建进程,第一个参数为要启动的程序完整路径,第二个参数为要执行的程序指令。当execve()函数把/bin/sh进程启动起来后,然后由sh来执行系统指令(内部|外部),即可完成PHP命令执行函数的整个调用过程。
事实上这里execve()函数为系统调用函数,内核入口为sys_execve(),系统调用号为0x3b,而在C语言的程序库中则又在此基础上向应用程序提供一整套的库函数,包括execl()、execle()、execlp()、execv()、execve()和execvp()。
在Linux C语言编程里面常用exec()函数族来启动程序进程:execl、execle、execlp、execv、execve和execvp函数,exec()函数族的6个成员函数语法如下:
| 所需头文件 | 函数说明 | 函数原型 | 函数返回值 |
|---|---|---|---|
#include <unistd.h> |
执行程序 | int execl(const char *pathname, const char *arg, ..., (char *)0)int execv(const char *pathname, char *const argv[])int execle(const char *pathname, const char *arg, ..., (char *)0, char *const envp[])int execve(const char *pathname, char *const argv[], char *const envp[])int execlp(const char *filename, const char *arg, ..., (char *)0)int execvp(const char *filename, char *const argv[]) |
成功:函数不会返回 出错:返回-1,失败原因记录在error中 |
这里以execve()函数为例简单编写一个Demo进行演示:CommandExec1.c
#include <stdio.h>
#include <unistd.h>

int main(int argc, char *argv[], char *env[])
{
        char *argvs[] = {"sh", "-c", "whoami"};
        execve("/bin/sh", argvs, env);
        return 0;
}
编译运行
┌──(root💀toor)-[~/桌面/CodeDebug/c]
└─# gcc CommandExec1.c -o CommandExec1
┌──(root💀toor)-[~/桌面/CodeDebug/c]
└─# ./CommandExec1
root

┌──(root💀toor)-[~/桌面/CodeDebug/c]
└─#
同理,按照上述整个审计思路,可整理出PHP常见命令执行函数在Linux平台下的底层调用链
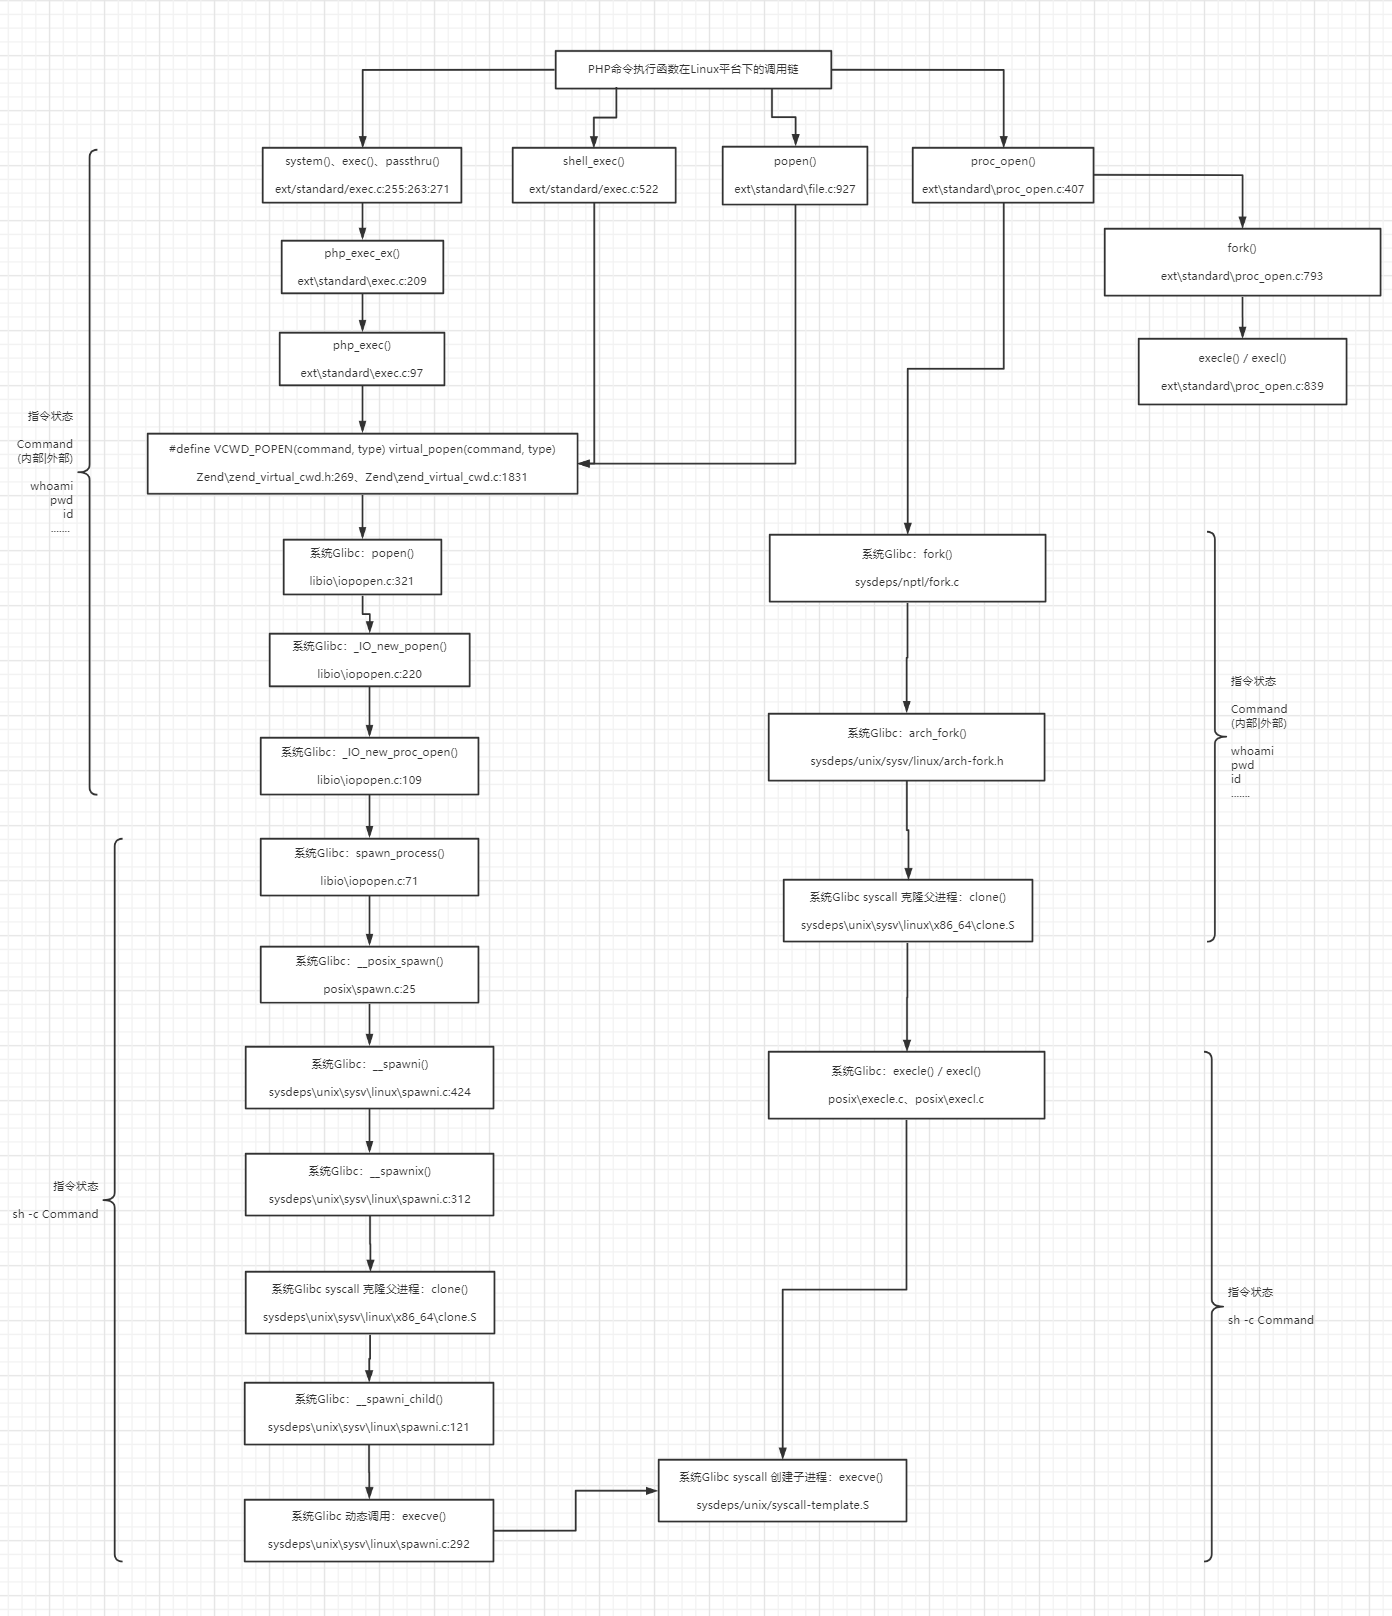
动态审计
除了枯燥静态审计PHP内核源码外,还可以使用更加直观的动态审计方式去动态审计PHP命令执行函数的实现原理与底层调用过程。
这里使用的调试工具为:Visual Studio Code、GDB,针对PHP内核源码的调试,VSCode动态调试原理使用的是GDB调试器,可以理解为使用图形化界面去操作GDB来调试;而GDB调试器为纯命令行调试工具,其调试原理为通过一个ptrace()系统调用函数SYS_ptrace()来完成,系统调用号为0x65。
由于动态调试PHP内核源码会调用到Glibc库,所以我们也需要对Glibc进行源码调试,然而我们使用的是系统自带的Glibc。那怎么才能调试Glibc呢,比较麻烦的是以调试模式编译一份Glibc,不过我们不必这么麻烦。其实有一种很简单的方法,下载和系统Glibc相同版本的源码项目,然后在GDB配置文件中声明Glibc的源码目录,之后就可以在PHP内核源码动态调试过程中对Glibc源码进行断点调试。
这里测试的Linux系统Glibc版本为2.31,所以下载配置glibc-2.31源码项目即可,下面是我使用的GDB配置信息:
└─# cat ~/.gdbinit
#source /mnt/hgfs/QSec/Binary/PWN/Tools/GDB/peda/peda.py
source /mnt/hgfs/QSec/Binary/PWN/Tools/GDB/pwndbg/gdbinit.py
#source /mnt/hgfs/QSec/Binary/PWN/Tools/GDB/gef/gdbinit-gef.py
directory /mnt/hgfs/QSec/Code-Audit/glibc/glibc-2.31/
Visual Studio Code
由于VSCode相比GDB调试简单,所以这里直接给出一些关键断点,然后给出动态调试命令执行函数的底层实现调用链。具体动态调试过程会在下面GDB调试部分叙述。
关键断点:BreakPoints
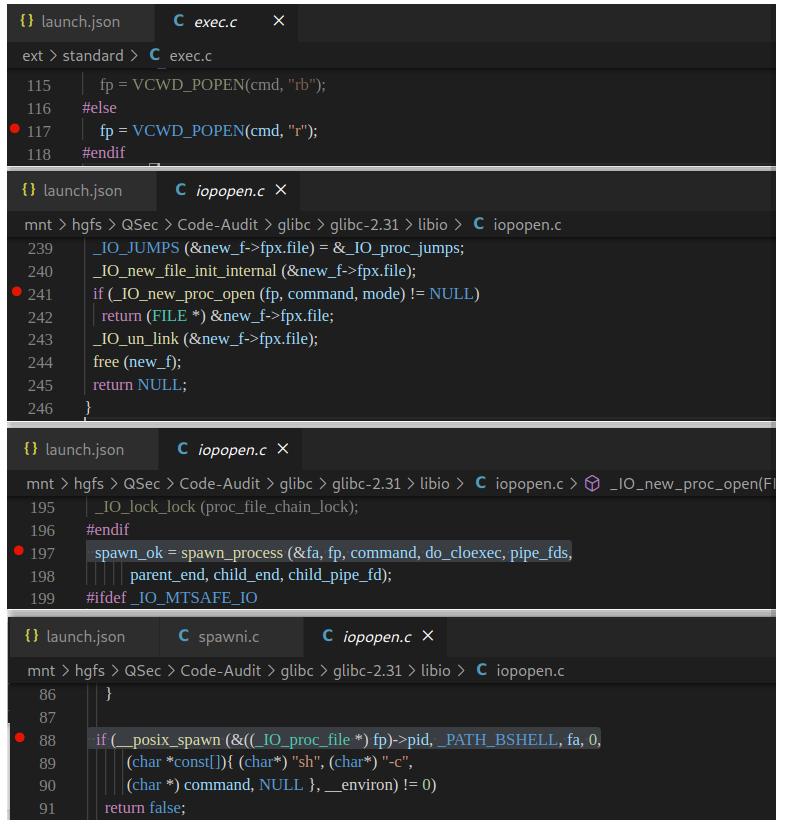
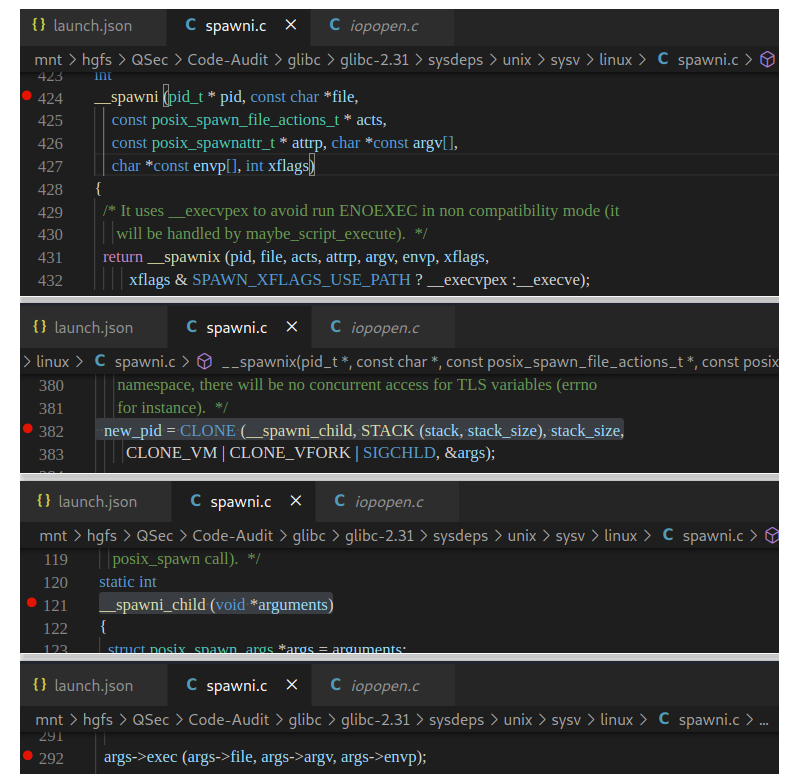
程序完整的调用栈:CallStack,程序入口到底层调用
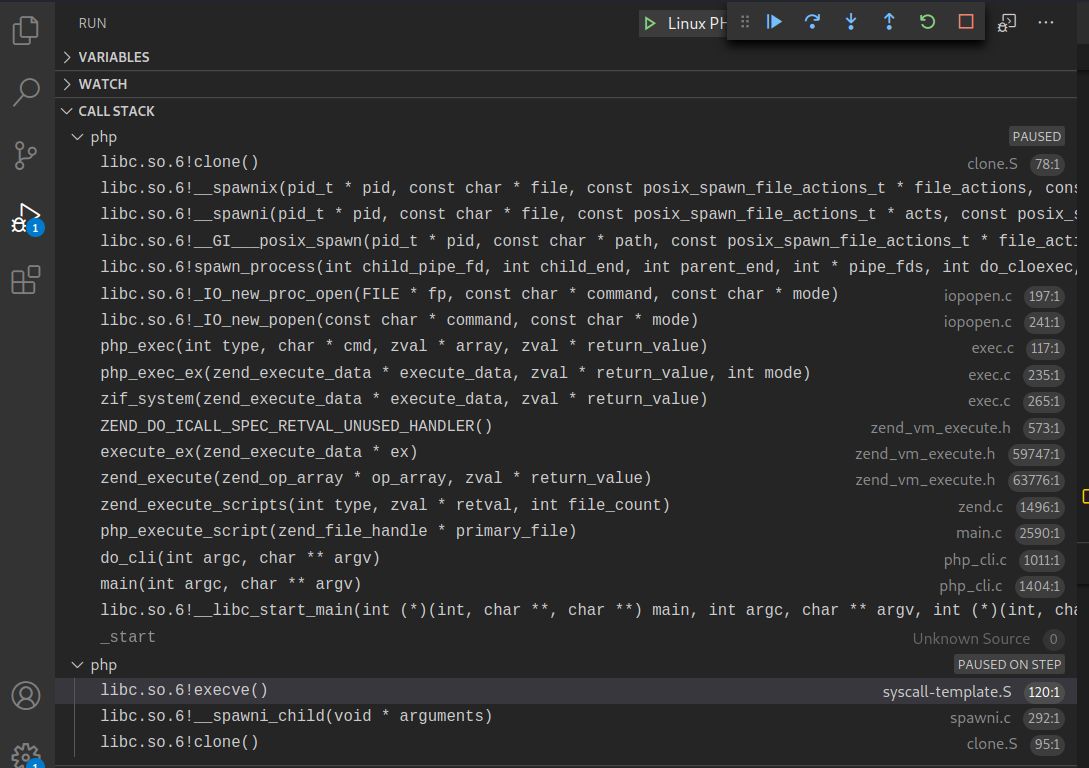
GDB
启动GDB调试,加载程序
└─# gdb --args ./php -r "system('whoami');"                                                                                            1 ⚙
GNU gdb (Debian 10.1-1+b1) 10.1
Copyright (C) 2020 Free Software Foundation, Inc.
License GPLv3+: GNU GPL version 3 or later <http://gnu.org/licenses/gpl.html>
This is free software: you are free to change and redistribute it.
There is NO WARRANTY, to the extent permitted by law.
Type "show copying" and "show warranty" for details.
This GDB was configured as "x86_64-linux-gnu".
Type "show configuration" for configuration details.
For bug reporting instructions, please see:
<https://www.gnu.org/software/gdb/bugs/>.
Find the GDB manual and other documentation resources online at:
    <http://www.gnu.org/software/gdb/documentation/>.

For help, type "help".
Type "apropos word" to search for commands related to "word"...
pwndbg: loaded 188 commands. Type pwndbg [filter] for a list.
pwndbg: created $rebase, $ida gdb functions (can be used with print/break)
Reading symbols from ./php...
pwndbg>
开始运行到主函数入口
pwndbg> startsystem()在PHP内核源码实现:
/* {{{ proto int system(string command [, int &return_value])
   Execute an external program and display output */
PHP_FUNCTION(system)
{
	php_exec_ex(INTERNAL_FUNCTION_PARAM_PASSTHRU, 1);
}
/* }}} */首次,对php_exec_ex()函数下断点
pwndbg> b php_exec_ex
Breakpoint 2 at 0x5555557a4942: file /mnt/hgfs/QSec/Code-Audit/PHP/PHP-Source-Code/php-7.2.9-linux-debug/ext/standard/exec.c, line 213.
pwndbg> 运行至断点处:php_exec_ex()函数实现
pwndbg> c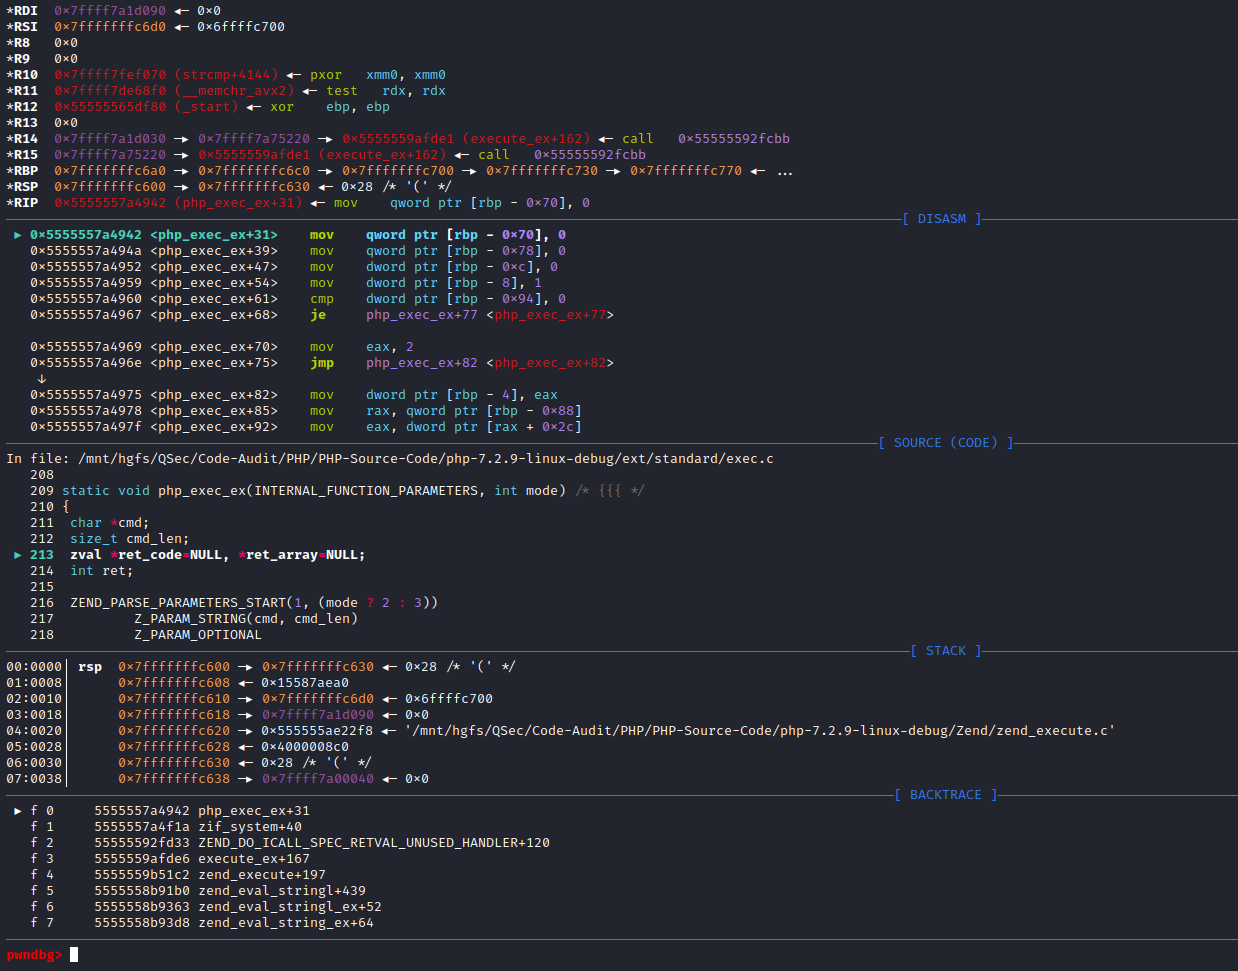
查看php_exec_ex()函数源码
pwndbg> l 209,248
209     static void php_exec_ex(INTERNAL_FUNCTION_PARAMETERS, int mode)
210     {
211             char *cmd;
212             size_t cmd_len;
213             zval *ret_code=NULL, *ret_array=NULL;
214             int ret;
215
216             ZEND_PARSE_PARAMETERS_START(1, (mode ? 2 : 3))
217                     Z_PARAM_STRING(cmd, cmd_len)
218                     Z_PARAM_OPTIONAL
219                     if (!mode) {
220                             Z_PARAM_ZVAL_DEREF(ret_array)
221                     }
222                     Z_PARAM_ZVAL_DEREF(ret_code)
223             ZEND_PARSE_PARAMETERS_END_EX(RETURN_FALSE);
224
225             if (!cmd_len) {
226                     php_error_docref(NULL, E_WARNING, "Cannot execute a blank command");
227                     RETURN_FALSE;
228             }
229             if (strlen(cmd) != cmd_len) {
230                     php_error_docref(NULL, E_WARNING, "NULL byte detected. Possible attack");
231                     RETURN_FALSE;
232             }
233
234             if (!ret_array) {
235                     ret = php_exec(mode, cmd, NULL, return_value);
236             } else {
237                     if (Z_TYPE_P(ret_array) != IS_ARRAY) {
238                             zval_ptr_dtor(ret_array);
239                             array_init(ret_array);
240                     } else if (Z_REFCOUNT_P(ret_array) > 1) {
241                             zval_ptr_dtor(ret_array);
242                             ZVAL_ARR(ret_array, zend_array_dup(Z_ARR_P(ret_array)));
243                     }
244                     ret = php_exec(2, cmd, ret_array, return_value);
245             }
246             if (ret_code) {
247                     zval_ptr_dtor(ret_code);
248                     ZVAL_LONG(ret_code, ret);
pwndbg> 单步调试至php_exec()函数
pwndbg> n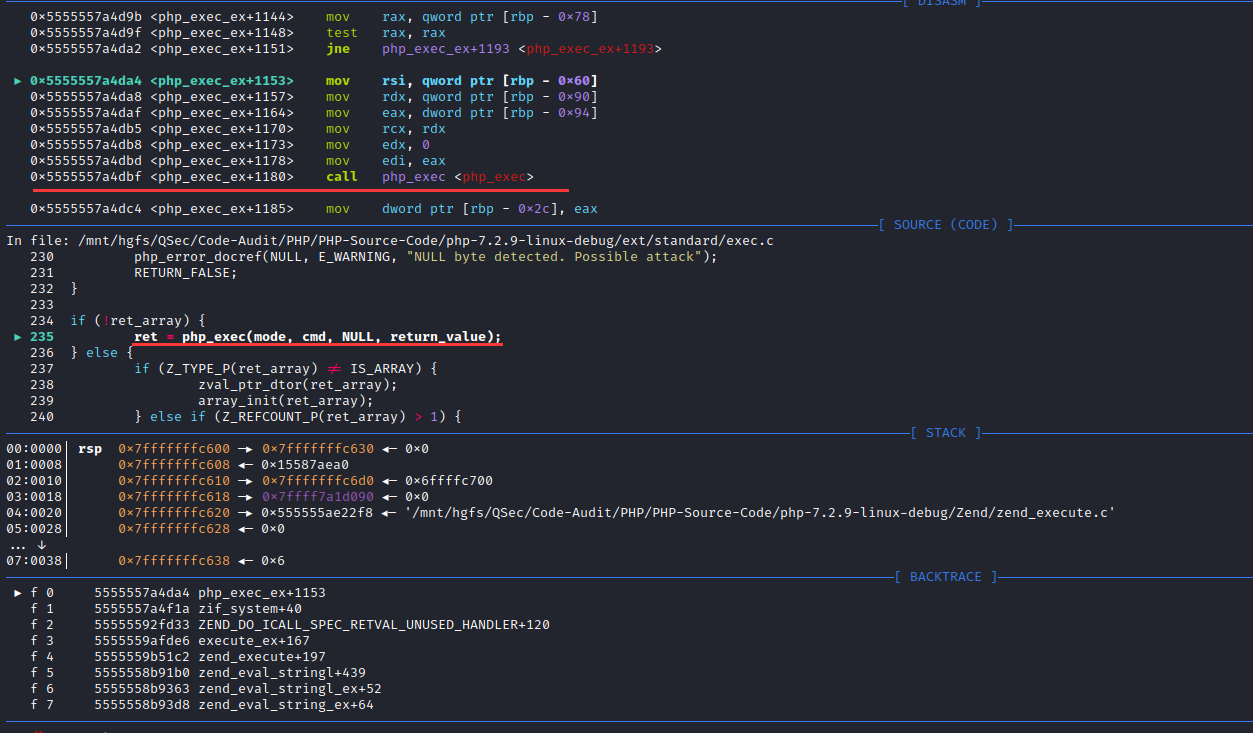
打印有关参数的值
pwndbg> p mode
$3 = 1
pwndbg> p cmd
$4 = 0x7ffff7a6eb98 "whoami"
pwndbg> 进入php_exec()函数实现
pwndbg> s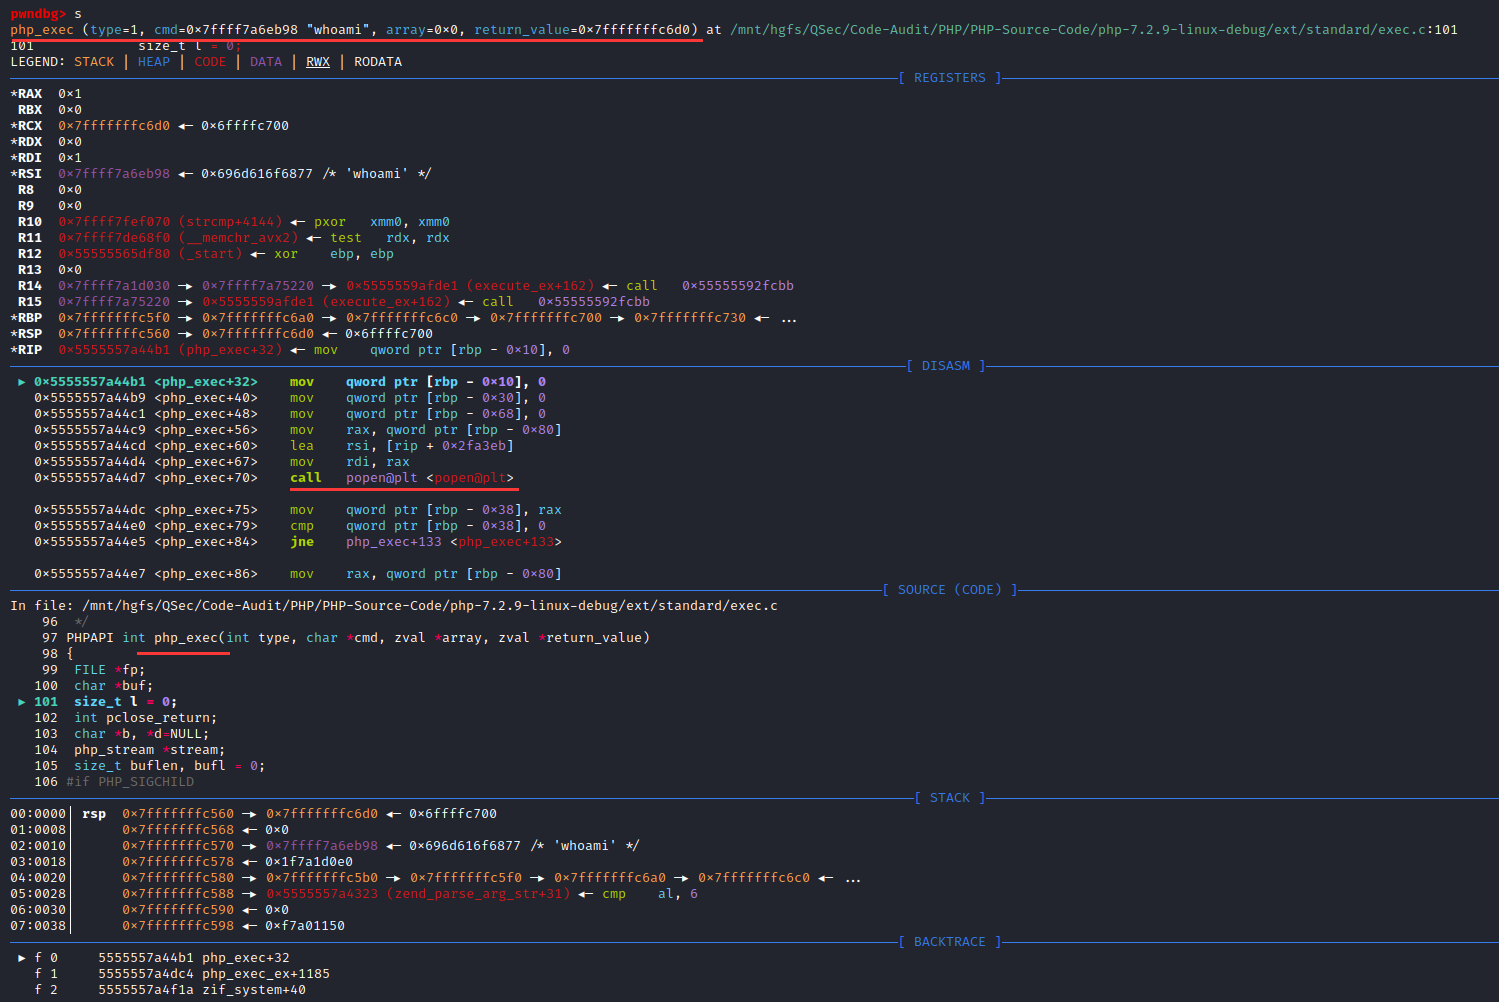
查看源码信息
pwndbg> l
96       */
97      PHPAPI int php_exec(int type, char *cmd, zval *array, zval *return_value)
98      {
99              FILE *fp;
100             char *buf;
101             size_t l = 0;
102             int pclose_return;
103             char *b, *d=NULL;
104             php_stream *stream;
105             size_t buflen, bufl = 0;
pwndbg> l
106     #if PHP_SIGCHILD
107             void (*sig_handler)() = NULL;
108     #endif
109
110     #if PHP_SIGCHILD
111             sig_handler = signal (SIGCHLD, SIG_DFL);
112     #endif
113
114     #ifdef PHP_WIN32
115             fp = VCWD_POPEN(cmd, "rb");
pwndbg>
116     #else
117             fp = VCWD_POPEN(cmd, "r");
118     #endif
119             if (!fp) {
120                     php_error_docref(NULL, E_WARNING, "Unable to fork [%s]", cmd);
121                     goto err;
122             }
123
124             stream = php_stream_fopen_from_pipe(fp, "rb");
125
pwndbg>
结合源码及汇编代码,可知VCWD_POPEN(cmd, "r");函数实现为popen@plt <popen@plt>,即glibc库函数popen()
单步调试汇编至call调用处
pwndbg> si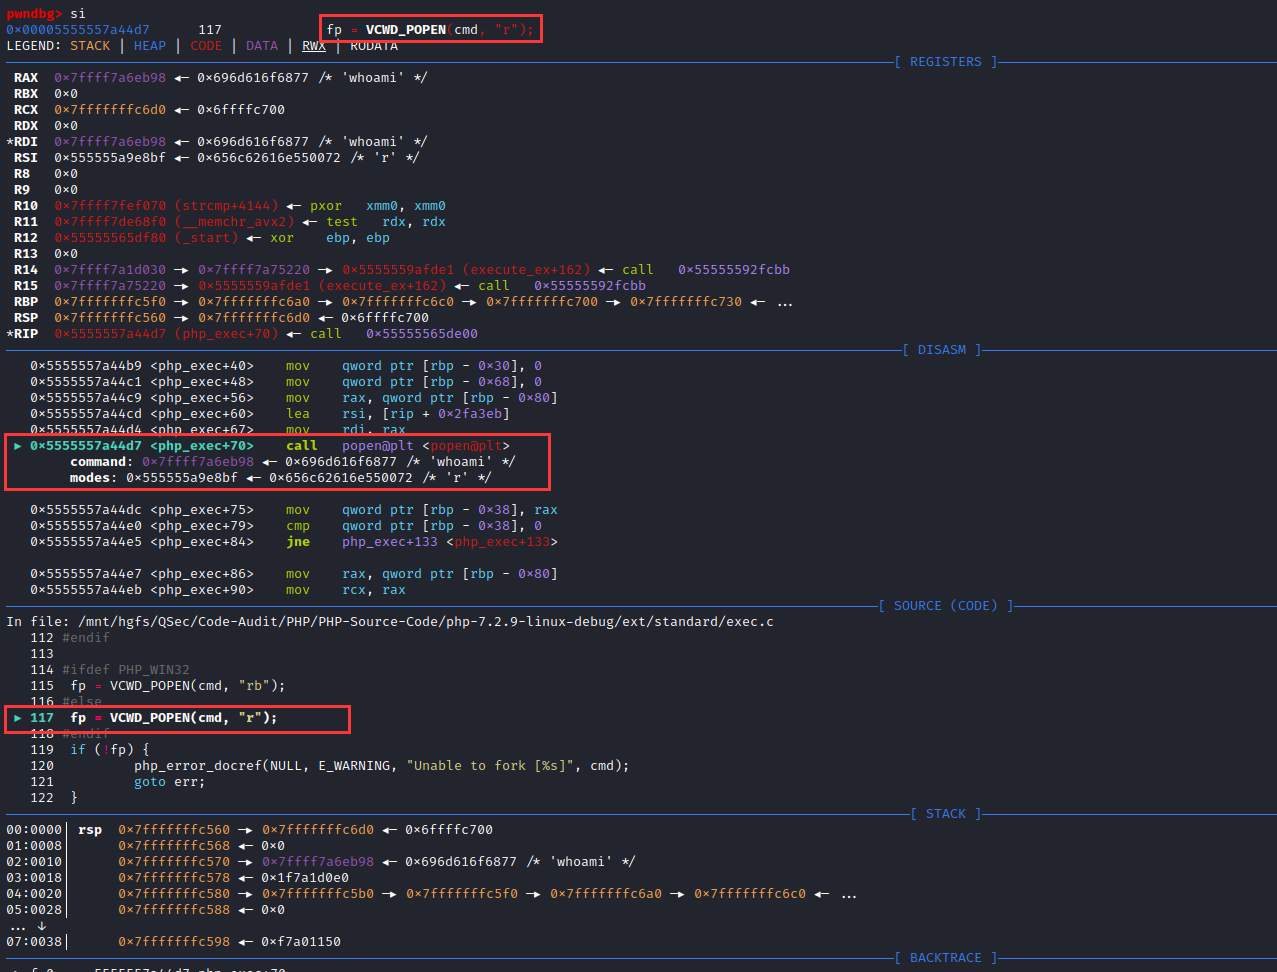
进入call函数调用体:popen@plt <popen@plt>
pwndbg> si
pwndbg> sglibc中popen()函数的实现即调用_IO_new_popen()函数
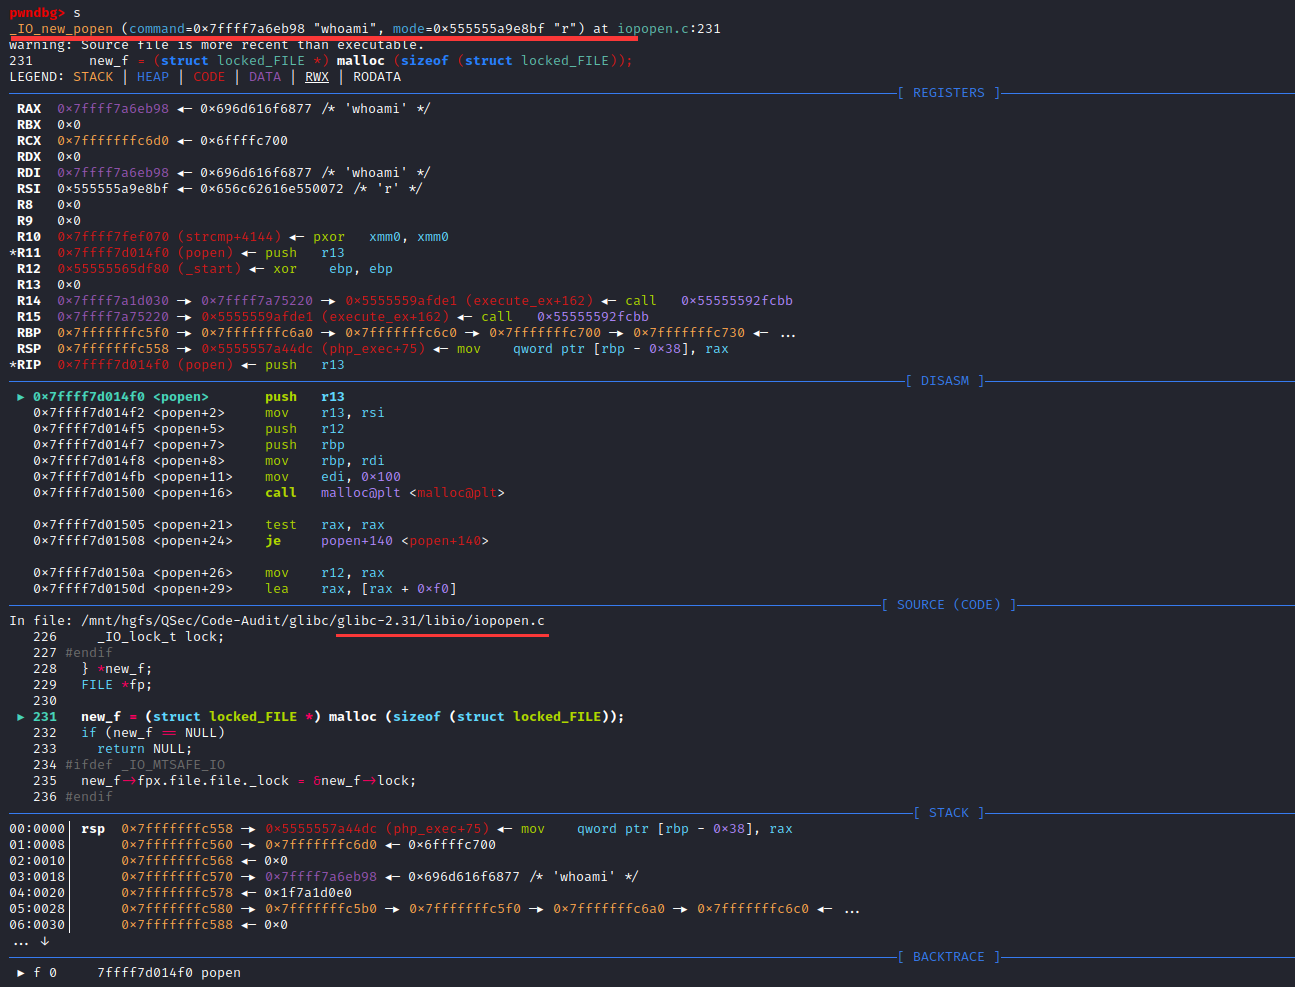
查看_IO_new_popen()函数源码
pwndbg> l
226         _IO_lock_t lock;
227     #endif
228       } *new_f;
229       FILE *fp;
230
231       new_f = (struct locked_FILE *) malloc (sizeof (struct locked_FILE));
232       if (new_f == NULL)
233         return NULL;
234     #ifdef _IO_MTSAFE_IO
235       new_f->fpx.file.file._lock = &new_f->lock;
pwndbg> l
236     #endif
237       fp = &new_f->fpx.file.file;
238       _IO_init_internal (fp, 0);
239       _IO_JUMPS (&new_f->fpx.file) = &_IO_proc_jumps;
240       _IO_new_file_init_internal (&new_f->fpx.file);
241       if (_IO_new_proc_open (fp, command, mode) != NULL)
242         return (FILE *) &new_f->fpx.file;
243       _IO_un_link (&new_f->fpx.file);
244       free (new_f);
245       return NULL;
pwndbg>观察_IO_new_popen()函数,末尾会调用_IO_new_proc_open()函数来执行处理系统指令,可对_IO_new_proc_open()函数下断点,然后运行进入_IO_new_proc_open()函数的实现。
pwndbg> b _IO_new_proc_open
Breakpoint 2 at 0x7ffff7d010f0: file iopopen.c, line 110.
pwndbg>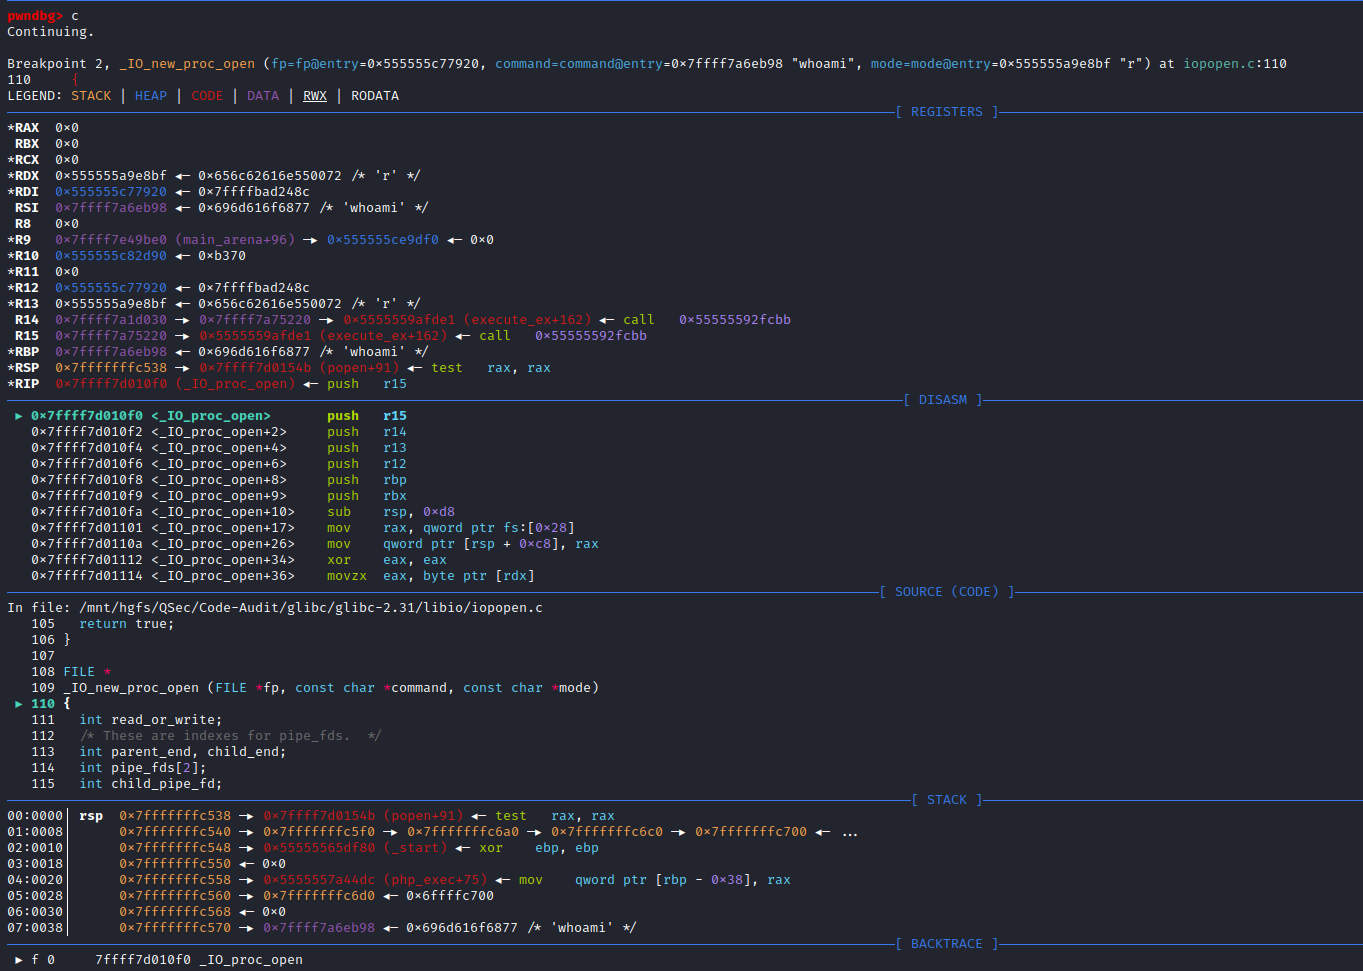
继续单步调试,_IO_new_proc_open()函数会调用spawn_process()函数
pwndbg> l
195       _IO_lock_lock (proc_file_chain_lock);
196     #endif
197       spawn_ok = spawn_process (&fa, fp, command, do_cloexec, pipe_fds,
198                                 parent_end, child_end, child_pipe_fd);
199     #ifdef _IO_MTSAFE_IO
200       _IO_lock_unlock (proc_file_chain_lock);
201       _IO_cleanup_region_end (0);
202     #endif
203
204       __posix_spawn_file_actions_destroy (&fa);
pwndbg>单步调试进入spawn_process()函数实现
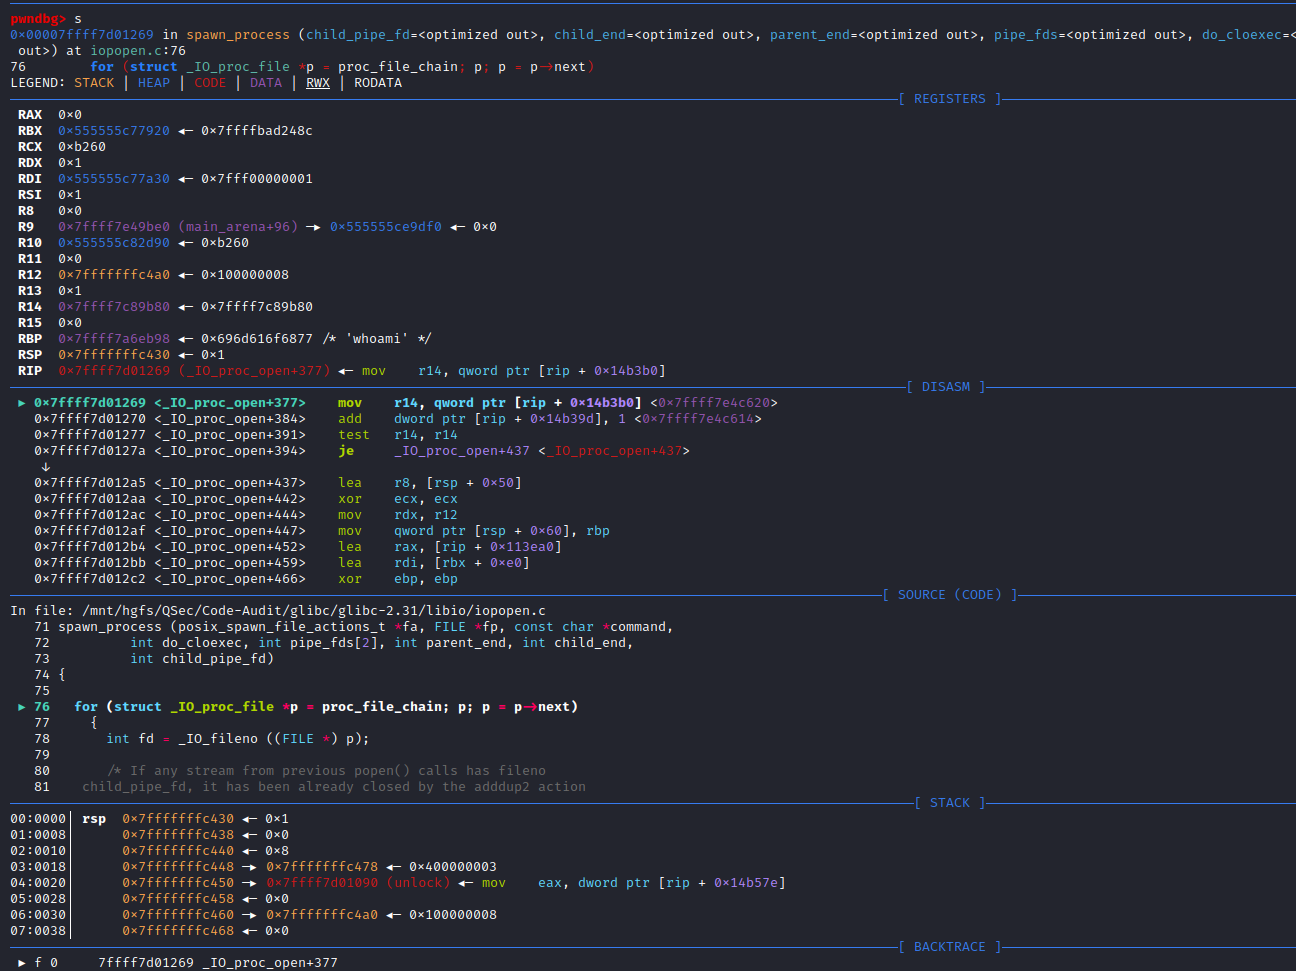
spawn_process()函数会调用__posix_spawn()函数
pwndbg> l
81               child_pipe_fd, it has been already closed by the adddup2 action
82               above.  */
83            if (fd != child_pipe_fd
84                && __posix_spawn_file_actions_addclose (fa, fd) != 0)
85              return false;
86          }
87
88        if (__posix_spawn (&((_IO_proc_file *) fp)->pid, _PATH_BSHELL, fa, 0,
89                           (char *const[]){ (char*) "sh", (char*) "-c",
90                           (char *) command, NULL }, __environ) != 0)
pwndbg> 单步汇编调试至__posix_spawn()函数调用处
pwndbg> si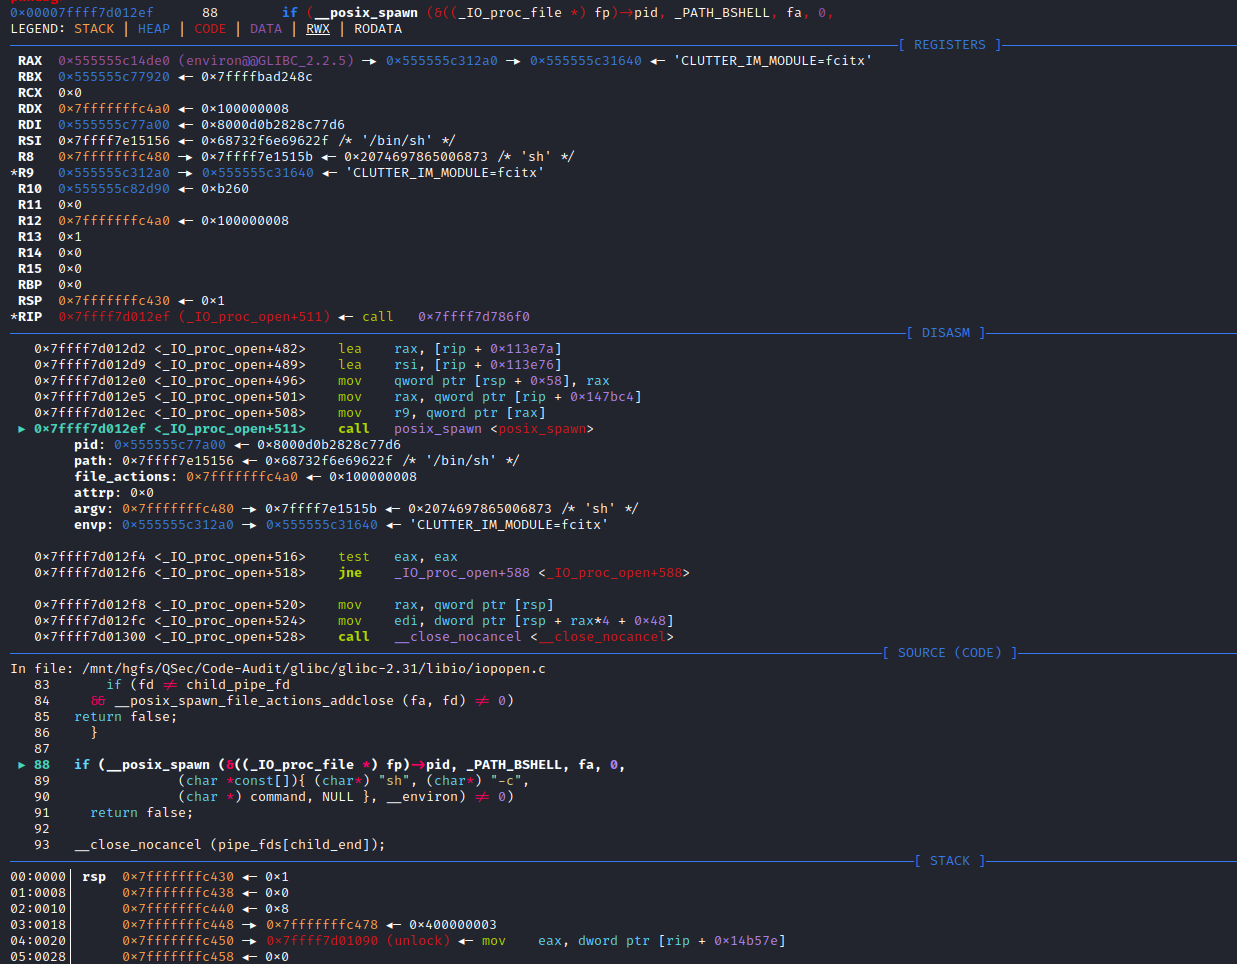
可以看到__posix_spawn()函数被传入的参数:sh -c command,可以判断php命令执行函数,底层会调用sh来执行系统指令,进入__posix_spawn()函数实现
pwndbg> si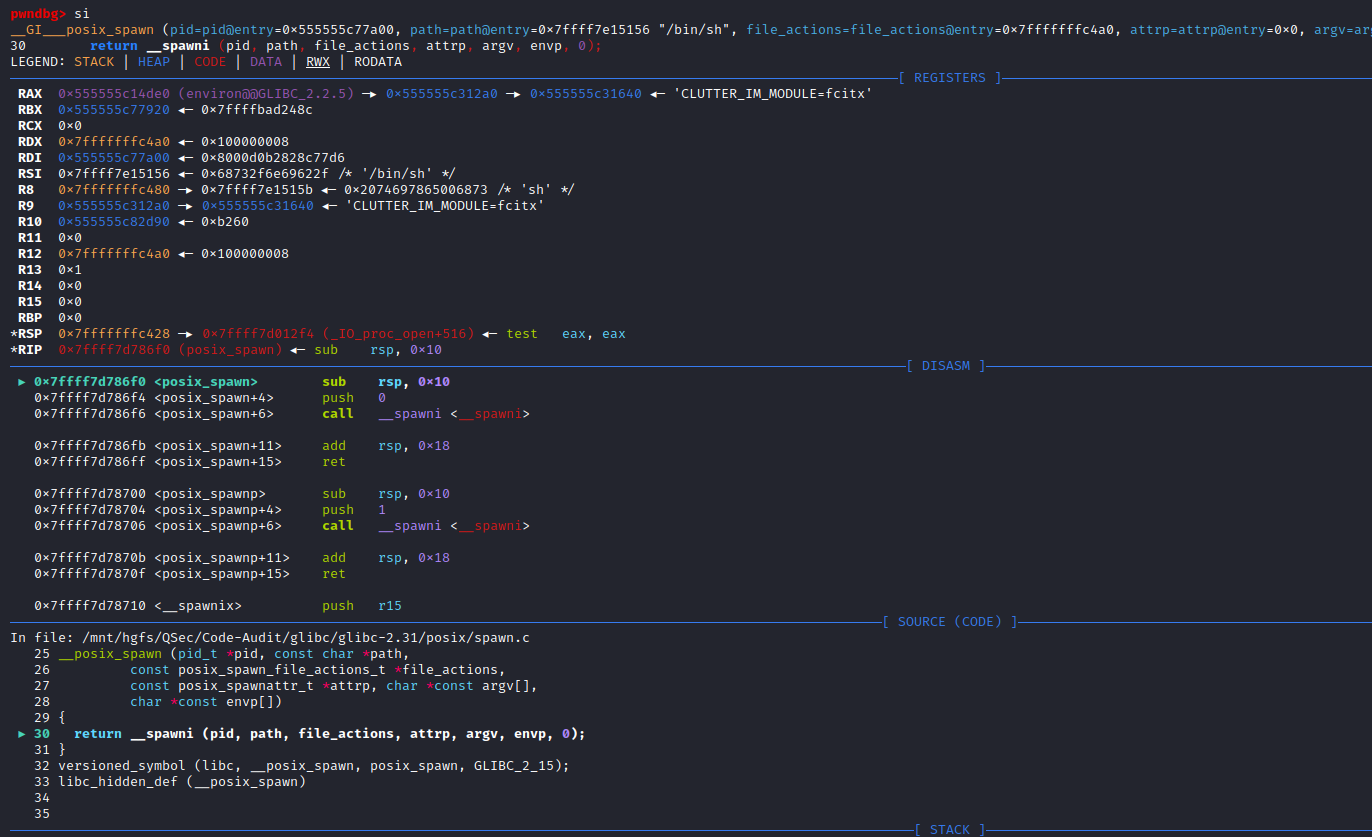
__posix_spawn()函数实现直接调用的__spawni()函数,单步步入调试进入__spawni()函数
pwndbg> s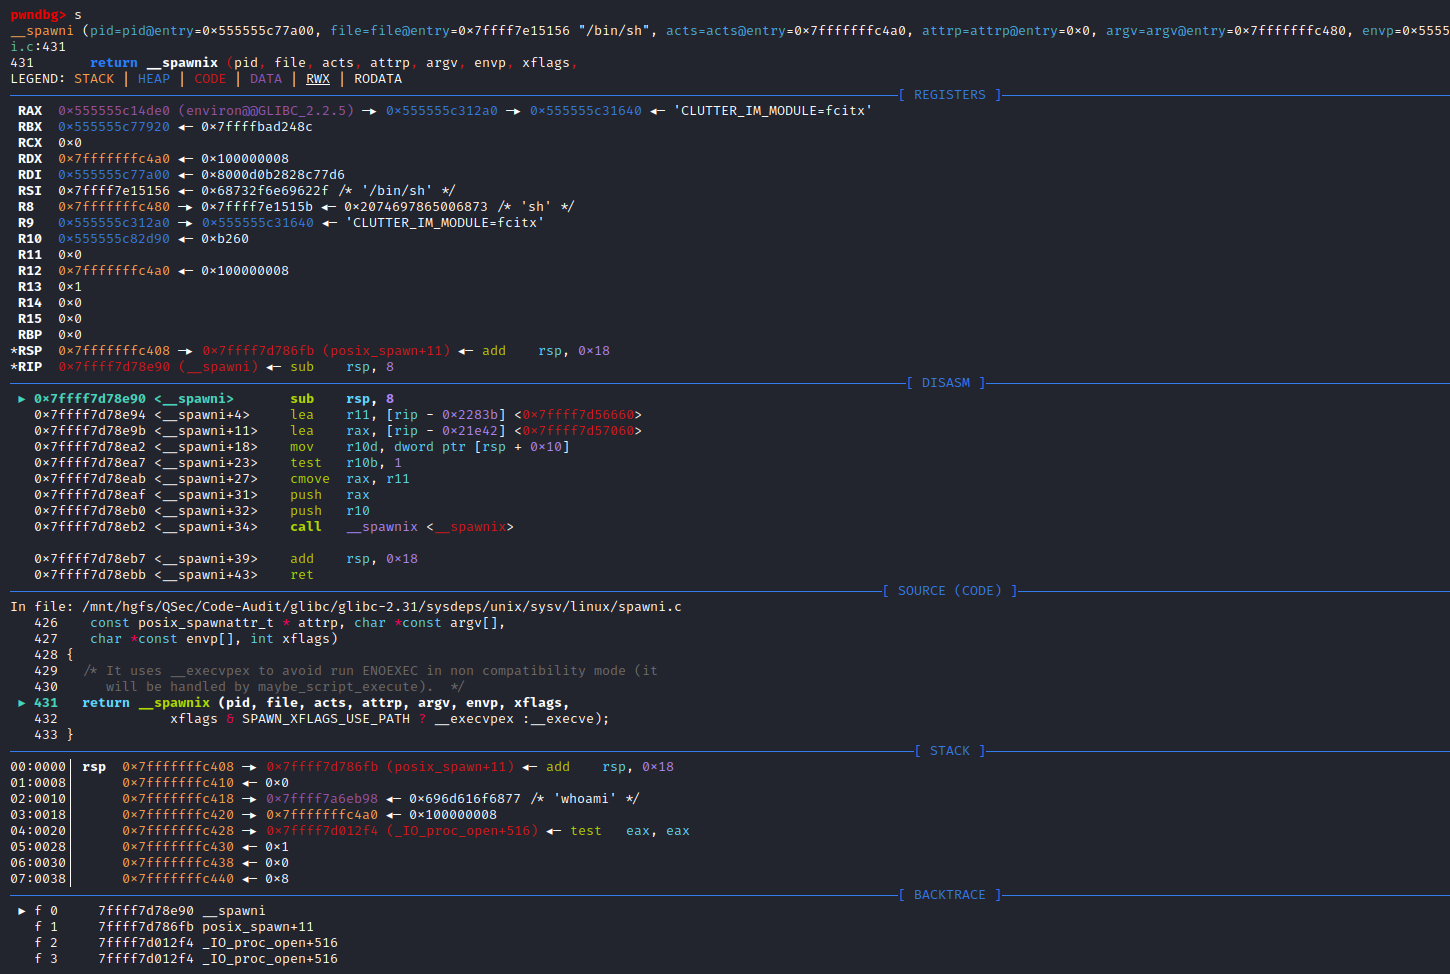
__spawni()函数实现调用__spawnix()函数,单步步入调试进入__spawnix()函数
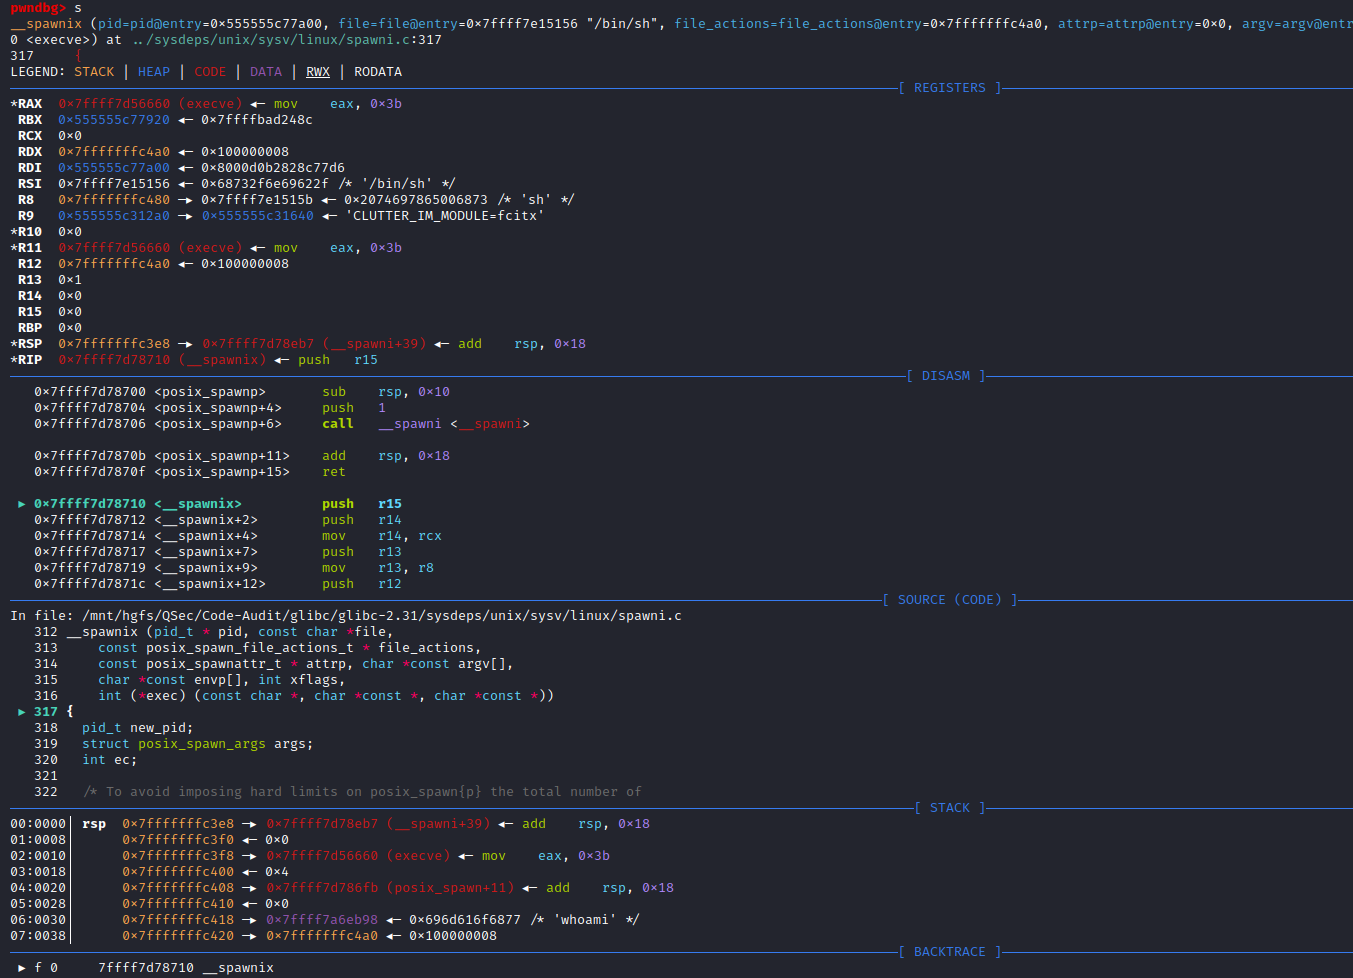
__spawnix()函数的核心代码:克隆父进程,为后续/bin/sh子进程的创建做准备
pwndbg> l
382       new_pid = CLONE (__spawni_child, STACK (stack, stack_size), stack_size,
383                        CLONE_VM | CLONE_VFORK | SIGCHLD, &args);
384
385       /* It needs to collect the case where the auxiliary process was created
386          but failed to execute the file (due either any preparation step or
387          for execve itself).  */
388       if (new_pid > 0)
389         {
390           /* Also, it handles the unlikely case where the auxiliary process was
391              terminated before calling execve as if it was successfully.  The
pwndbg> 在CLONE()函数处下断点,并进入CLONE()函数的实现:函数的实现为汇编代码
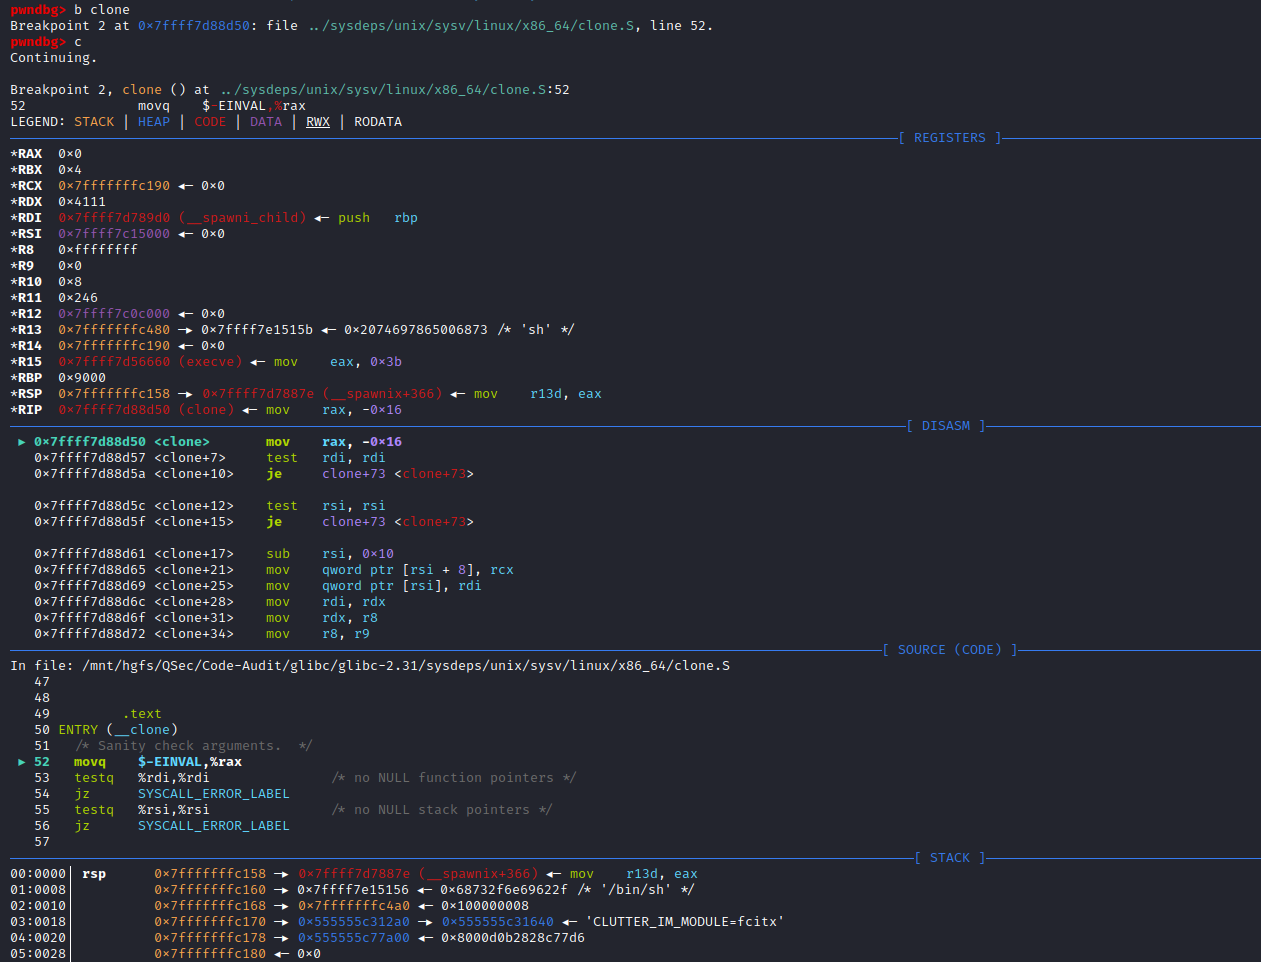
对clone()函数汇编代码进行单步汇编调试:clone()函数是一个系统调用函数,内核入口为sys_clone(),调用号为0x38
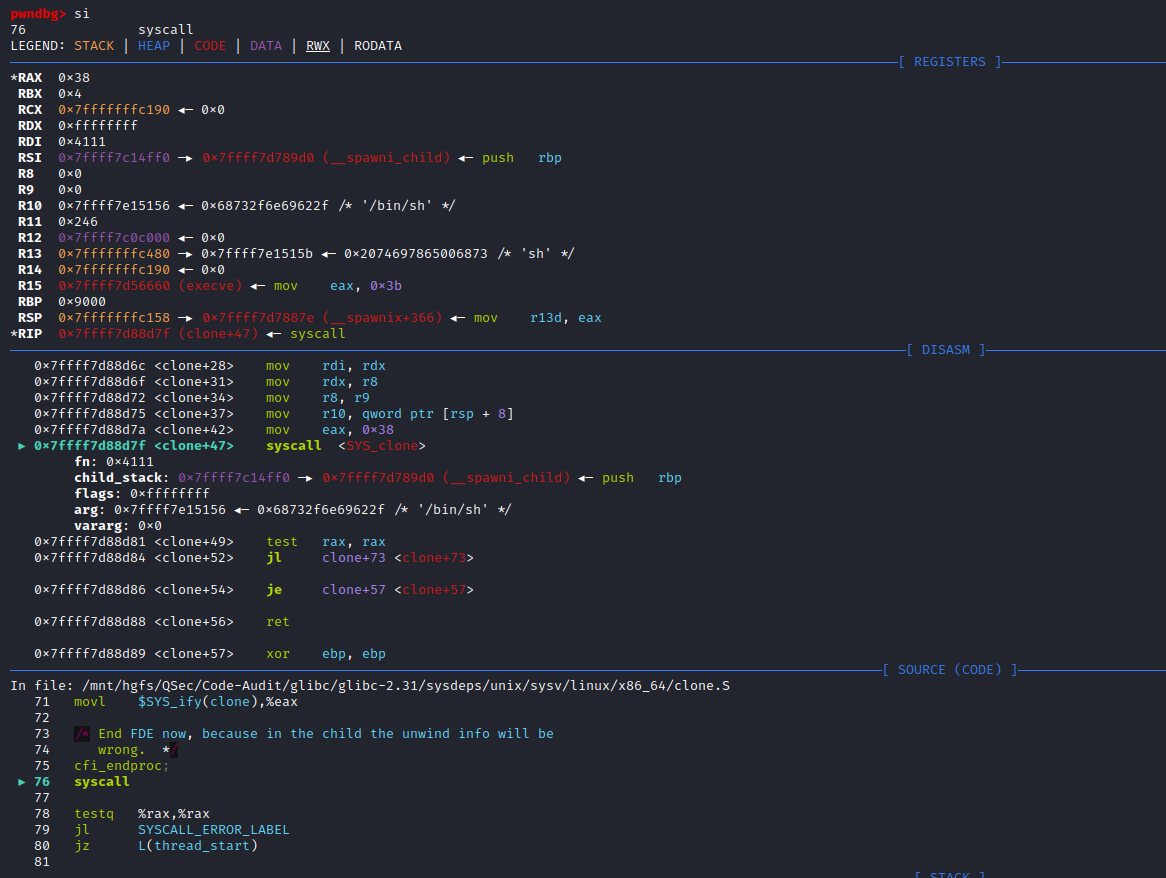
继续单步汇编步入,执行系统调用
pwndbg> si
[Attaching after process 48284 vfork to child process 48289]
[New inferior 2 (process 48289)]
[Switching to process 48289]
clone () at ../sysdeps/unix/sysv/linux/x86_64/clone.S:79
79              jl      SYSCALL_ERROR_LABEL
LEGEND: STACK | HEAP | CODE | DATA | RWX | RODATA
─────────────────────────────────────────────────────────[ REGISTERS ]─────────
 RAX  0x0
 RBX  0x4
 RCX  0x7ffff7d88d81 (clone+49) ◂— test   rax, rax
 RDX  0xffffffff
 RDI  0x4111
 RSI  0x7ffff7c14ff0 —▸ 0x7ffff7d789d0 (__spawni_child) ◂— push   rbp
 R8   0x0
 R9   0x0
 R10  0x7ffff7e15156 ◂— 0x68732f6e69622f /* '/bin/sh' */
 R11  0x306
 R12  0x7ffff7c0c000 ◂— 0x0
 R13  0x7fffffffc480 —▸ 0x7ffff7e1515b ◂— 0x2074697865006873 /* 'sh' */
 R14  0x7fffffffc190 ◂— 0x0
 R15  0x7ffff7d56660 (execve) ◂— mov    eax, 0x3b
 RBP  0x9000
 RSP  0x7ffff7c14ff0 —▸ 0x7ffff7d789d0 (__spawni_child) ◂— push   rbp
 RIP  0x7ffff7d88d84 (clone+52) ◂— jl     0x7ffff7d88d99
─────────────────────────────────────────────────[ DISASM ]───────────────────────────
   0x7ffff7d88d72 <clone+34>    mov    r8, r9
   0x7ffff7d88d75 <clone+37>    mov    r10, qword ptr [rsp + 8]
   0x7ffff7d88d7a <clone+42>    mov    eax, 0x38
   0x7ffff7d88d7f <clone+47>    syscall
   0x7ffff7d88d81 <clone+49>    test   rax, rax
 ► 0x7ffff7d88d84 <clone+52>    jl     clone+73 <clone+73>

   0x7ffff7d88d86 <clone+54>    je     clone+57 <clone+57>
    ↓
   0x7ffff7d88d89 <clone+57>    xor    ebp, ebp
   0x7ffff7d88d8b <clone+59>    pop    rax
   0x7ffff7d88d8c <clone+60>    pop    rdi
   0x7ffff7d88d8d <clone+61>    call   rax
──────────────────────────────────────────────────[ SOURCE (CODE) ]─────────────────────────
In file: /mnt/hgfs/QSec/Code-Audit/glibc/glibc-2.31/sysdeps/unix/sysv/linux/x86_64/clone.S
   74      wrong.  */
   75   cfi_endproc;
   76   syscall
   77
   78   testq   %rax,%rax
 ► 79   jl      SYSCALL_ERROR_LABEL
   80   jz      L(thread_start)
   81
   82   ret
   83
   84 L(thread_start):
clone函数作用,创建子进程:克隆父进程

接着clone函数内部会调用__spawni_child()函数,将克隆的子进程给真正起起来
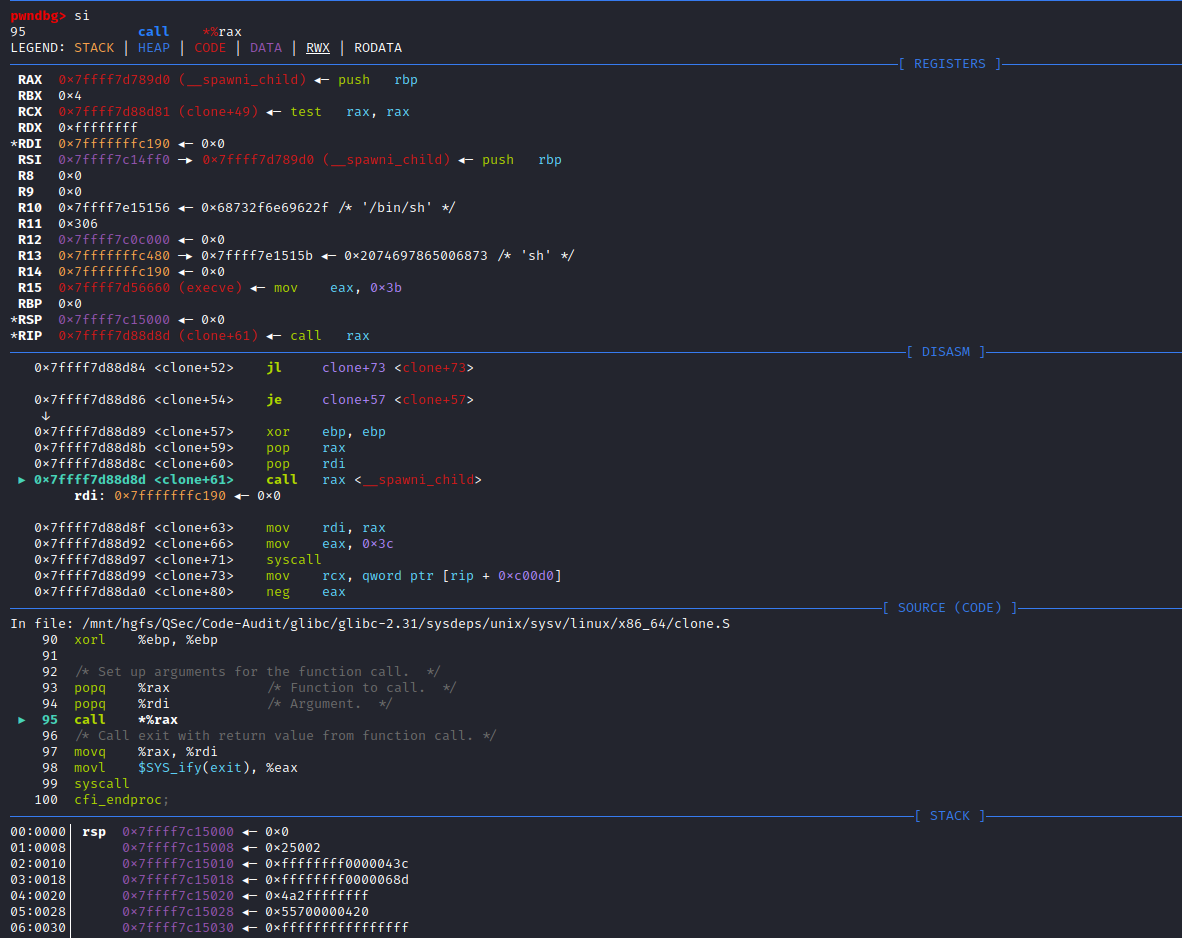
单步汇编步入__spawni_child函数实现
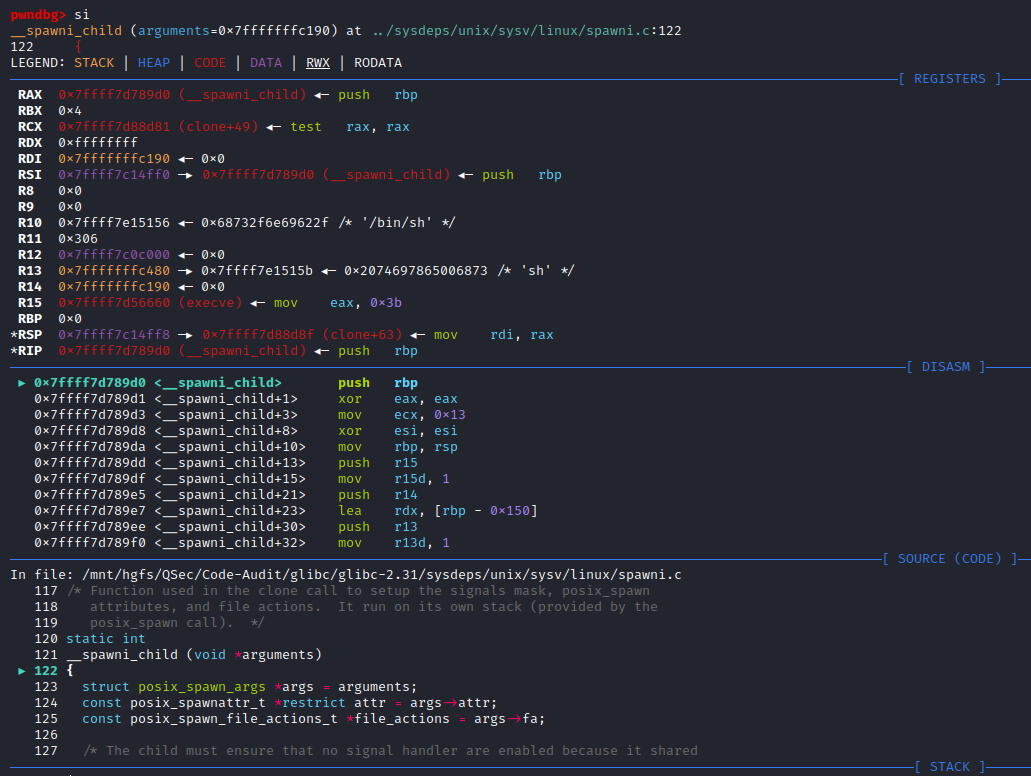
__spawni_child函数内部会动态调用execve()函数,最终来将子进程给启动起来
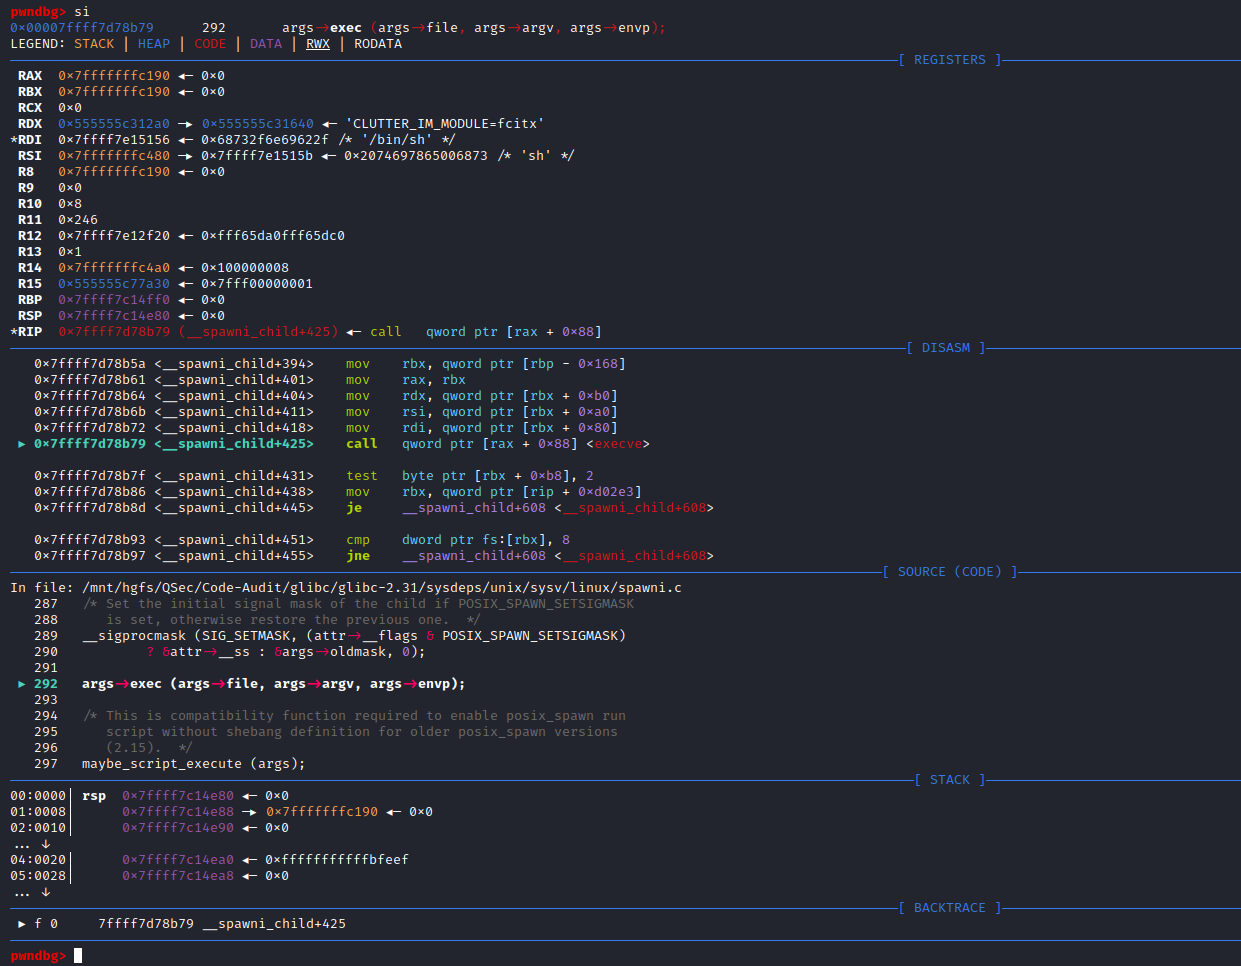
步入execve()函数的实现:函数实现为汇编代码sysdeps/unix/syscall-template.S。execve()函数为系统调用函数,内核入口为sys_execve(),系统调用号为0x3b
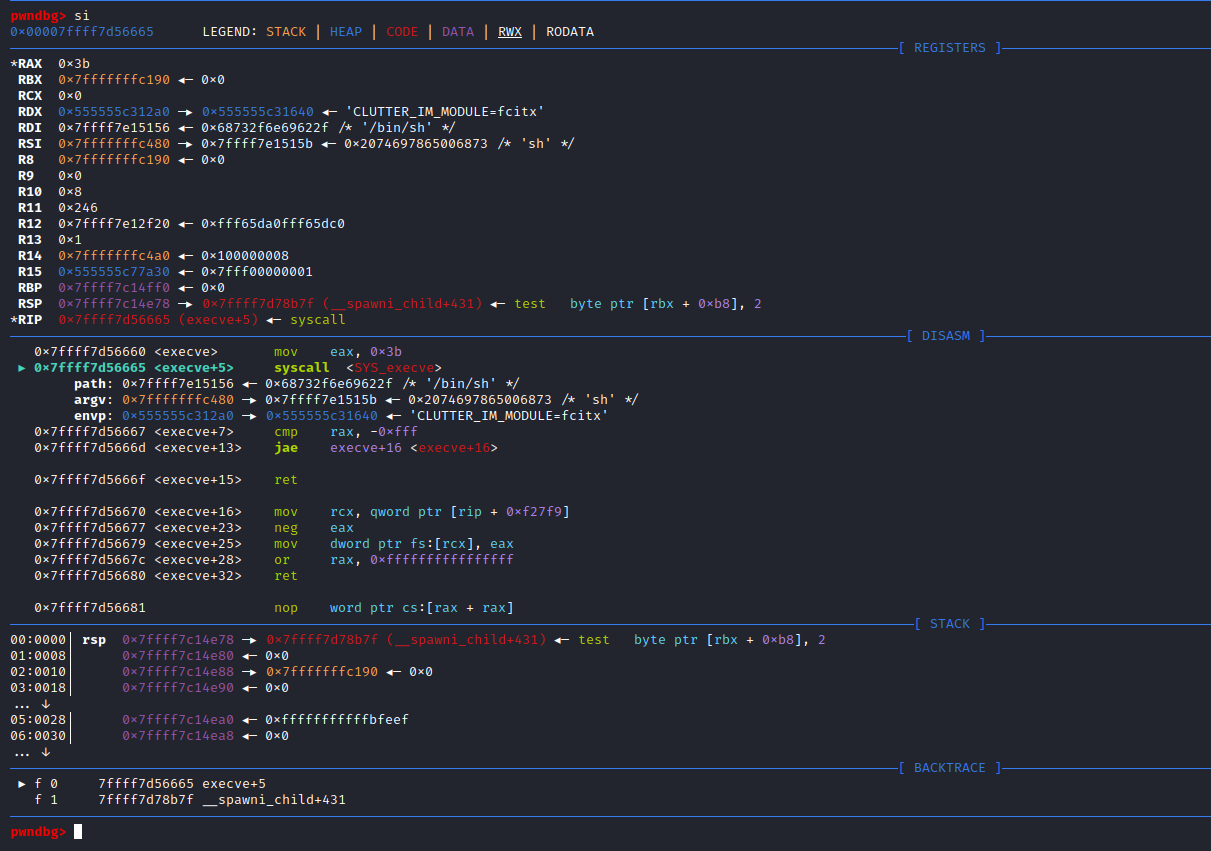
这里如果继续单步汇编步入,就会导致执行execve()函数系统调用,成功创建子进程,同时GDB调试就会完成,输出程序的执行结果。因为,这里并没有捕捉创建子进程这一事件,无法对创建的子进程进行调试,从而导致程序的执行完毕。
为了避免这一结果发生,我们可以在execve()函数系统调用前,设置捕捉点用来补捉程序运行时的一些事件:这里捕捉系统调用事件execve
pwndbg> catch syscall execve捕捉点设置完毕后,就可以步入执行execve()函数系统调用,查看此时的所有进程的栈调用情况
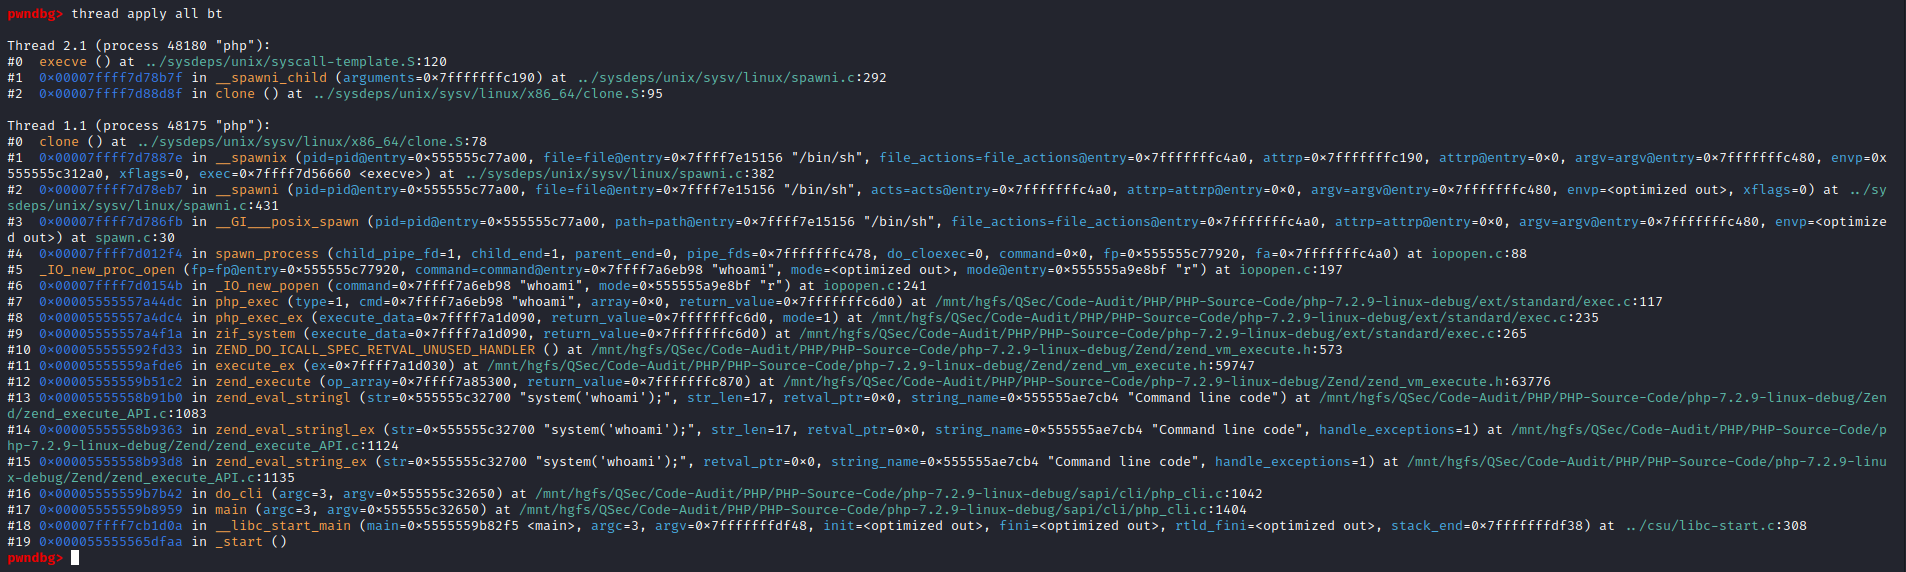
执行execve()函数系统调用:成功创建子进程/bin/sh->/bin/dash
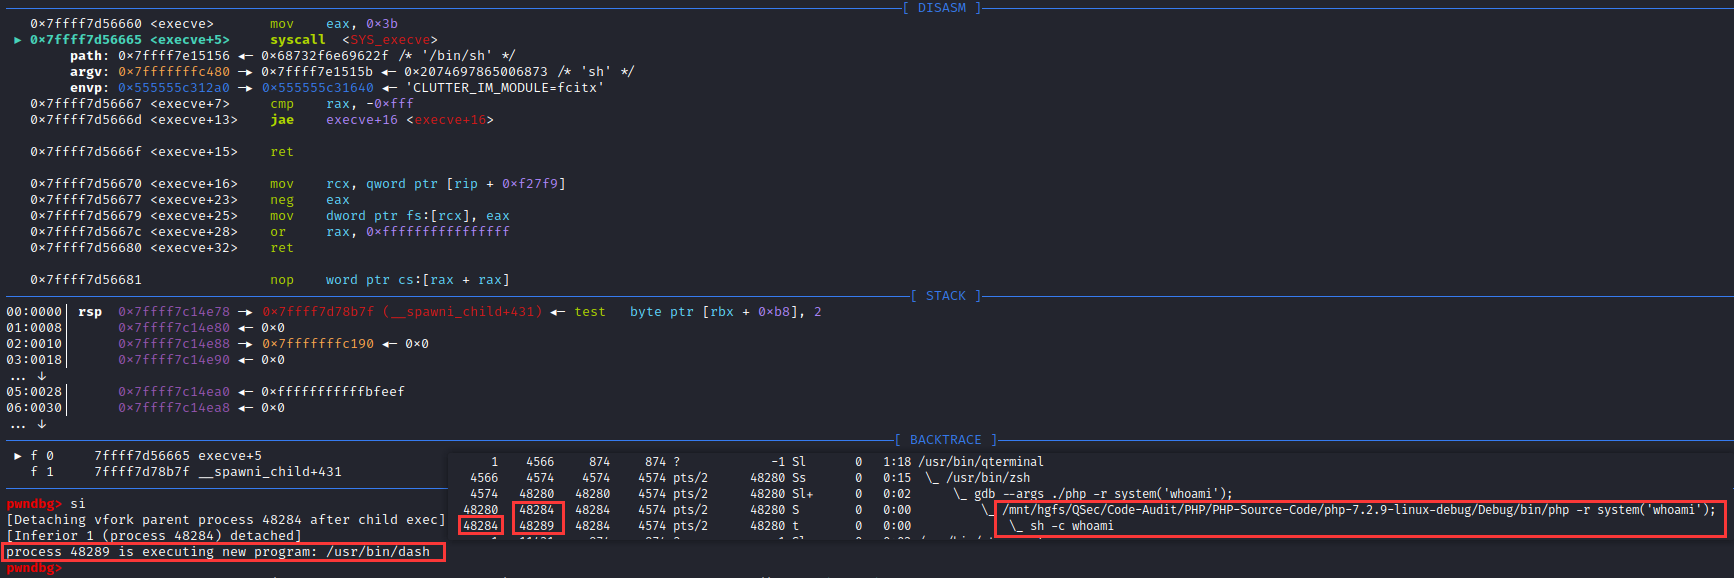
此时GDB调试已进入/bin/sh进程中
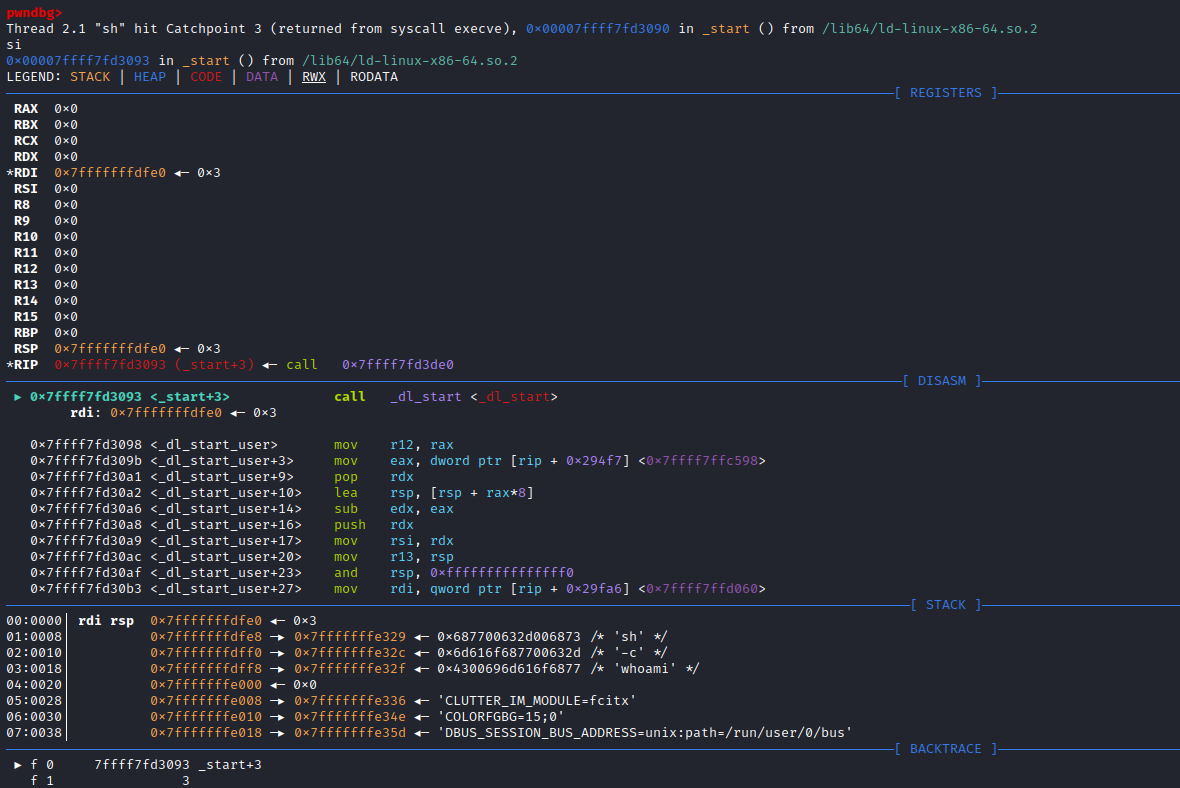
后续工作执行未执行完的sh -c Command,在/bin/sh进程中执行Command指令(内部|外部),外部指令则会在/bin/sh进程下启动相应的子进程。
最后,这里也可以通过Linux下strace工具来追踪PHP命令执行函数的底层调用执行情况:
- PHP命令执行函数底层系统调用函数统计
└─# strace -f -c ./php -r "system('whoami');"
strace: Process 48432 attached
strace: Process 48433 attached
root
% time     seconds  usecs/call     calls    errors syscall
------ ----------- ----------- --------- --------- ----------------
  0.00    0.000000           0        14           read
  0.00    0.000000           0         2           write
  0.00    0.000000           0        23           close
  0.00    0.000000           0         7         4 stat
  0.00    0.000000           0        24           fstat
  0.00    0.000000           0        10           lstat
  0.00    0.000000           0         5         3 lseek
  0.00    0.000000           0        49           mmap
  0.00    0.000000           0        17           mprotect
  0.00    0.000000           0        12           munmap
  0.00    0.000000           0        14           brk
  0.00    0.000000           0       206           rt_sigaction
  0.00    0.000000           0         5           rt_sigprocmask
  0.00    0.000000           0         1           rt_sigreturn
  0.00    0.000000           0         4         3 access
  0.00    0.000000           0         1           madvise
  0.00    0.000000           0         1           dup2
  0.00    0.000000           0         1           getpid
  0.00    0.000000           0         2           socket
  0.00    0.000000           0         2         2 connect
  0.00    0.000000           0         2           clone
  0.00    0.000000           0         3           execve
  0.00    0.000000           0         2           wait4
  0.00    0.000000           0         1           fcntl
  0.00    0.000000           0         2           getcwd
  0.00    0.000000           0         1           getuid
  0.00    0.000000           0         1           getgid
  0.00    0.000000           0         3           geteuid
  0.00    0.000000           0         1           getegid
  0.00    0.000000           0         1           getppid
  0.00    0.000000           0         3           arch_prctl
  0.00    0.000000           0        20         4 openat
  0.00    0.000000           0         1           pipe2
  0.00    0.000000           0         3           prlimit64
------ ----------- ----------- --------- --------- ----------------
100.00    0.000000                   444        16 total

└─# - PHP命令执行函数底层创建进程情况
└─# strace -f -e execve php -r "system('whoami');"
execve("/usr/bin/php", ["php", "-r", "system('whoami');"], 0x7ffe259e22c8 /* 53 vars */) = 0
strace: Process 48440 attached
[pid 48440] execve("/bin/sh", ["sh", "-c", "whoami"], 0x56260233beb0 /* 53 vars */) = 0
strace: Process 48441 attached
[pid 48441] execve("/usr/bin/whoami", ["whoami"], 0x563b845c2ed8 /* 53 vars */) = 0
root
[pid 48441] +++ exited with 0 +++
[pid 48440] --- SIGCHLD {si_signo=SIGCHLD, si_code=CLD_EXITED, si_pid=48441, si_uid=0, si_status=0, si_utime=0, si_stime=0} ---
[pid 48440] +++ exited with 0 +++
--- SIGCHLD {si_signo=SIGCHLD, si_code=CLD_EXITED, si_pid=48440, si_uid=0, si_status=0, si_utime=0, si_stime=0} ---
+++ exited with 0 +++
总 结
这篇文章主要是讲述不同平台下PHP语言命令执行函数的底层实现与分析。而有关其它语言(Python、Java等)这里不在讲述分析,因为针对不同语言的分析思路都是一样的,归结到系统底层调用:大差不差(PHP和Python底层调用原理类似;Java与PHP和Python相比,少了一步系统可执行终端调用)。
参考链接
- Build your own PHP on Windows
- Visual Studio docs
- Visual Studio Code docs
- 《PHP 7底层设计与源码实现+PHP7内核剖析》
- 深入理解 PHP 内核
- WINDOWS下用VSCODE调试PHP7源代码
- 调式PHP源码
- 用vscode调试php源码
- GDB: The GNU Project Debugger
- CreateProcessW function
- 命令注入成因小谈
- 浅谈从PHP内核层面防范PHP WebShell
- Program execution Functions
- linux系统调用
- system calls
文章首发于安全客:
https://www.anquanke.com/post/id/226292
https://www.anquanke.com/post/id/226293
https://www.anquanke.com/post/id/226294
https://www.anquanke.com/post/id/226295